Create a Scheduled Task
You can create an automated task to schedule the following:
- Work Request to Work Order Automation - When a work request is created, then convert it into a work order automatically.
- PM to Work Order Automation - When the preventative maintenance schedule becomes due, the work order is created automatically.
Watch the Video
00:38 Create a Scheduled Task - Work Request to Work Order Automation
02:20 Create a Scheduled Task - PM to Work Order Automation
Audio: Sound Length: 04:05 mins
Watch the video in ...
Disclaimer: This video is translated from English using an AI tool; you may notice that the length of the speech may be slightly out-of-sync with the user interface recording.
Work Request to Work Order Automation
Let's learn how to set up a schedule task to take a newly created work request and then convert it into a work order automatically.
- Click the New Implementation button. The Notification Wizard dialog displays Step 1: Select a template.

- From the Filter, select Work Requests.
- From the list, select (Lighting) Change Request Status - Converts requests to work orders that meet a certain options.
- Click the Next button and the Step 2: Criteria & Options displays.
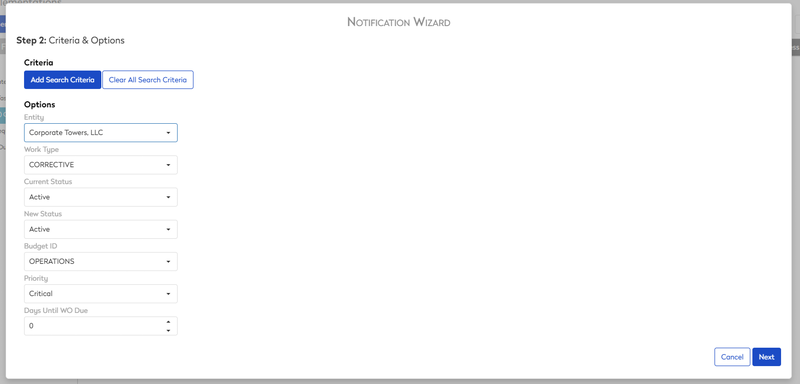
This step will let you add search criteria and options (these are optional steps).
- Click the Add Search Criteria button.

- Complete the following criteria:
| Element | Description |
|---|---|
|
AND / OR |
Select either AND or OR. |
|
Fields |
There are fields for Parts, Vendors, or Warehouse available for selection. |
|
Equation |
This option includes the following:
|
|
Compare option |
Select either Compare To Value or Compare To Field. |
|
Value |
Enter the value. |
- When you have finished, click the Save
 icon.
icon. - If you want to add another criteria, then click the + icon.

Delete Search Criteria
If you click the Delete icon, this will delete the specific search criteria or you can click the Clear All Search Criteria button to clear all search criteria.
- Complete the options:
- From the Entity drop-down, select the entity.
- From the Work Type drop-down, select the work type.
- From the Current Status drop-down, select the current status.
- From the New Status drop-down, select the new status.
- From the Budget ID drop-down, select the budget.
- From the Priority drop-down, select the priority.
- In the Days Until WO Due field, enter the days.
- Click the Next button and the Step 3: Scheduling displays.

The Scheduling allows you to determine the frequency of the Notifications being sent out.
- From the Scheduled drop-down, you can choose from Daily, Weekdays, Weekly, Monthly, or Yearly.
- From the Starts On calendar pick, select when to start the notification.
- Click the Next button and the Step 6: Name & Description.

- In the Implementation Name field, enter the name of the notification.
- In the Description field, enter the short description.
- Click the Save button.
The email notification is saved and displays in the implementation list.
PM to Work Order Automation
Let's learn how to set up a schedule task, that when the preventative maintenance schedule becomes due, the work order is created automatically.
- Click the New Implementation button. The Notification Wizard dialog displays Step 1: Select a template.

- From the Filter, select Work Orders.
- From the list, select Generate Due Schedules - Converts schedules to work orders that meet a certain threshold.
- Click the Next button and the Step 2: Criteria & Options displays.

This step will let you add search criteria and options (these are optional steps).
- Click the Add Search Criteria button.
- Complete the following criteria:
| Element | Description |
|---|---|
|
AND / OR |
Select either AND or OR. |
|
Fields |
There are fields for Parts, Vendors, or Warehouse available for selection. |
|
Equation |
This option includes the following:
|
|
Compare option |
Select either Compare To Value or Compare To Field. |
|
Value |
Enter the value. |
- When you have finished, click the Save icon.
- If you want to add another criteria, then click the + icon.
Delete Search Criteria
If you click the Delete icon, this will delete the specific search criteria or you can click the Clear All Search Criteria button to clear all search criteria.
- Complete the options:
- From the Days Until Due drop-down, select the number of days. For example, 1 day.
- Then select either AND or OR.
- From the Minimum % drop-down, select the percentage. For example, 90%.
- Click the Next button and the Step 3: Scheduling displays.

This is where you can specify how often you want this automation task to run. For example, you can schedule this to run once a week on a Monday morning.
- From the Scheduled drop-down, you can choose from Daily, Weekdays, Weekly, Monthly, or Yearly.
- From the Starts On calendar pick, select when to start the notification.
- Click the Next button and the Step 4: Name & Description.

- In the Implementation Name field, enter the name of the notification.
- In the Description field, enter the short description.
- Click the Save button.
The schedule task is saved and displays in the implementation list.