Create and Receive a Transfer
Learn how to complete a local inventory transfer and a remote inventory transfer.
Watch the Video
This video will show you how to create a transfer and then add the parts to that transfer. Then it gets more interesting as it includes examples of showing you ...
- Send & Receive a Local Inventory Transfer
- Send & Receive a Remove Inventory Transfer
Audio: Sound Length: 05:09 mins
Watch the video in ...
Disclaimer: This video is translated from English using an AI tool; you may notice that the length of the speech may be slightly out-of-sync with the user interface recording.
Learn more
Create the Inventory Transfer and add the Parts
Step 1. Create Transfer
- Navigate to Transfers and the Inventory Transfer Management screen displays.

- Click the New Transfer button and the Create Transfer form displays.

- From the Transfer Mode drop-down, select either:
- Local Move - Transfer parts between warehouses within the same site.
- Remote Transfer - Transfer parts between warehouses within separate sites.
- In the Purpose field, enter the purpose of transfer.
- From the Source Warehouse drop down, select the warehouse the parts will be transferred from.
Source Warehouses credit budget accounts for the value of the transfer, as if they were returning inventory to a supplier.
- If the transfer has already been sent, click calendar picker and select the date the transfer was sent.
- From the Destination Warehouse drop-down, select the warehouse the parts have been sent to.
Destination Warehouses expense budget accounts for the value of the transfer, as if they were purchasing inventory from any other supplier.
- In the Deliver To field, enter the name of the recipient if you require a specific person to receive the transfer.
- If you have selected Remote Transfer, this field displays. - From the Tracking # field, enter the tracking number.
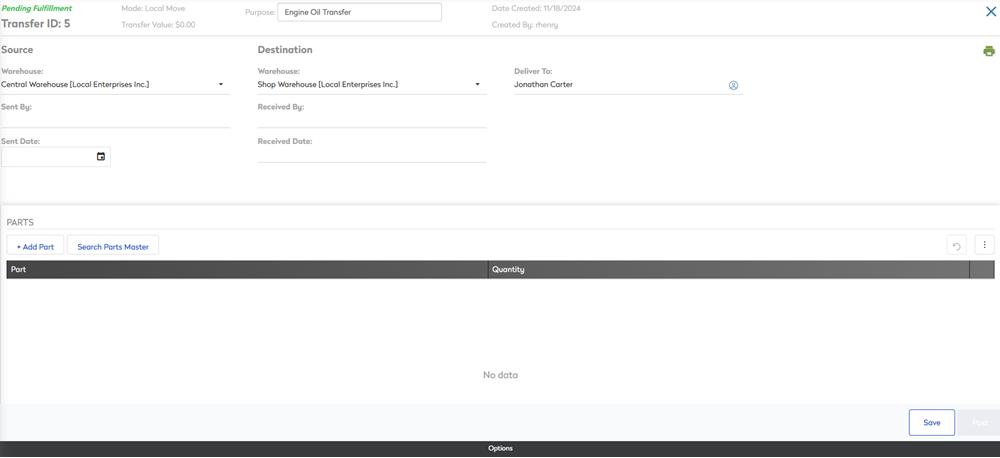
- Click the Save & Add Parts button and the new transfer displays OR if you want to add the parts later, then click the Create Transfer button.
The transfer displays and next you can add the parts.

Step 2. Add Parts to the Transfer
Add parts to a created transfer to track which parts are moving from one warehouse to another.
- Click the + Add Part button. A new line populates in the parts list on the transfer screen.

- In the search parts field, enter a search term and the search results populate.
- From the search results, select the part.

- From the quantity field, enter the quantity.
- Click the Save button.
The part has now been added to the transfer.
If the part is not found, you can search in the Parts Master.
- Click the Search Parts Master button and then either create a new part or search for an existing part.
- New Part
- If the part is a new part, then click the New Part button.
- Then complete the part's details, learn more in Create a New Part and Create a New Tire Record.
- The part is added to the transfer.
- Existing Part
- If the part is an existing part, then in the Search parts master field, enter the name of the part.
- Hover over the part and then click the Add
 icon.
icon. - The part is added to the transfer.
Step 3. Send the Transfer
After all parts are listed on the transfer and ready for fulfillment, send the transfer to the destination.
- Click the Send button.

The transfer is now sent and ready to be received by the destination warehouse.
- Click the Print Packing Slip
 icon to add the packing slip with the physical transfer.
Receive a Remote Inventory Transfer
A sent transfer is ready to be received at the destination warehouse. Receive the transfer to add the parts to the destination warehouse inventory.
- Navigate to Transfers and the Inventory Management Transfer Screen displays.
- Click a sent transfer and the Transfer Screen displays.
- Click the Receive button.
The transfer is now fulfilled.
