Set up an Open Form Request Portal
One of the ways to create a request is through a Request Portal. This allows your employees and requesters to go to a specifically created URL and submit a request.
In this article, we will show you how to set up an Open Form Request Portal.
Watch the Video
Audio: Sound Length: 5:25 minutes
Learn more
Create a new Request Portal
- Navigate to Settings.
- Under the Tools and Support heading, click the Portal icon.
- Click the Save drop-down and select New.

The new portal settings screen displays and learn more about settings in Open Form Request Portal Fields below.
Remember, when you have finished your updates, you must click the Save button.
Edit a Request Portal
Your organization may have a couple of Request Portals set up, complete the following to edit a specific Request Portal.
- Navigate to Settings.
- Under the Tools and Support heading, click the Portal icon.
- From the Portal Name drop-down, select the portal name.

The portal settings screen displays and learn more about settings in Open Form Request Portal Fields below.
Remember, when you have finished your updates, you must click the Save button.
Open Form Request Portal Fields

The form contains the following:
- (A) General Settings
- (B) Help and Contact
- (C) Field Selection
- (D) Custom Fields
- (E) Customize Portal
- (F) Request Routing - See Create a Rule to route the Request.
General Settings
| Fields | Description |
|---|---|
|
Portal Name |
Enter the Request Portal name and the name can contain only letters and numbers. |
|
URL |
This is the specific URL for your Request Portal and it will be automatically created from the Portal Name. |
|
Portal Type |
Select Open Form. |
| Use Captcha | If you want a captcha to display on the Open Form, then click the toggle to be On. The captcha is used to stop Bots from entering requests into the form. |
| Entity | Select the entity/site that you want. |
| Contacts Only | If you only contacts only, then click the toggle to be On. |
|
Portal Enabled |
Activate the portal; toggle this to On. |
| Portal Default Language | Select the default language. |
|
White Label |
If you don't want the default Powered by Eptura label on your Work Request Portal, toggle this to On. |
Help and Contact
| Field | Description |
|---|---|
|
Display Help Phone |
If you want to display the help phone number for the requester to call, then click the toggle to On and enter the phone number. |
|
Display Help Email |
If you want to display the email for the requester to email, then click the toggle to On and enter the email address. |
|
Display Twitter Link |
If you want to display the your Twitter handle, then click the toggle to On and enter the Twitter handle. |
|
Display Facebook Link |
If you want to display the your Facebook handle, then click the toggle to On and enter the Facebook username. |
Field Selection
| Field | Description |
|---|---|
|
Allow Asset Lookup |
Toggle this to On if you want to allow the requester to look up a specific asset. |
|
Phone Field |
If you want the field to be displayed, toggle this to On. |
|
Required Phone |
If you want the field to be required, toggle this to On. |
|
Asset Label |
This can't be edited.
|
|
Child Asset Label |
This can't be edited.
|
|
Site Structure Label |
This can't be edited. |
|
Require Asset |
Toggle this to On if you want to require the asset when submitting a Work Request. |
|
Name Field |
If you want the field to be displayed, toggle this to On. |
|
Required Name |
If you want the field to be required, toggle this to On. |
|
Require Description |
If you want the field to be required, toggle this to On. |
|
Site Structure Enabled |
This can't be edited. |
|
Request Form Title |
Enter the title of the form. |
|
Welcome Message |
Enter a short welcome message. |
Custom Fields
Custom fields can be added after the new Portal has been saved.
- Click the Add
 icon and the Custom Fields dialog displays.
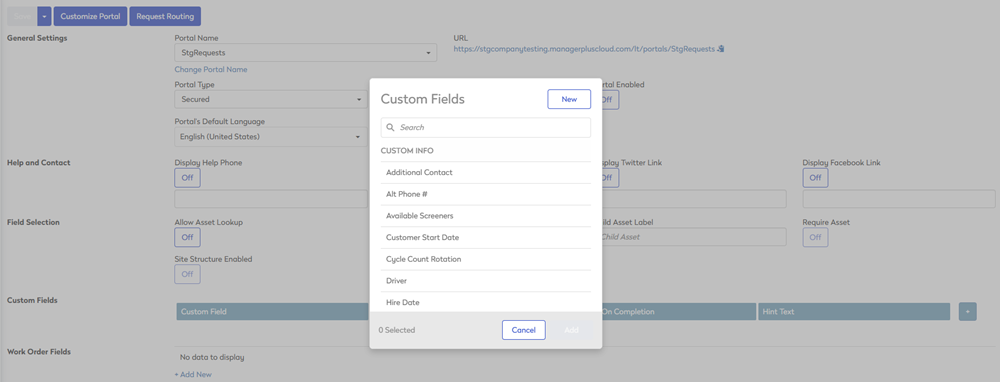
- Either select a custom field or create a new custom field.
- Click the Add button and the custom field displays.

- If the custom field is required, then check the Required check box.
- If the custom field is required on completion, then check the Required on Completion check box.
- In the Hint Text field, enter a short help text.
Customize Portal
- Click the Customize Portal button and the form displays.

- The following fields can be changed:
| Field | Description |
|---|---|
|
Logo |
Either use the default logo or upload your company's logo. |
|
Favicon |
Either use the default logo or upload your company's favion. The favion display in the web browser's tab. |
|
Request icon |
Select the request icon from the list. |
|
Font |
Select the font. |
|
Show Text in All Caps |
To show the text in all capitals, toggle this to On. |
|
Header Color Header Text Color |
Either select the color from the color picker OR enter the Hex number or RGB number. |
|
Menu Color Menu Text Color |
Either select the color from the color picker OR enter the Hex number or RGB number. |
|
Body Color Body Text Color |
Either select the color from the color picker OR enter the Hex number or RGB number. |
|
Footer Color Footer Text Color |
Either select the color from the color picker OR enter the Hex number or RGB number. |
|
Button Color Button Text Color |
Either select the color from the color picker OR enter the Hex number or RGB number. |
|
Button Style |
Select either Rounded Corners or Square Colors. |
|
Hyperlink Color |
Either select the color from the color picker OR enter the Hex number or RGB number. |
Remember to Save
When you are finished editing the settings, then click the Save button.