Okta Integration
Customer IT / SpaceIQ Onboarding Team
SpaceIQ supports integration with Okta and this article details how to configure the Okta provisioning integration.
The following Okta integration features are supported:
- Push New Users - New users created through Okta will also be created in the SpaceIQ application.
- Push Profile Updates - Updates made to a user's profile through Okta will be pushed to the SpaceIQ application.
- Push User Deactivation
- Deactivation means the removal of all a user's data and the deletion of the user's account.
- Deactivating the user or disabling the user's access to the application through Okta will delete the user from the SpaceIQ application.
It is not possible to pull users or profile updates within SpaceIQ from Okta. They must be pushed.
Contents
- Prerequisites
- Integration Activities
- Logout Redirect
- SpaceIQ Login Flow (SP-initiated Login)
- Attribute Mappings from SiQ to Okta User Profile
- Troubleshooting Tips
Prerequisites
Before configuring SCIM-based provisioning for SpaceIQ, make sure you have configured, enabled, and verified SAML support between your Okta implementation and SpaceIQ.
You will need Okta admin privileges to complete this integration, and for the SpaceIQ setup, you must have a SiQ Admin or an IT role.
Integration Activities
Step 1. Activate the Okta Integration in SpaceIQ
From the SpaceIQ application, complete the following steps:
- In the top-right corner, click on your Profile Name, and then click on Settings.

- From the left menu, click Integrations.
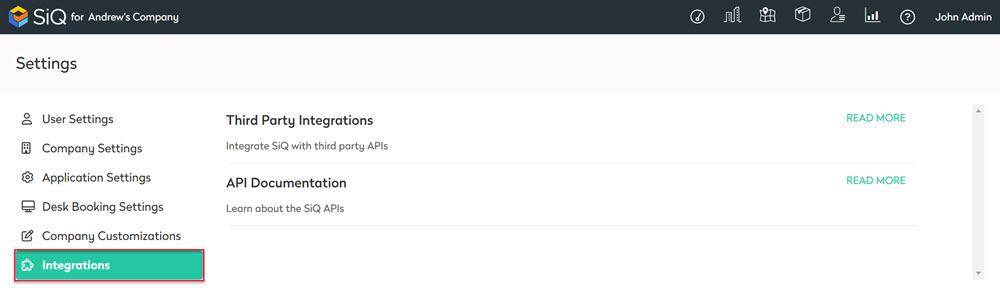
- From the Third Party Integrations area, click the READ MORE link.
The Integrations screen displays.
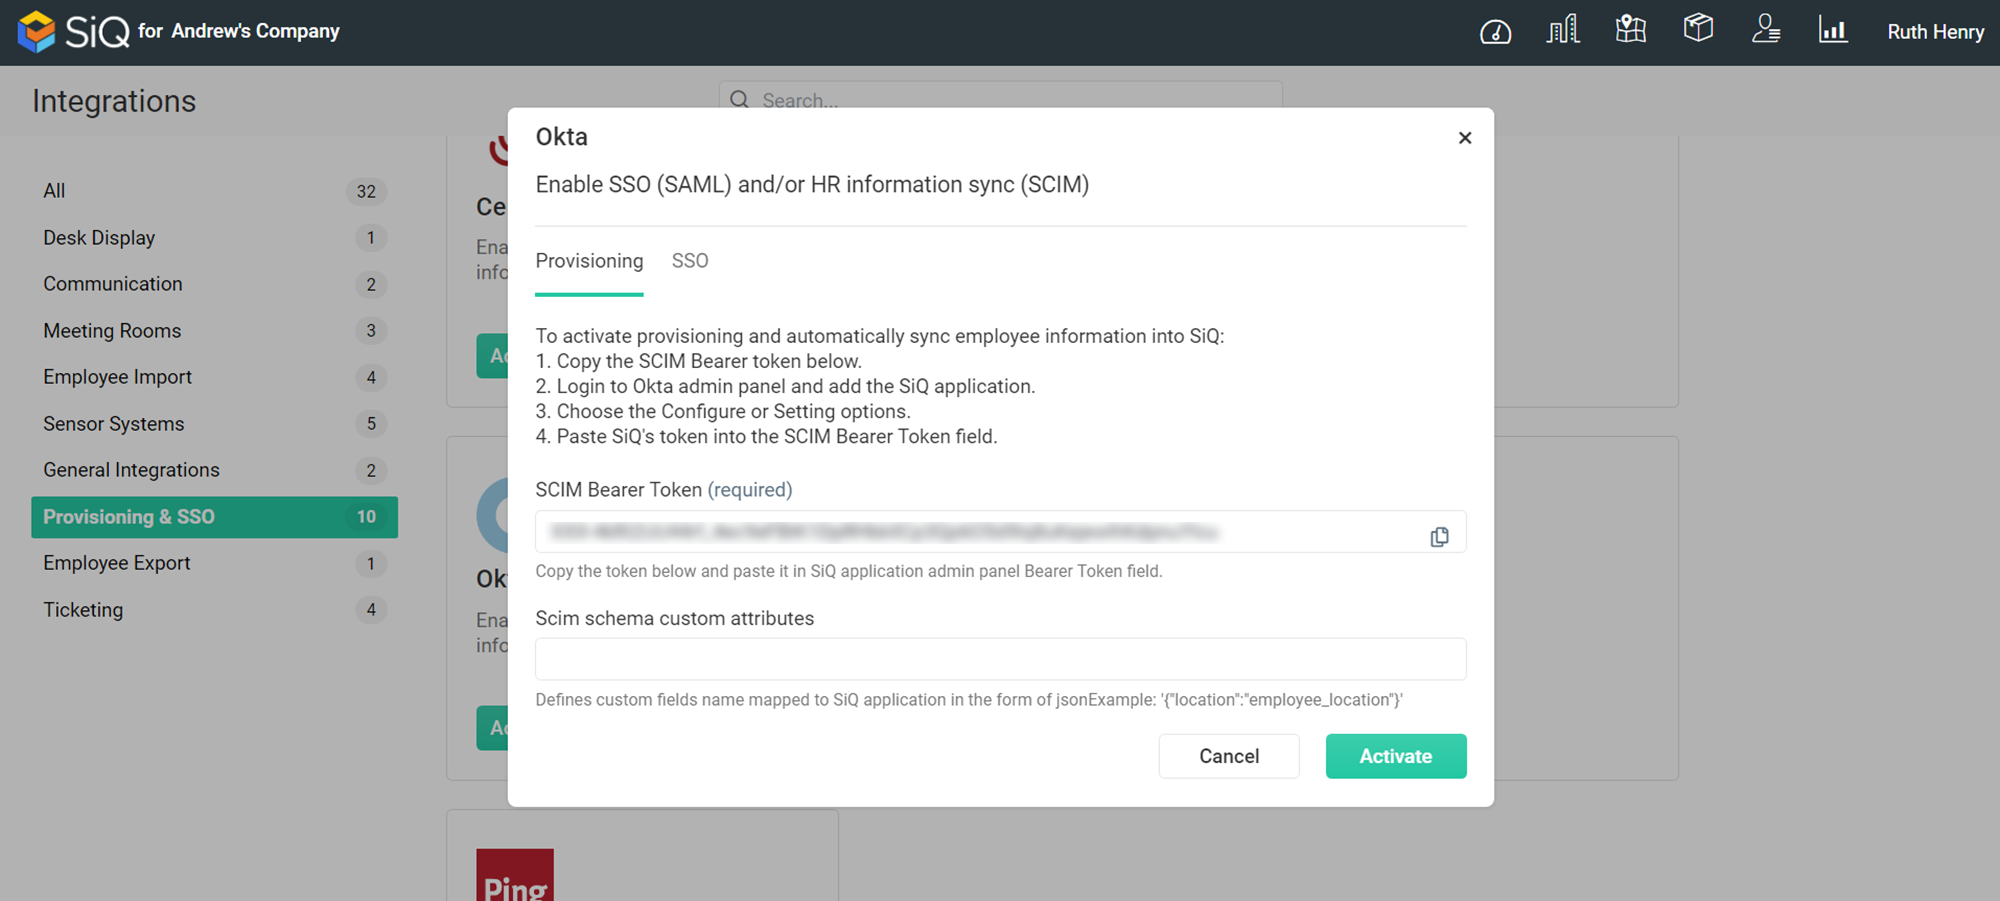
You can search for Okta in the Search field or navigate to Okta tile. To navigate complete the following:
- From the left menu, click Provisioning & SSO.
- For Okta, click the Activate button.
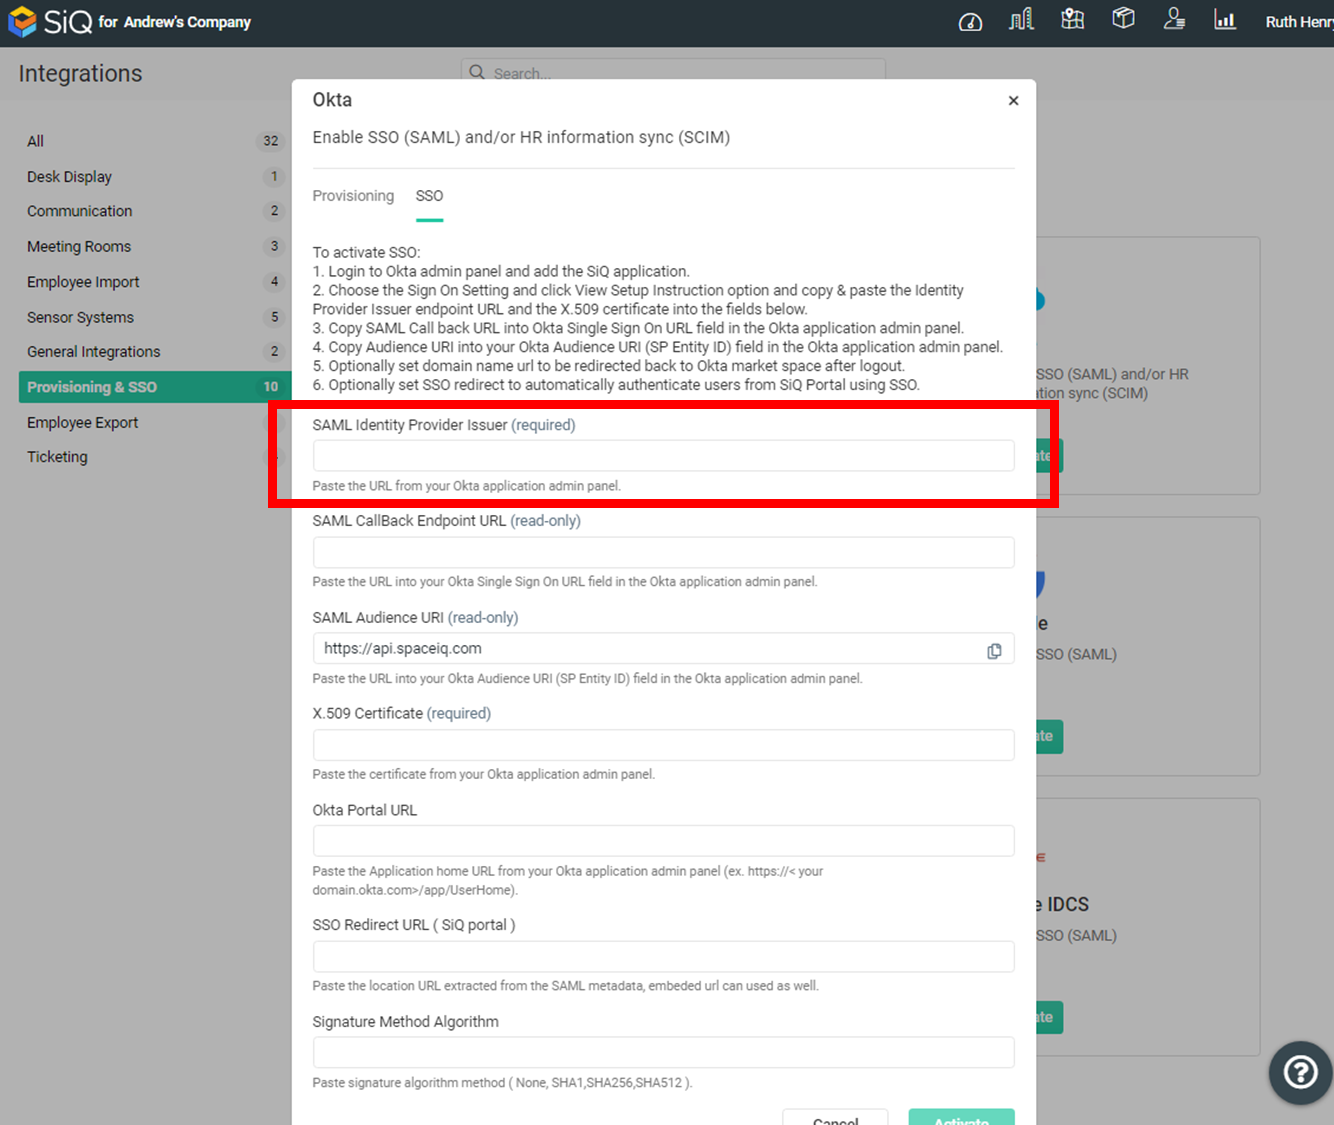
The Okta dialog displays, and contains a Provisioning tab and an SSO tab.
Step 2. Add a new SpaceIQ app in to Okta
Okta distinguishes between an application and the instances of that application. Within Okta, an app admin can be granted access to all instances of an app, or just specific instances of that application.
You must be an admin within Okta in order to provision the SpaceIQ integration.
The screenshots below are from the Admin Dashboard (Classic UI).
Complete the following in Okta:
- From the menu, click Applications. The Admin Dashboard (Classic UI) displays.
- Click the Add Applications button. The Add Application screen displays.
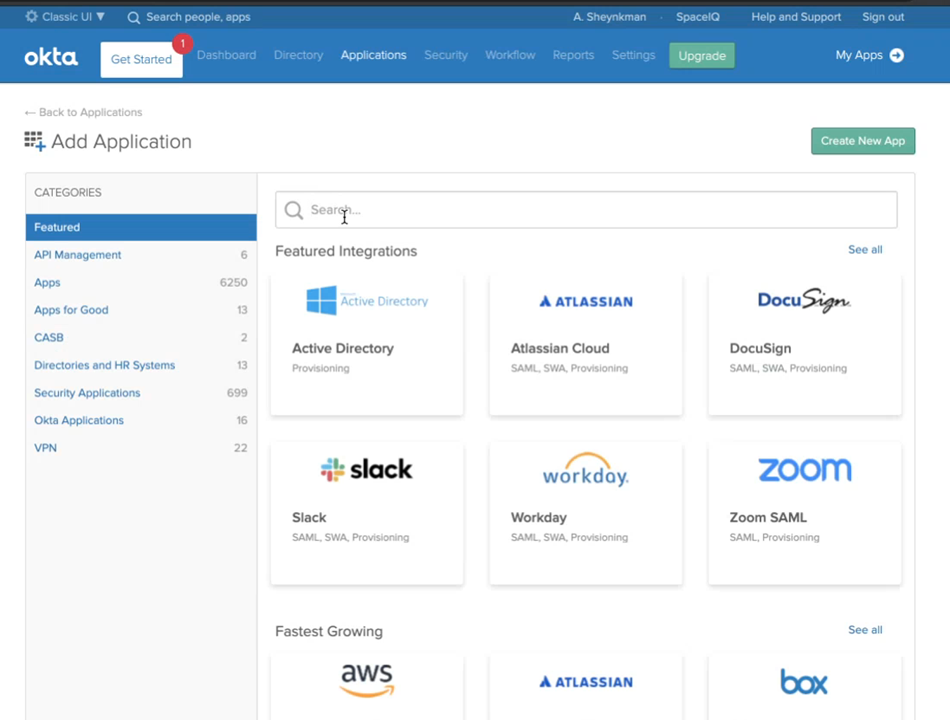
- In the Search field, enter SiQ.
- Click Okta's SiQ app. The SiQ app displays.
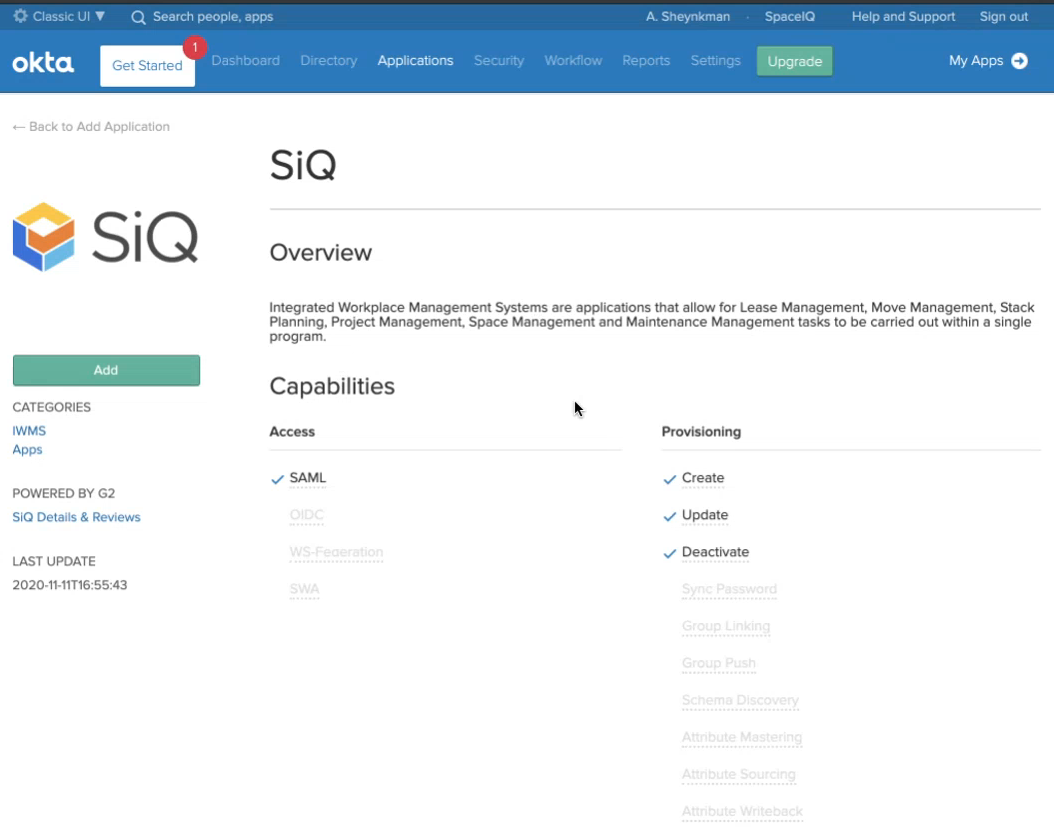
- Click the Add button.
Optional - In the Application label field, enter a descriptive label or name for your SiQ application within Okta and update your visibility settings.

- Click the Done button.
Step 3. Set up the SpaceIQ app Sign On Details
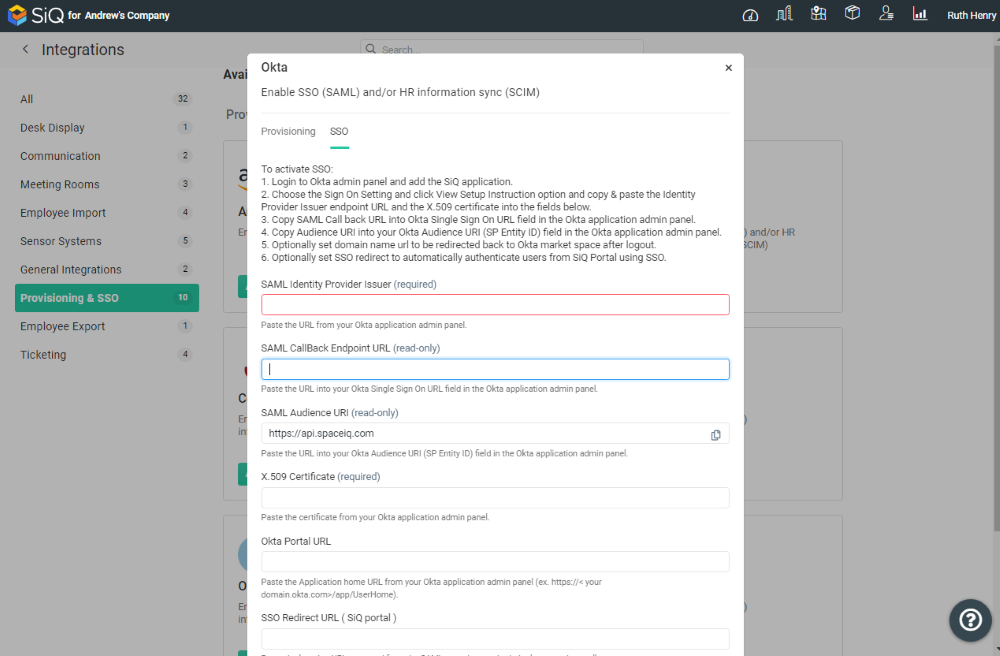
From Okta’s SpaceIQ app, you will copy the Sign On details from Okta into your SpaceIQ Web App.
- Click the Sign On tab.
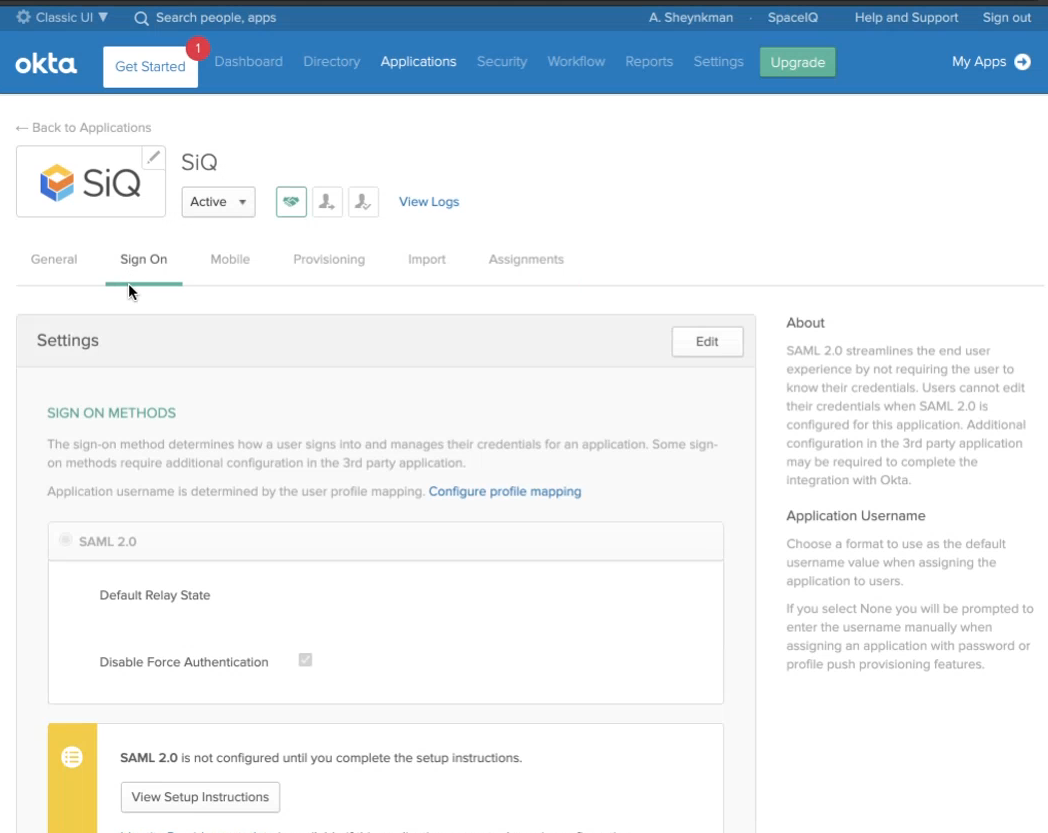
- Click the View Setup Instructions button. This displays the online instructions which tell you what to do.
- Scroll down Okta's instructions to step 5, and this lists the following:
- SAML Identity Provider
- X.509 Certificate
- Okta Portal URL
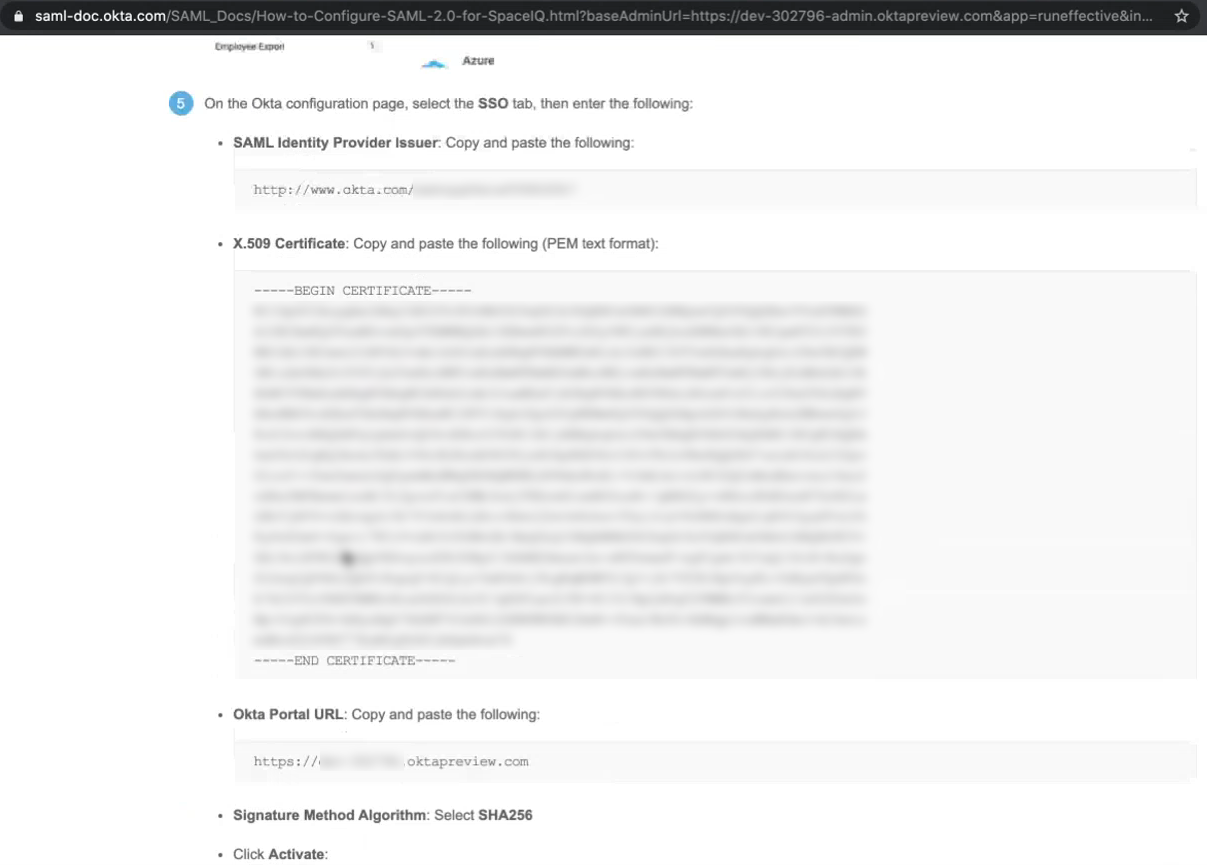
Step 3.1 Copy and paste the SAML Identify Provider Issuer
From the Okta instructions, complete the following:
- From the SAML Identify Provider Issuer field, copy the URL.
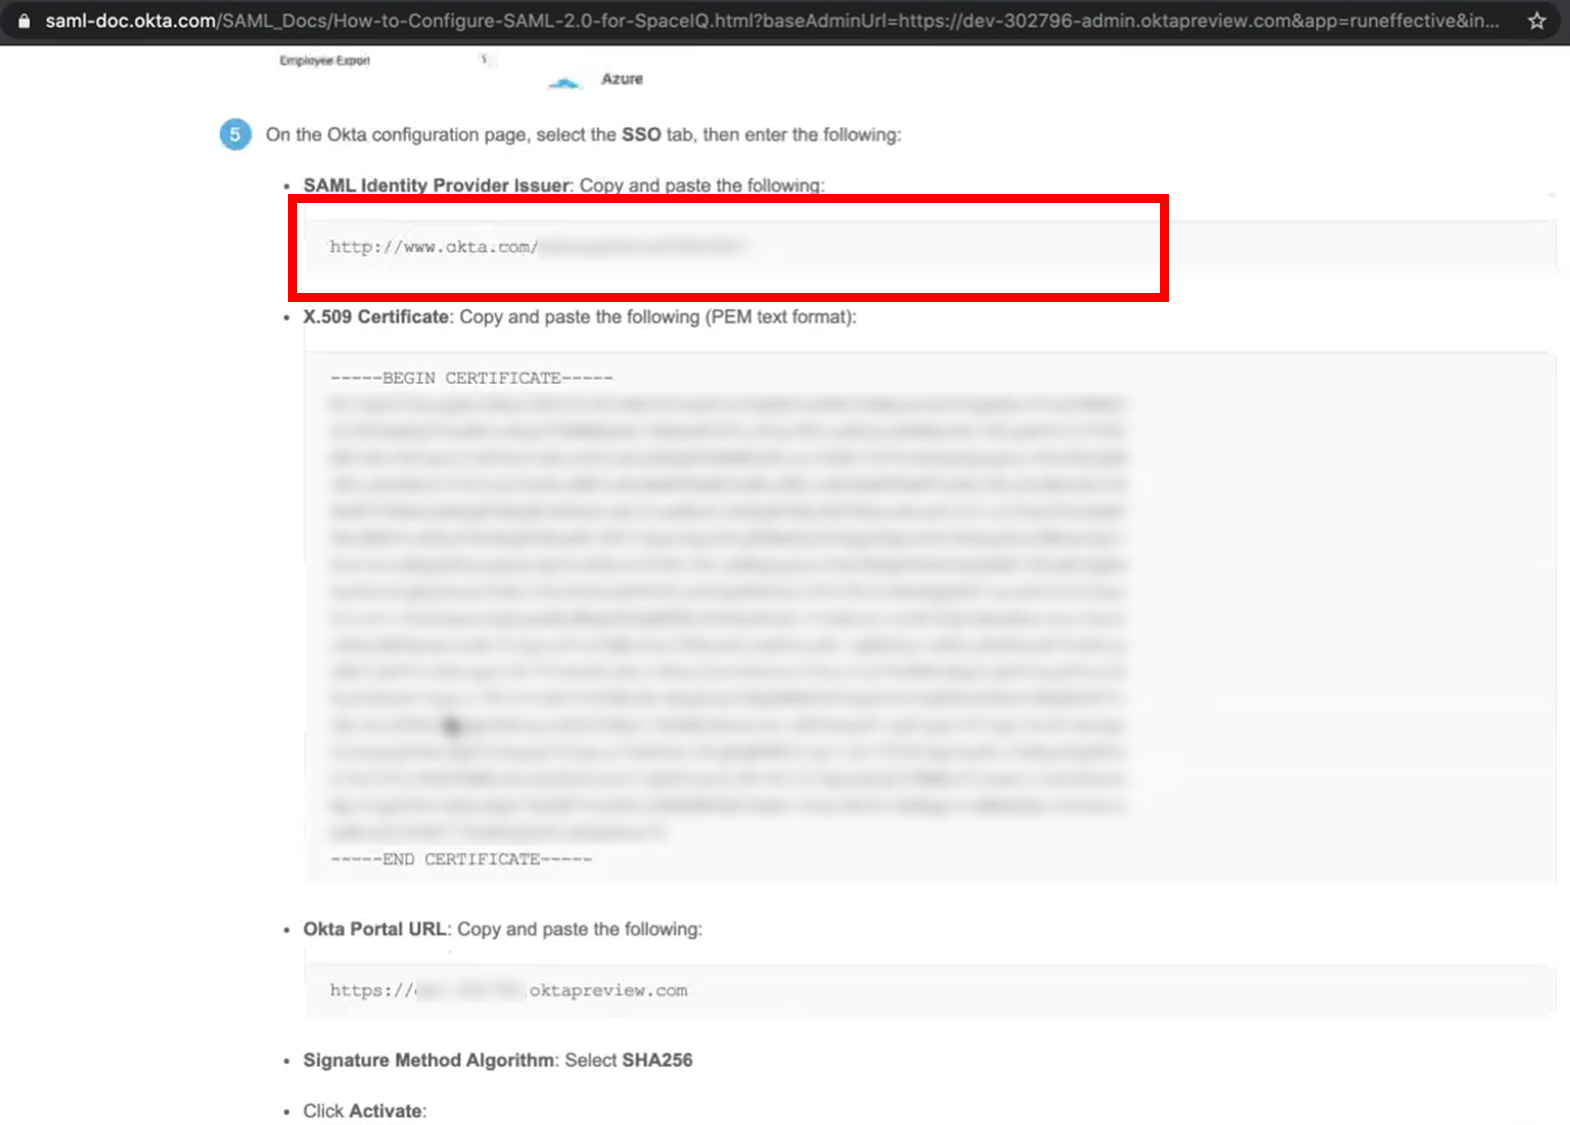
Return to your SpaceIQ Web App and complete the following:
- From the SSO tab, in the SAML Identify Provider Issuer field, paste in the URL.
Step 3.2 Copy and paste the X.509 Certificate
Return to the Okta instructions and complete the following:
- From the X.508 Certificate field, copy the certificate.
Make sure that you include the ---- BEGIN CERTIFICATE ---- and the ---- END CERTIFICATE ---- in the copy as this is part of the certificate.

In your SpaceIQ Web App, complete the following:
- In the X.509 Certificate field, paste in the certificate.
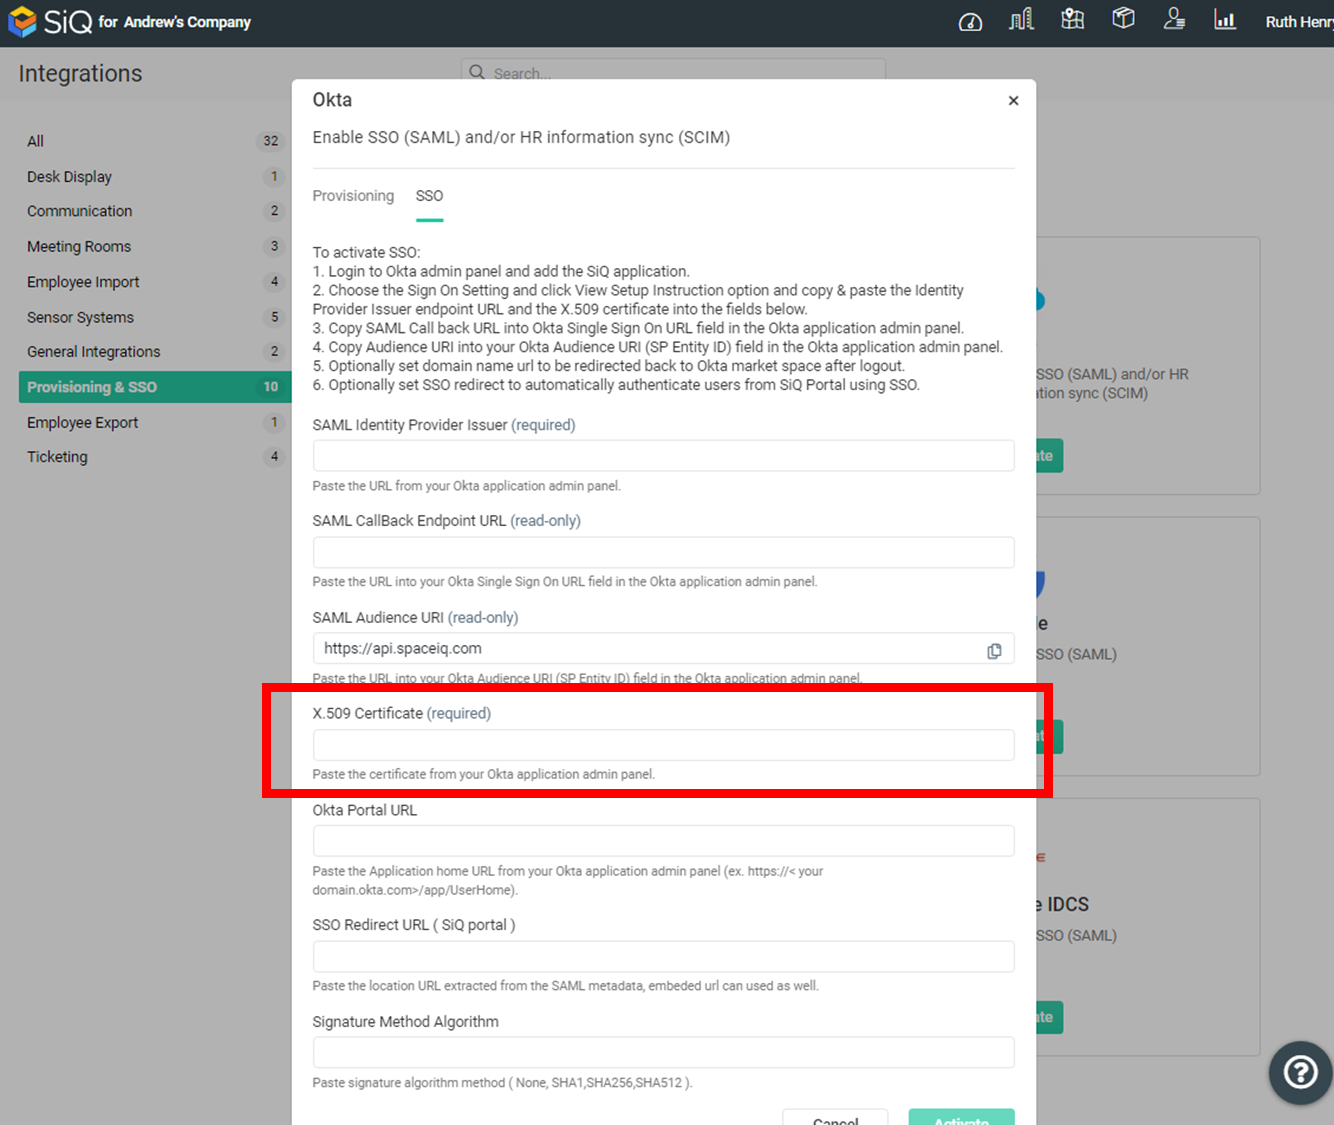
- Click the Activate button.
Step 3.3 Copy and paste the SAML Callback Endpoint URL
The Okta Integration displays in the active integration list.
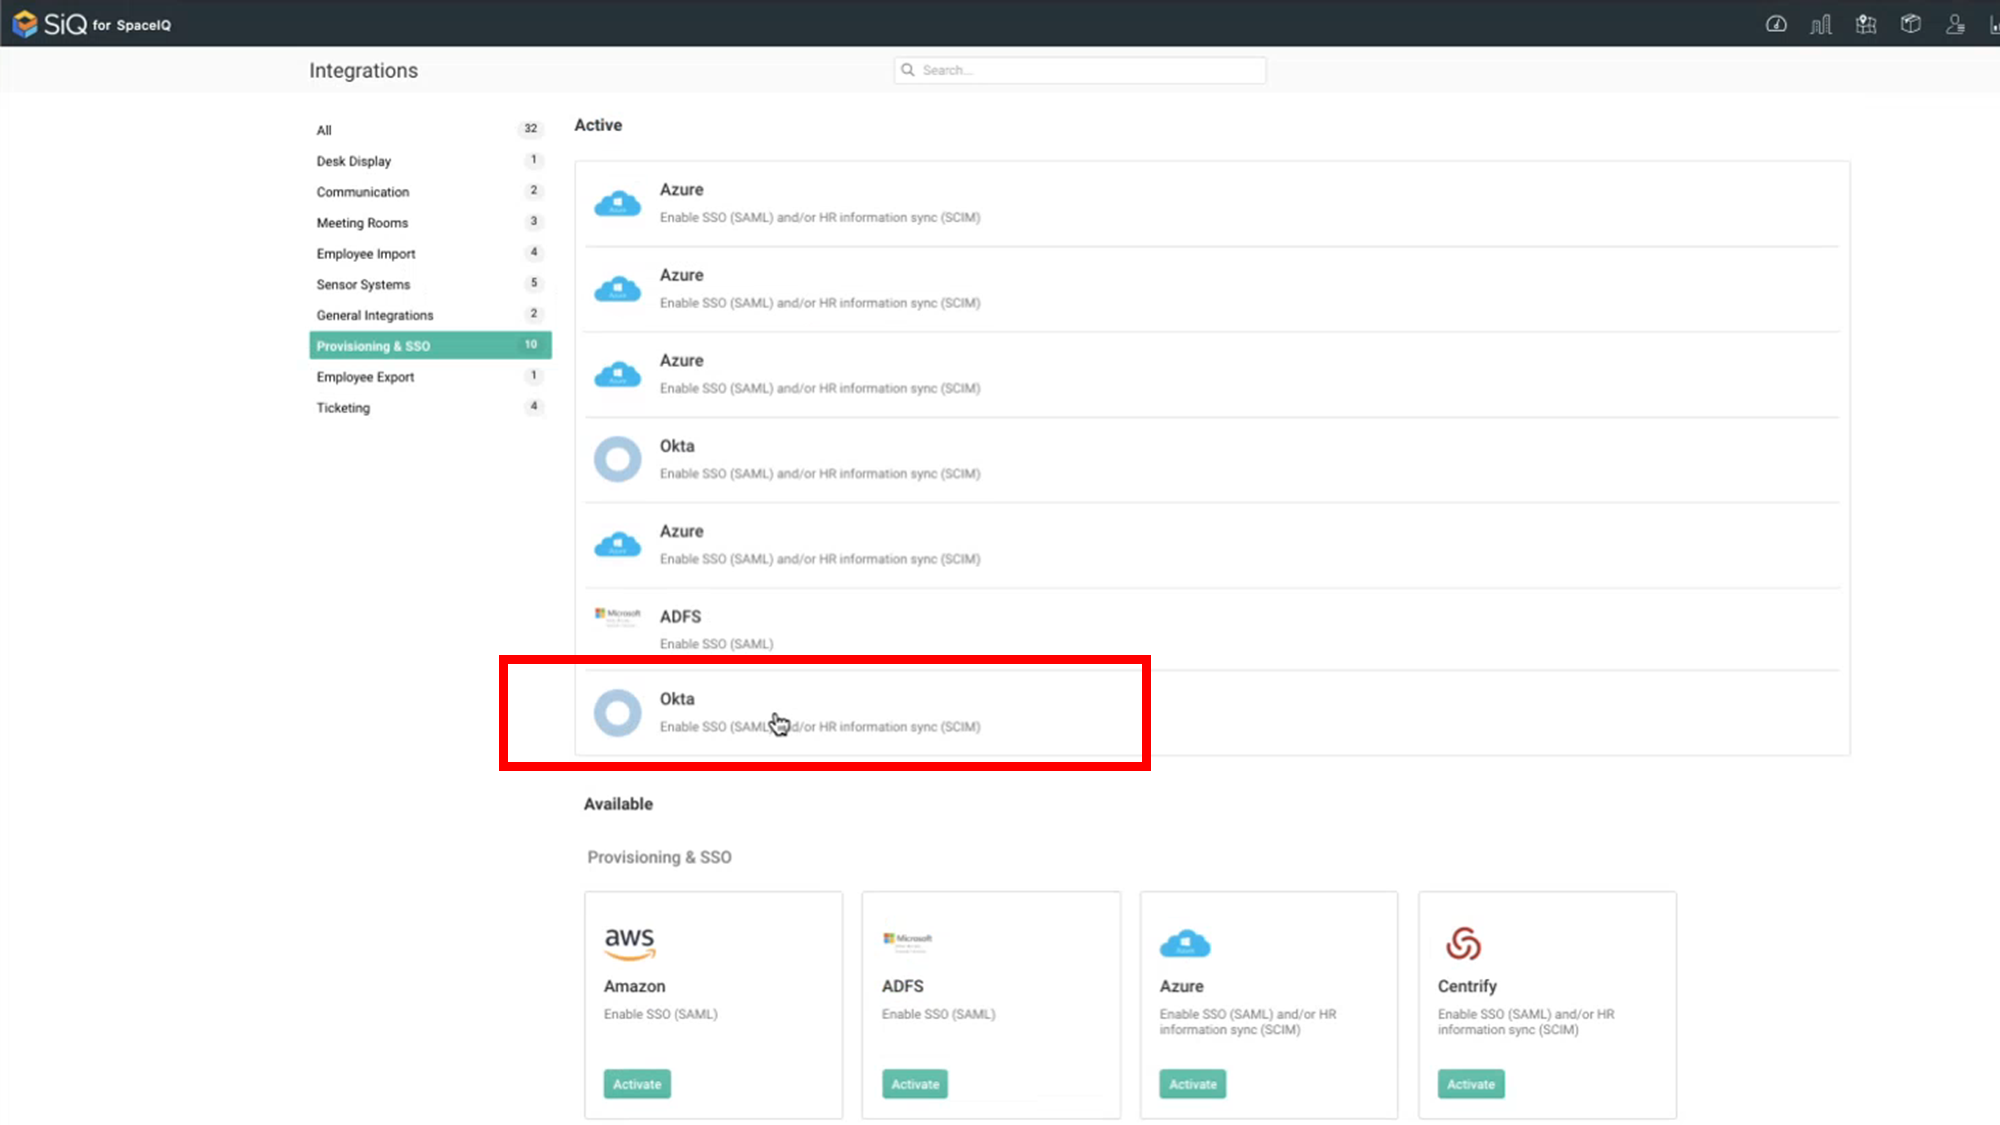
- Click the Okta Integration. The Okta dialog displays.
- Click the SSO tab.
The SAML Callback Endpoint URL is now generated.
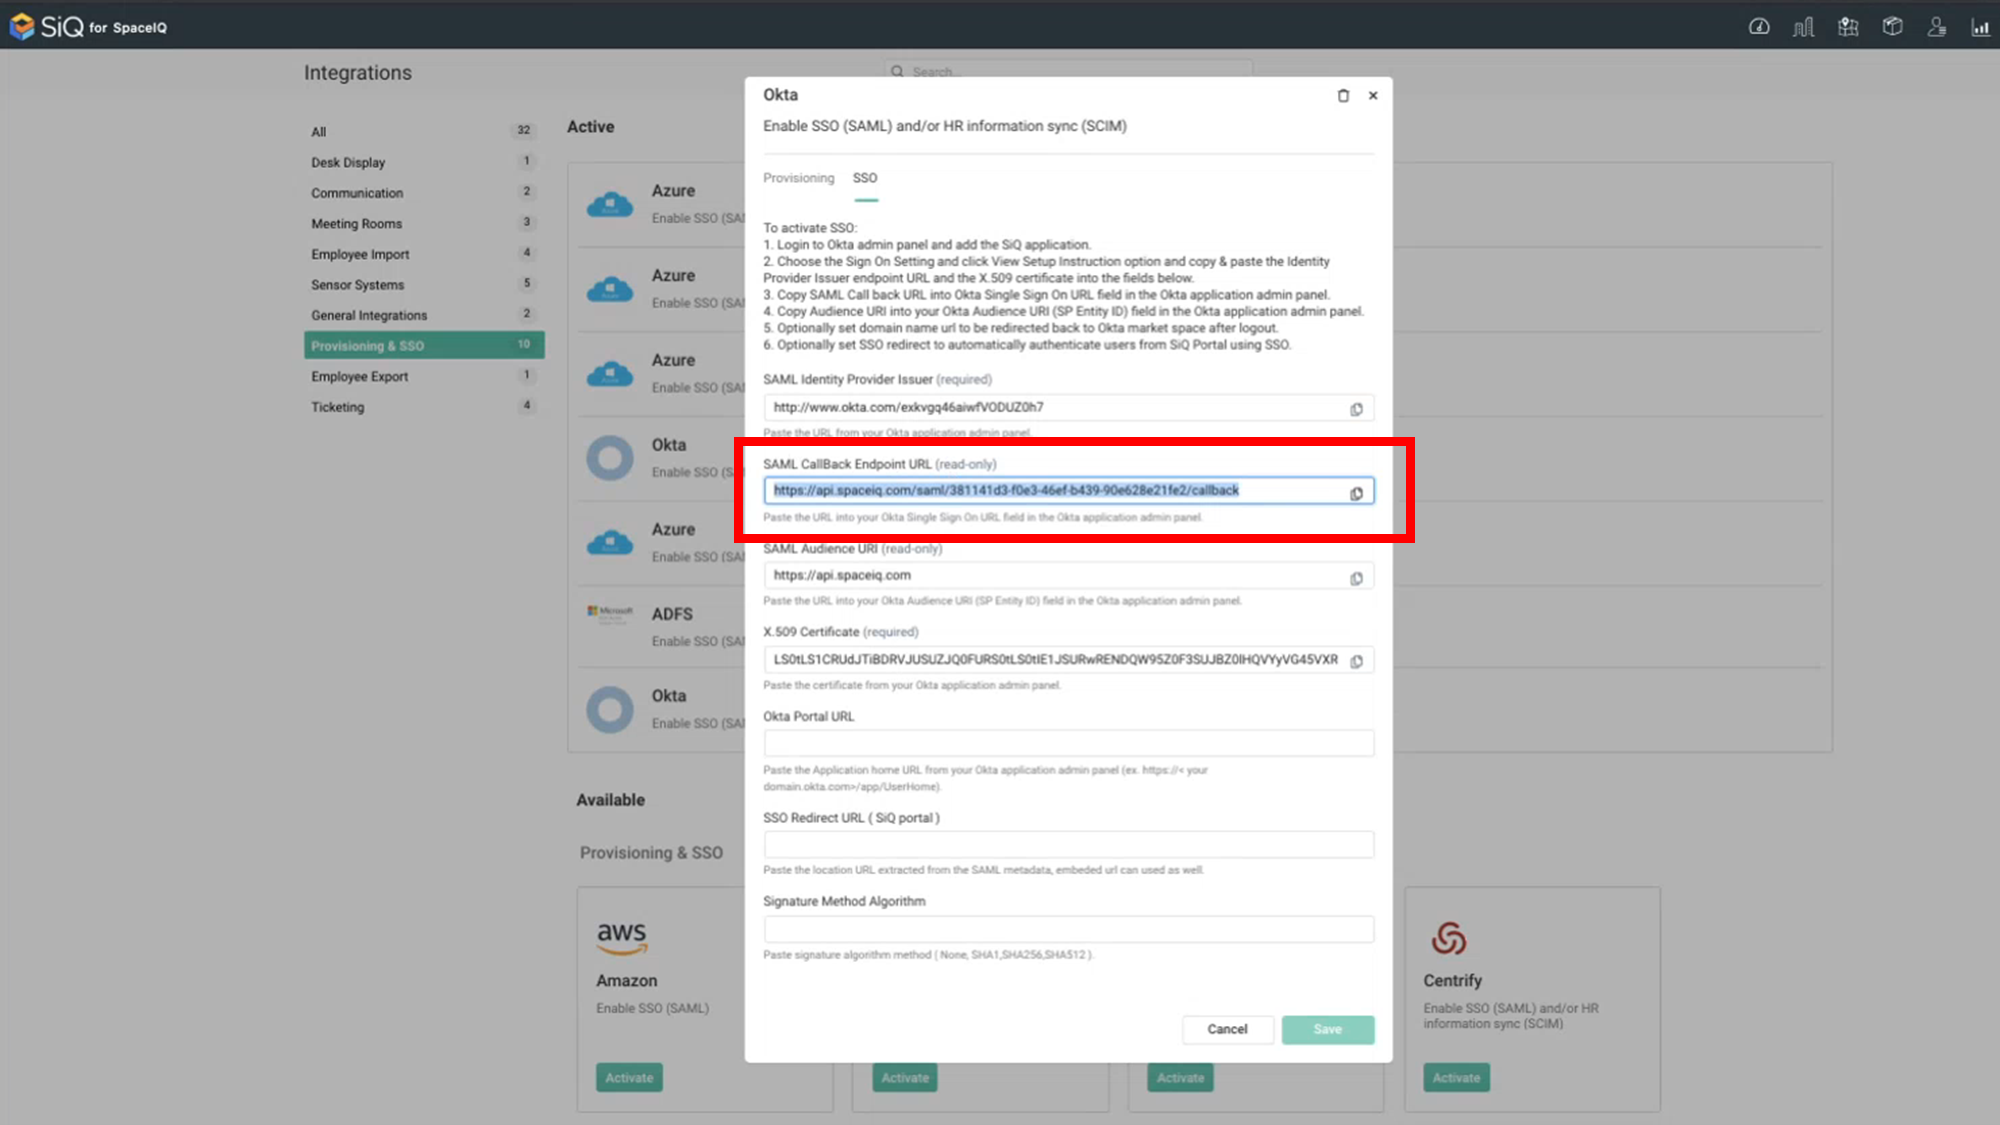
- Click the Copy
 icon.
icon.
Return to Okta’s Sign On tab.

- Click the Edit button and then scroll down.
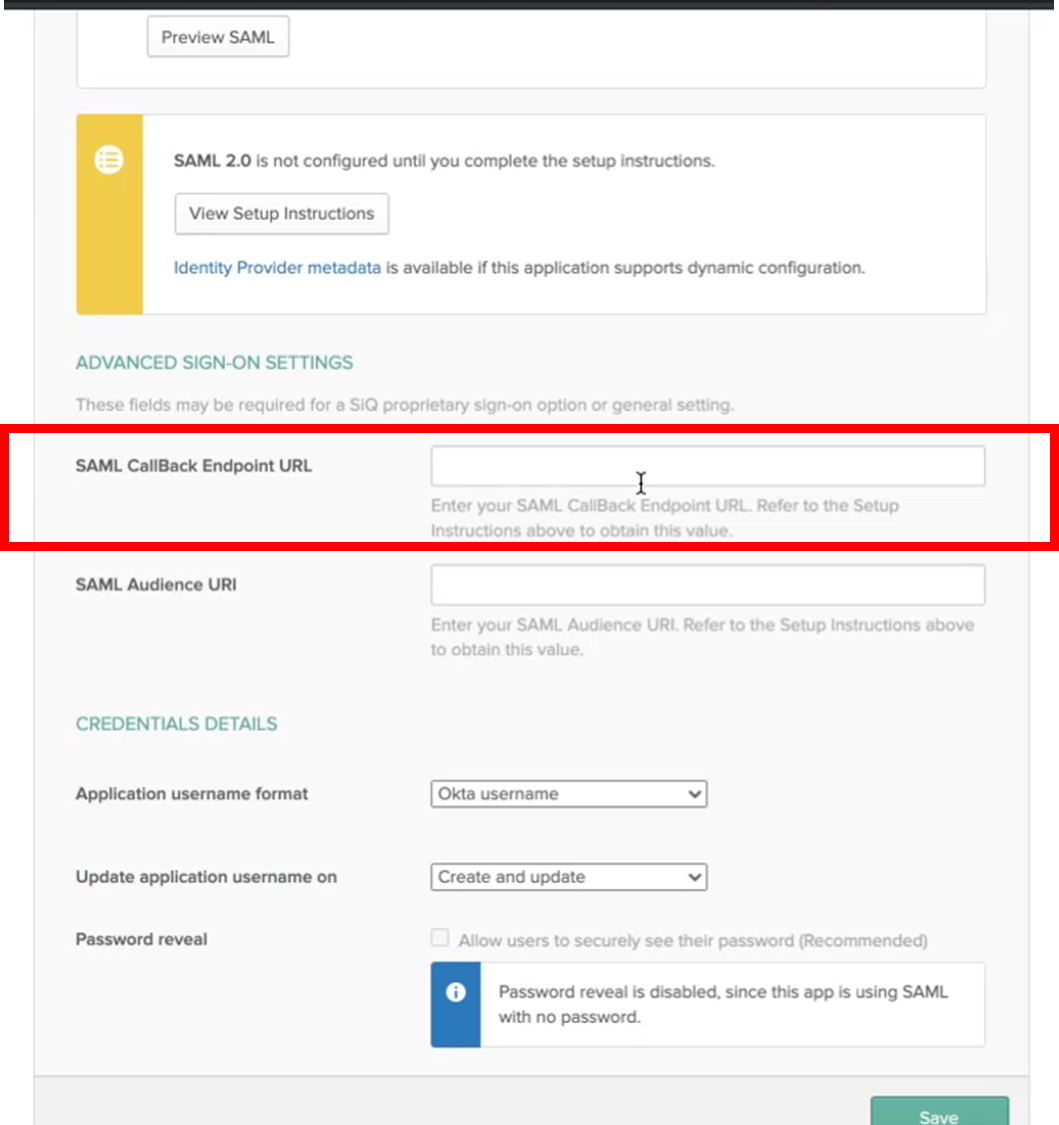
- In the SAML CallBack Endpoint URL field, paste in the URL.
Step 3.4 Copy and paste the Audience URL
- Return to SpaceIQ and complete the following:

- For the SAML Audience URL field, click the Copy
 icon.
icon. - Return to Okta’s Sign On tab.
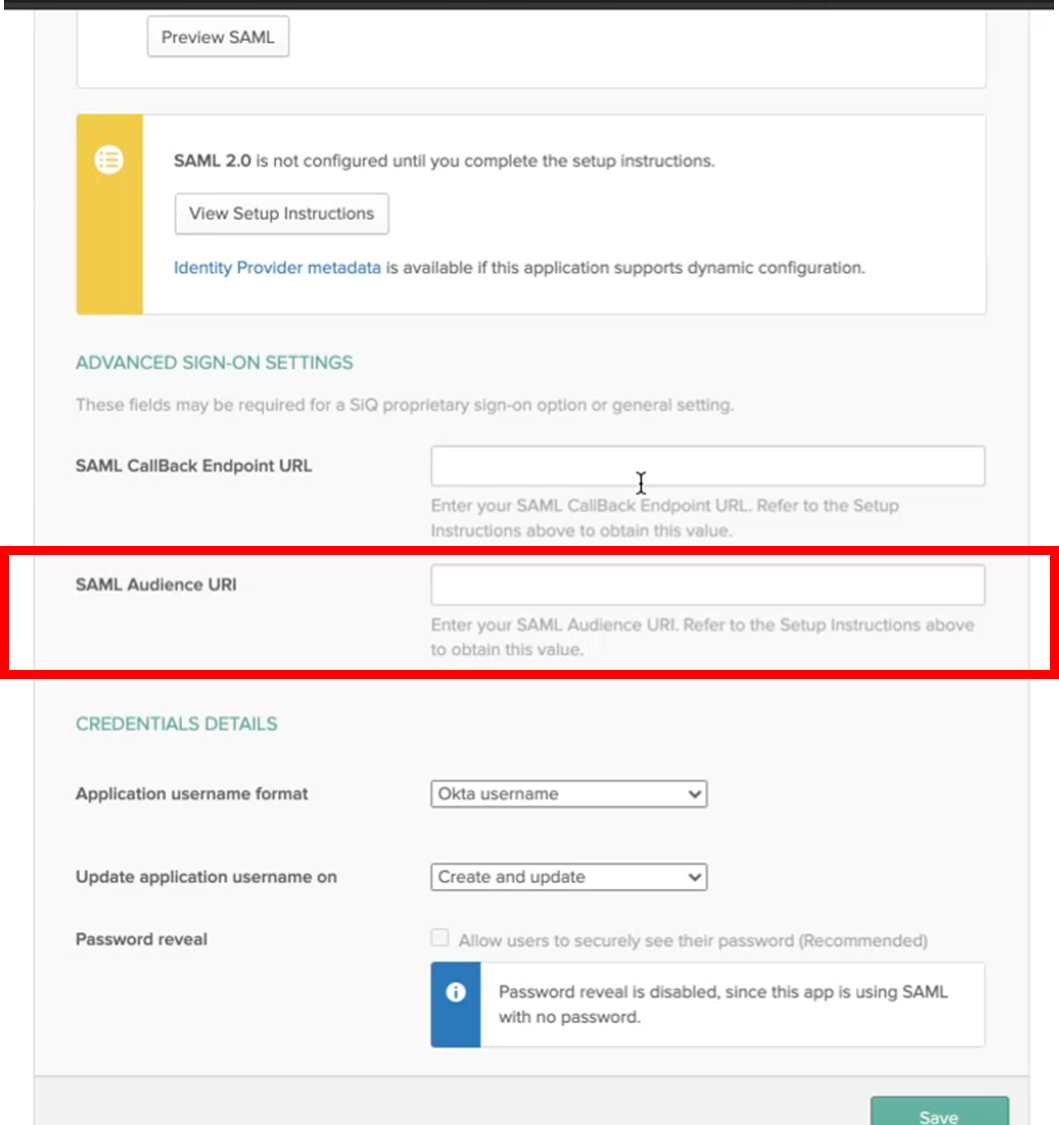
- In the SAML Audience URI field, past in the URI.
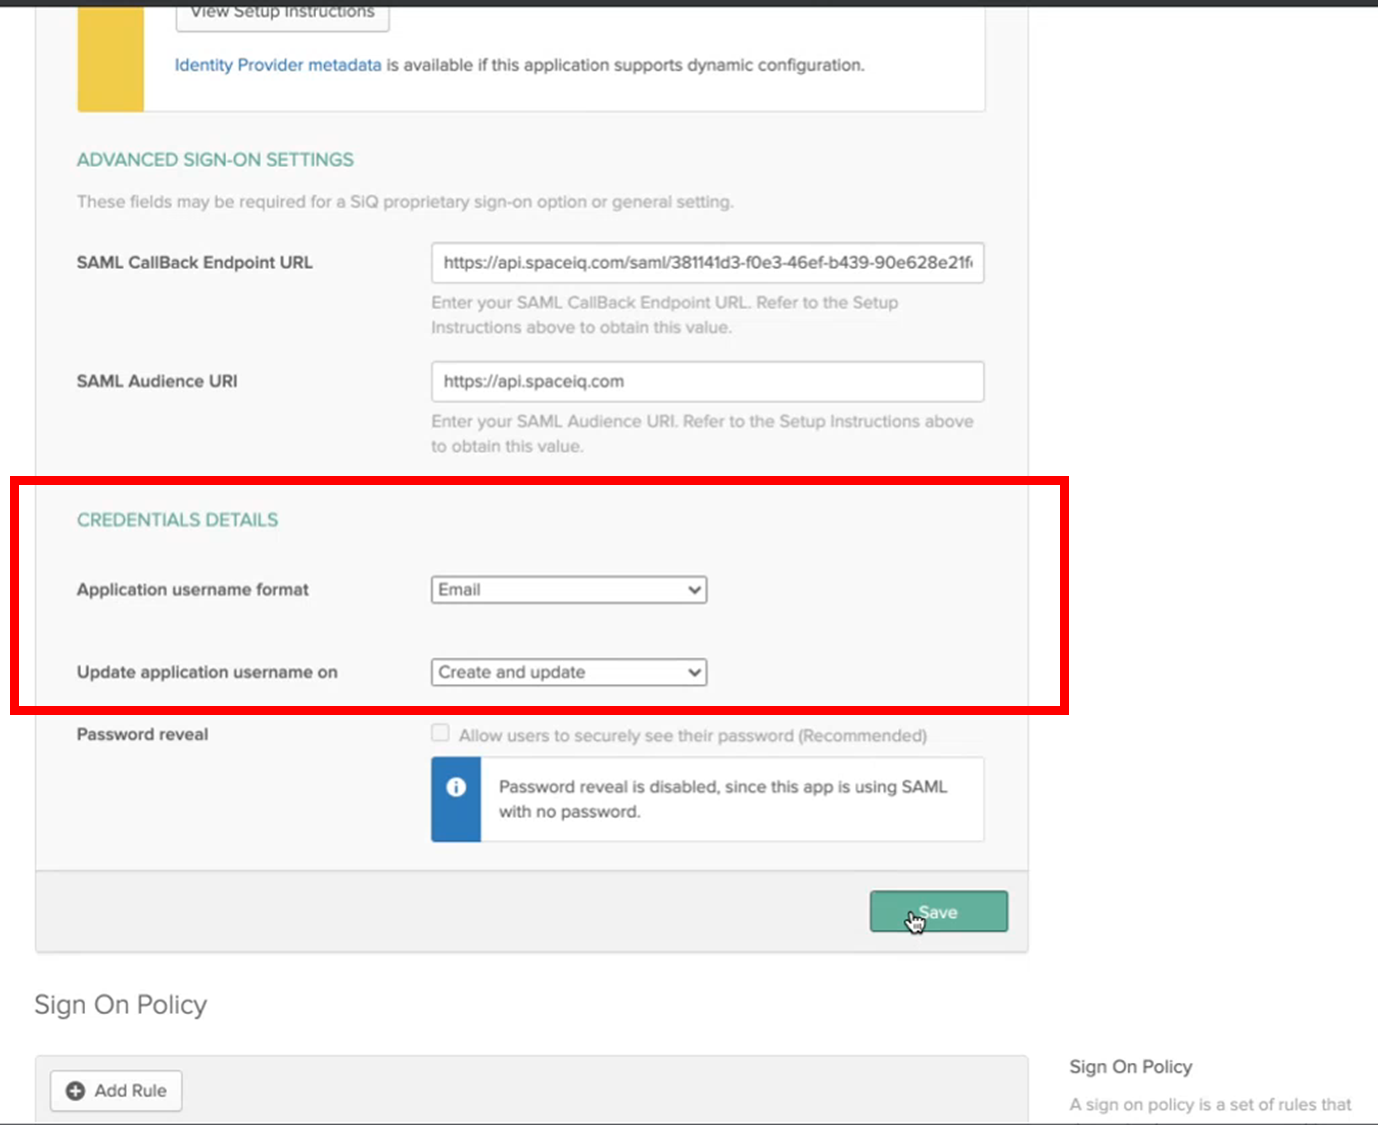
Step 3.5 Set the Credential Details
From Okta’s Sign On tab, complete the following:
- From the Application username format, select Email.
- Click the Save button.
Step 4. Set up Provisioning with the SCIM Bearer Token
From SiQ, complete the following:
- Click your Profile Name in the top right corner.
- Click Settings. The Settings screen displays.
- From the left menu, click Integrations.
- From the Third Party Integrations area, click the READ MORE link. The Integrations screen displays.
- In the Search field, enter Okta. The Okta dialog displays.

- For the SCIM Bearer Token, click the Copy
 icon to copy the token and paste it to a secure temporary location as you will use this to configure Okta’s SiQ instance.
 - Click the Okta’s Activate.
From Okta, complete the following:
- Click the Provisioning tab.
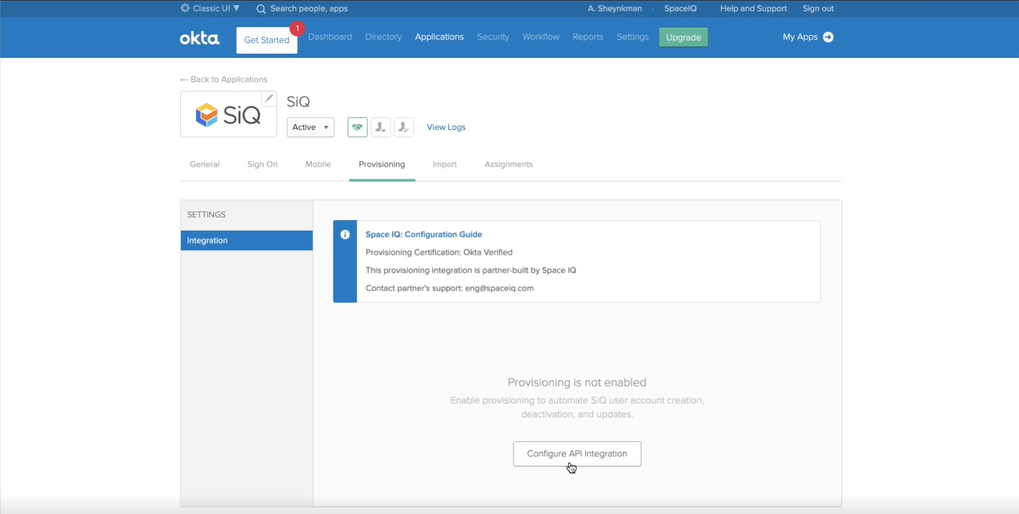
- Click the Configure API Integration button.
- Tick the Enable API Integration check box.
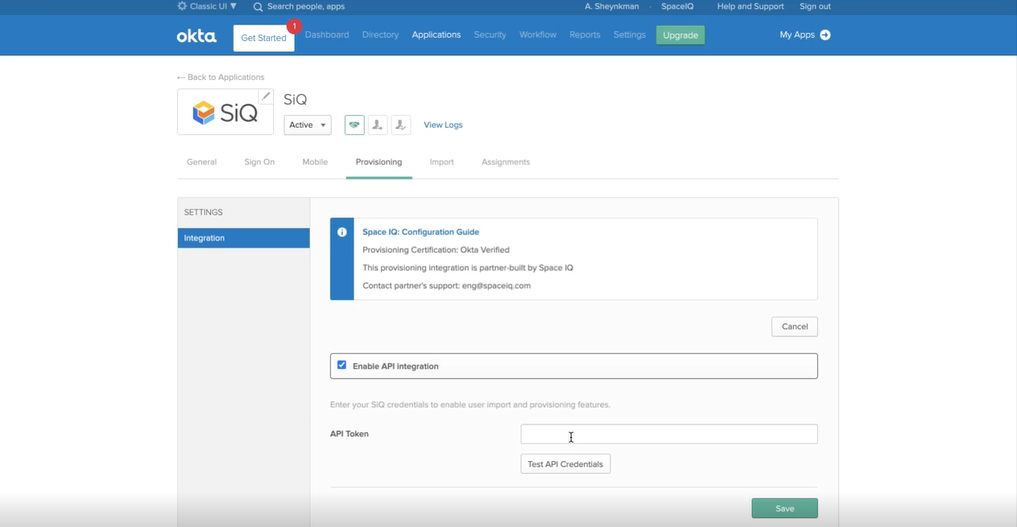
- In the API Token field, paste in the SCIM Bearer Token.
- Click the Test API Credentials button to make sure the credentials work.
- Click the Save button.
Next, enable the Okta Action Items.
Step 5. Enable the Okta Action Items
You must enable the Create Users, Update User Attributes, and Deactivate Users.
From Okta's To App screen, complete the following:
- Click the Edit button.
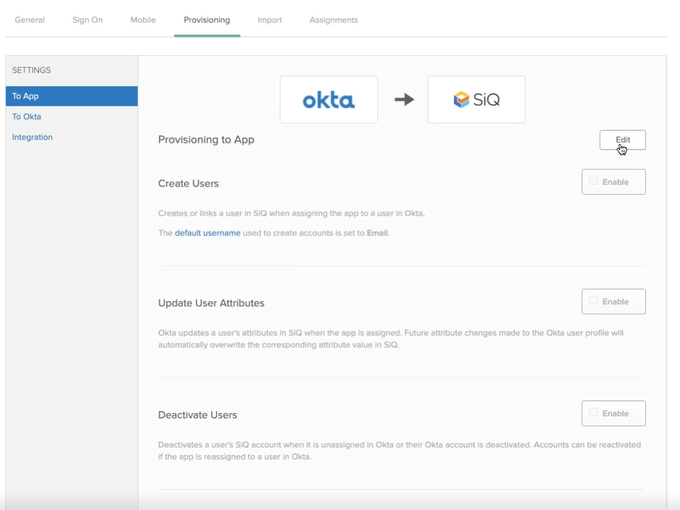
- Check the Enable check box for the Create Users, Update User Attributes, and Deactivate Users.
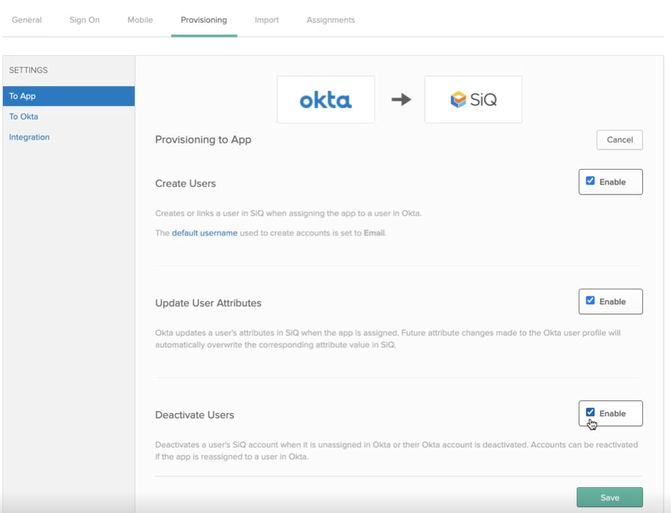
- Click the Save button.
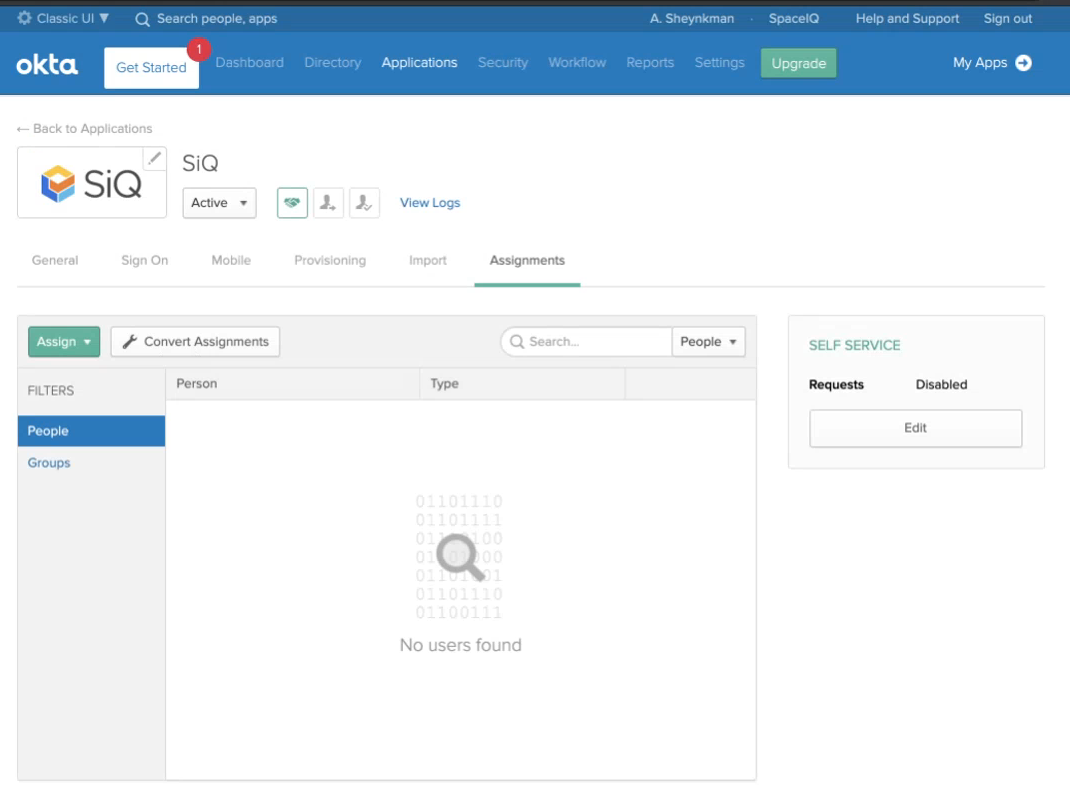
Step 6. Assign People or Groups to the SiQ App
You can assign the people or groups within your Okta organization.
From Okta, complete the following:
- Click the Assignments tab.
- Click the Assign button.
- Select either Assign to People or Assign to Groups.
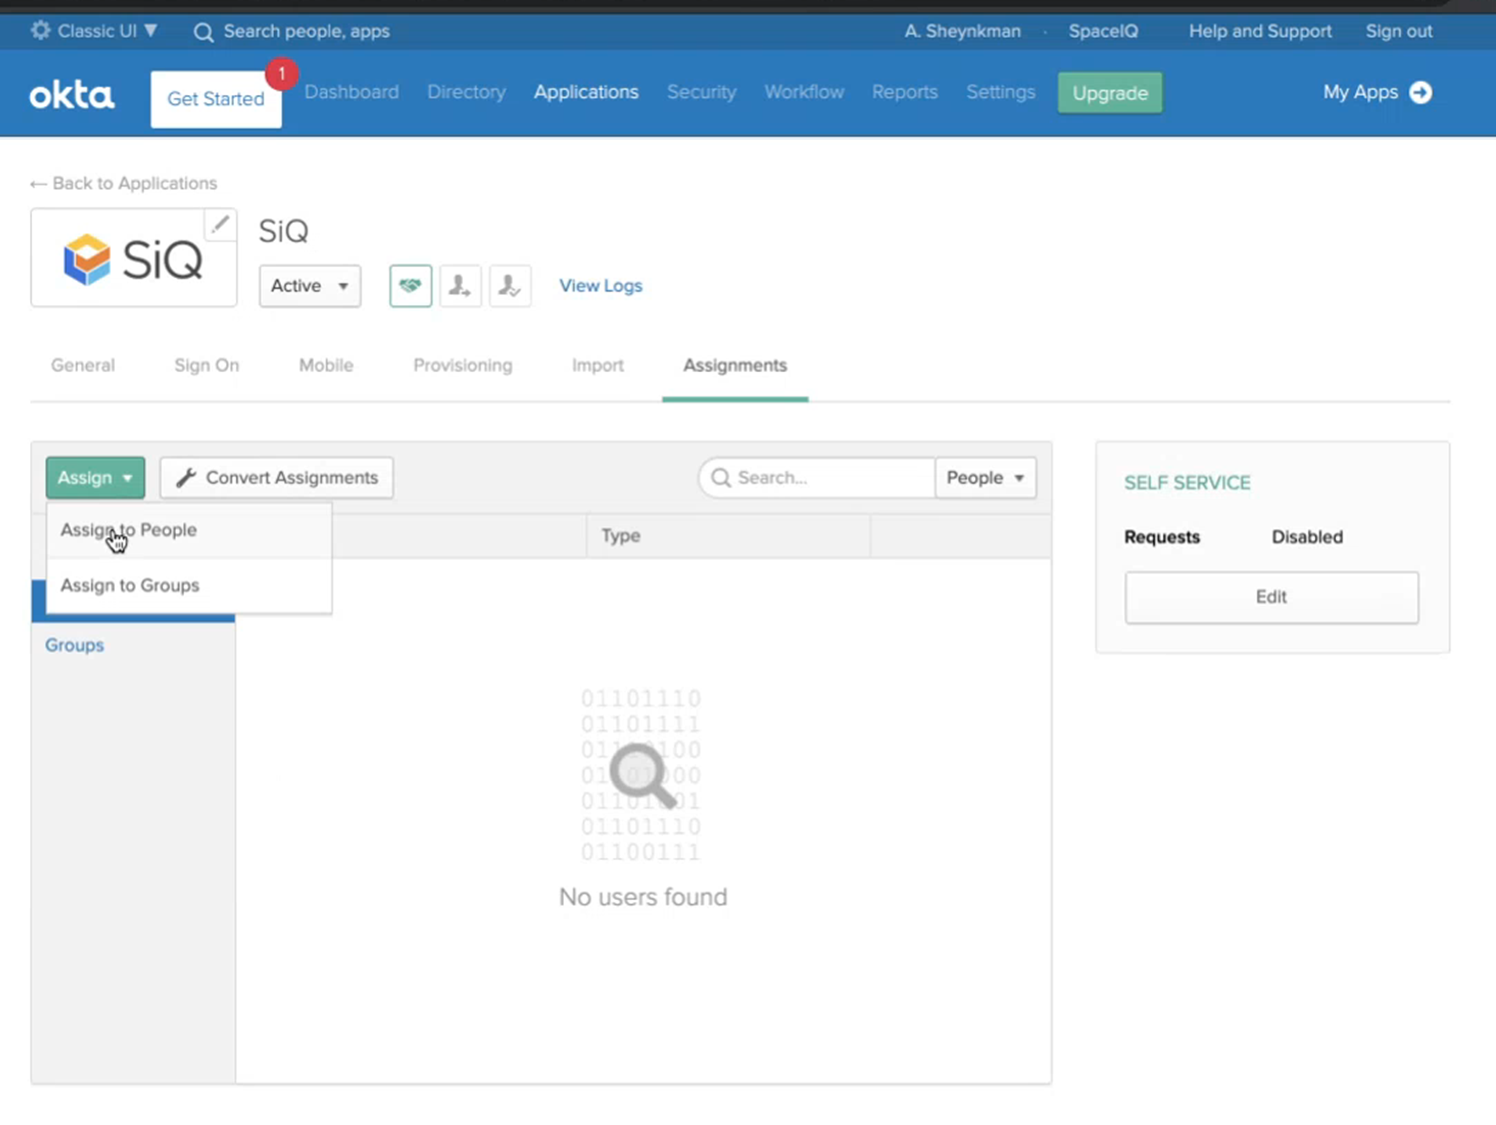
After assigning people or groups, your users can log in to the SpaceIQ Web App.
Logout Redirect
When a user logs out of the SpaceIQ Web App, they can be redirected back to the user's home page. To configure the logout redirect, an administrator must configure the domain URL in the SSO configuration property with the user's home page value.
From the SpaceIQ Web App's Okta Integration, complete the following:
- Click the SSO tab.
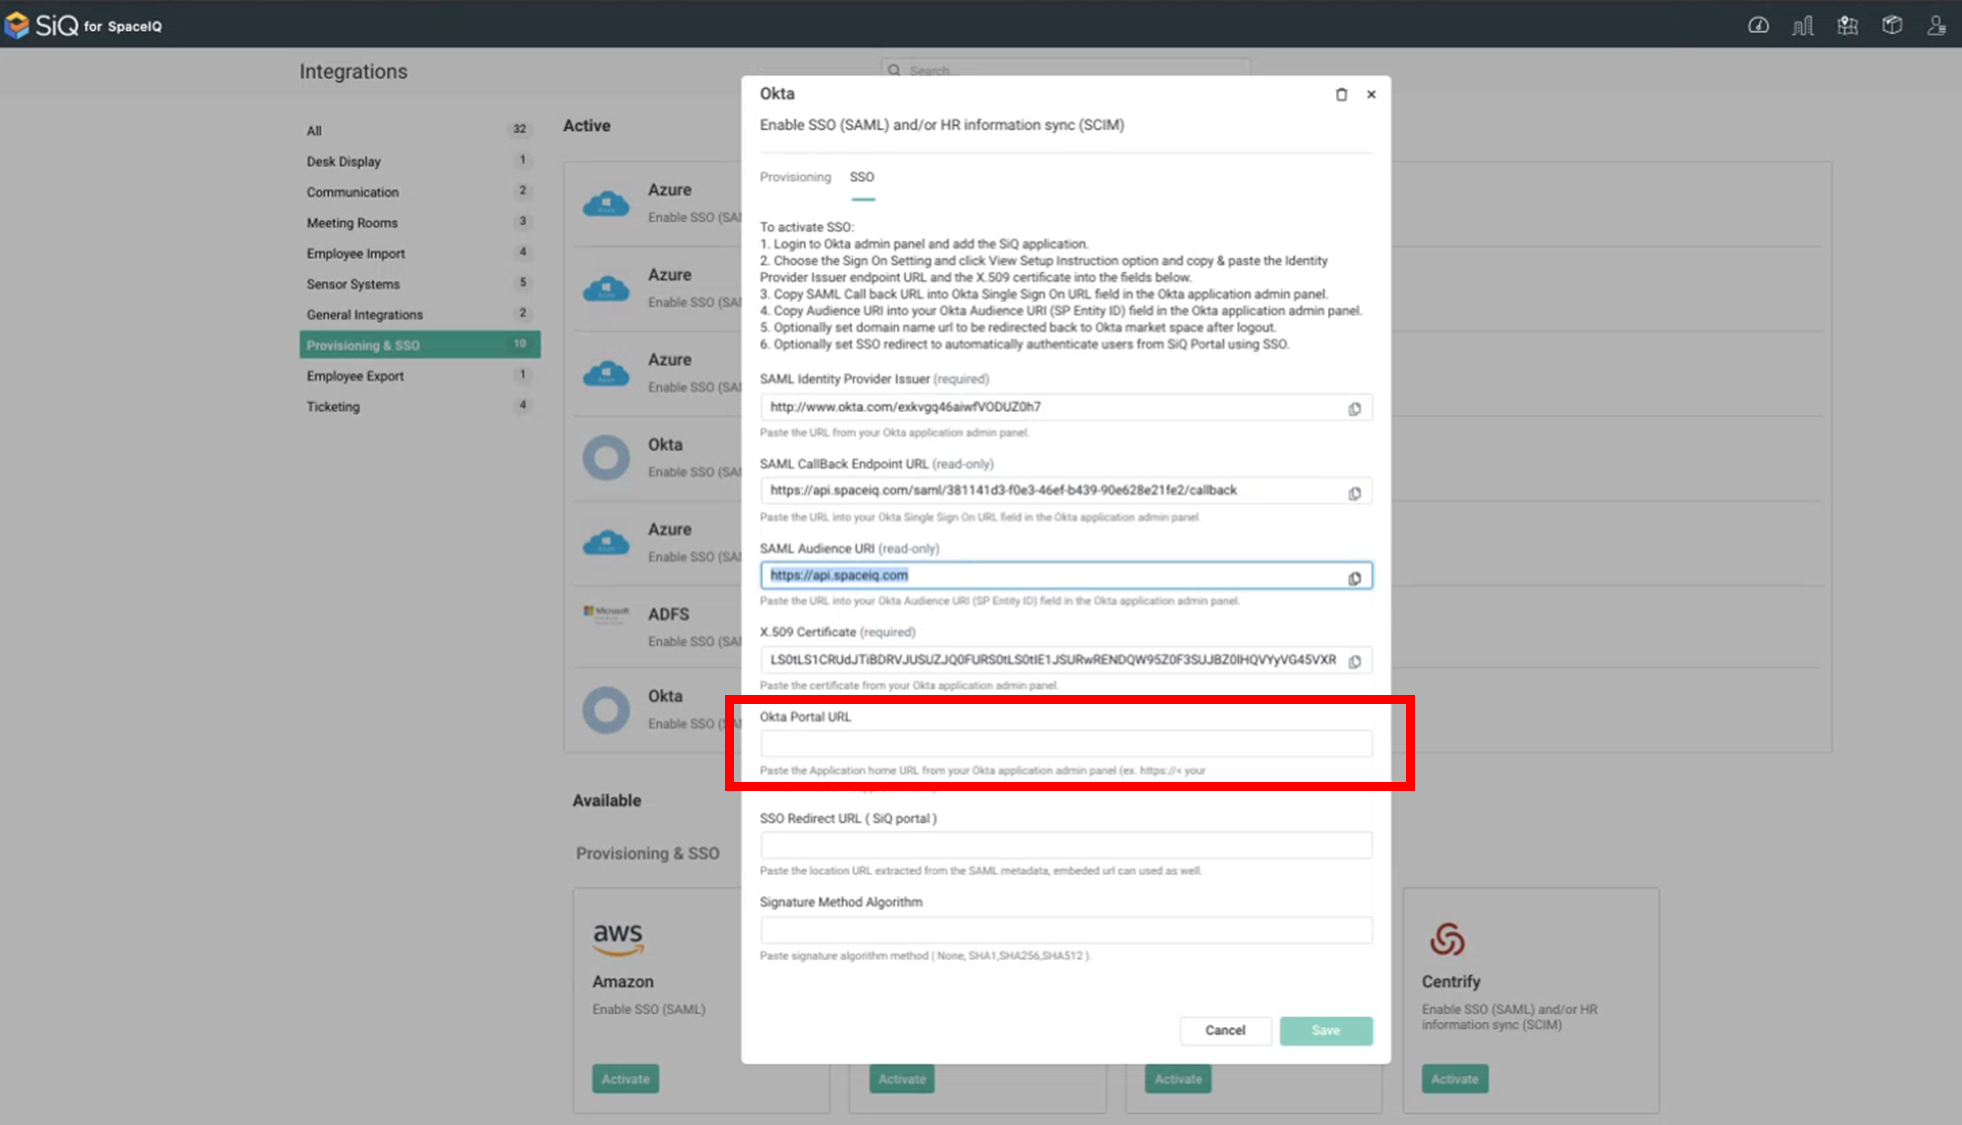
- In the Okta Portal URL field, enter the URL.
Example:
https://<yoursubdomain>.okta.com/app/UserHome
- Click the Save button.
SpaceIQ Login Flow (SP-initiated Login)
SpaceIQ also supports login SSO authentication initiated from inside the SpaceIQ Web App. The operation typically occurs when a user lands on the SiQ Web App without signing into the application first.
In order to configure SP-initiated login an admin must set the redirect URL to Okta portal.
Step 1. Copy either the Embedded Link or the URL in the Identity Provider Metadata from Okta
The URL can be obtained from two different sources:
- Embedded Link
- Identity Provider Metadata Location
Embedded Link
From Okta, complete the following:
- Click the Applications menu.
- In the Search field, search for the SpaceIQ app.
- Click the SiQ app to open it.
The SpaceIQ App screen displays.
- Click the General tab.
- Scroll down to the screen to the App Embed area.
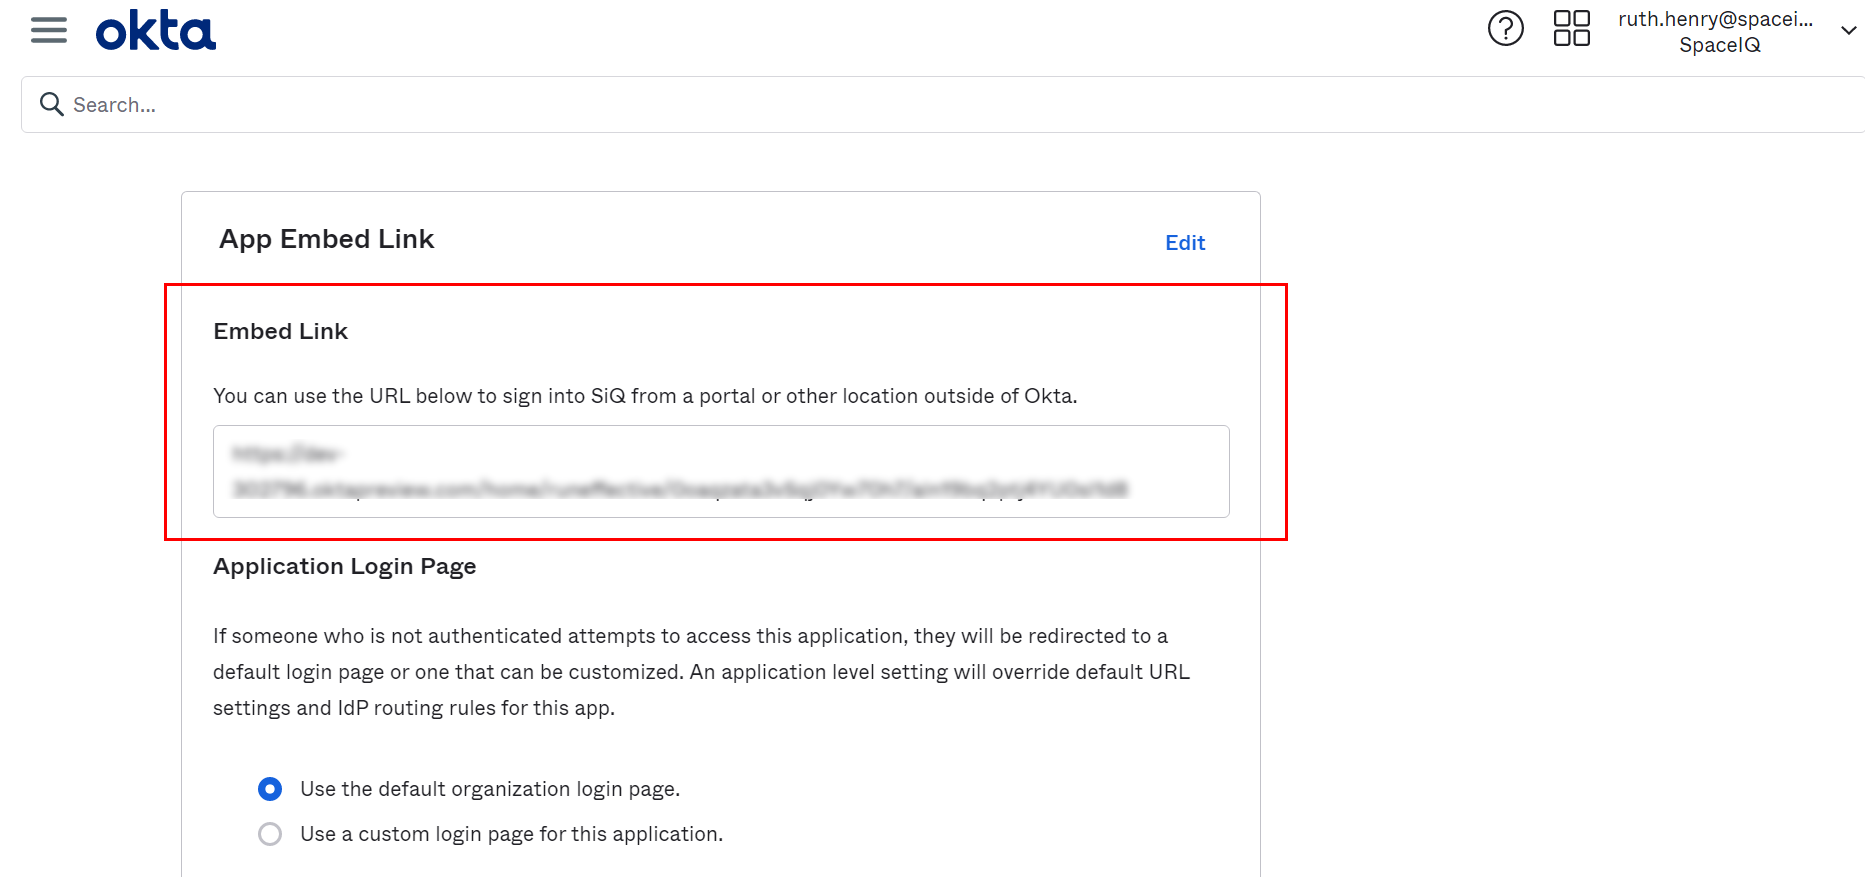
- Copy the Embed Link URL.
Go to Step 2 below.
Identity Provider Metadata
In order to obtain the location URL from metadata, an Okta admin should again log in and
From Okta, complete the following:
- Click the Applications menu.
- In the Search field, search for the SiQ app.
- Click the SiQ app to open it.
The SiQ App screen displays.
- Click the Sign On tab.
- Scroll down to the Identity Provider Metadata area.
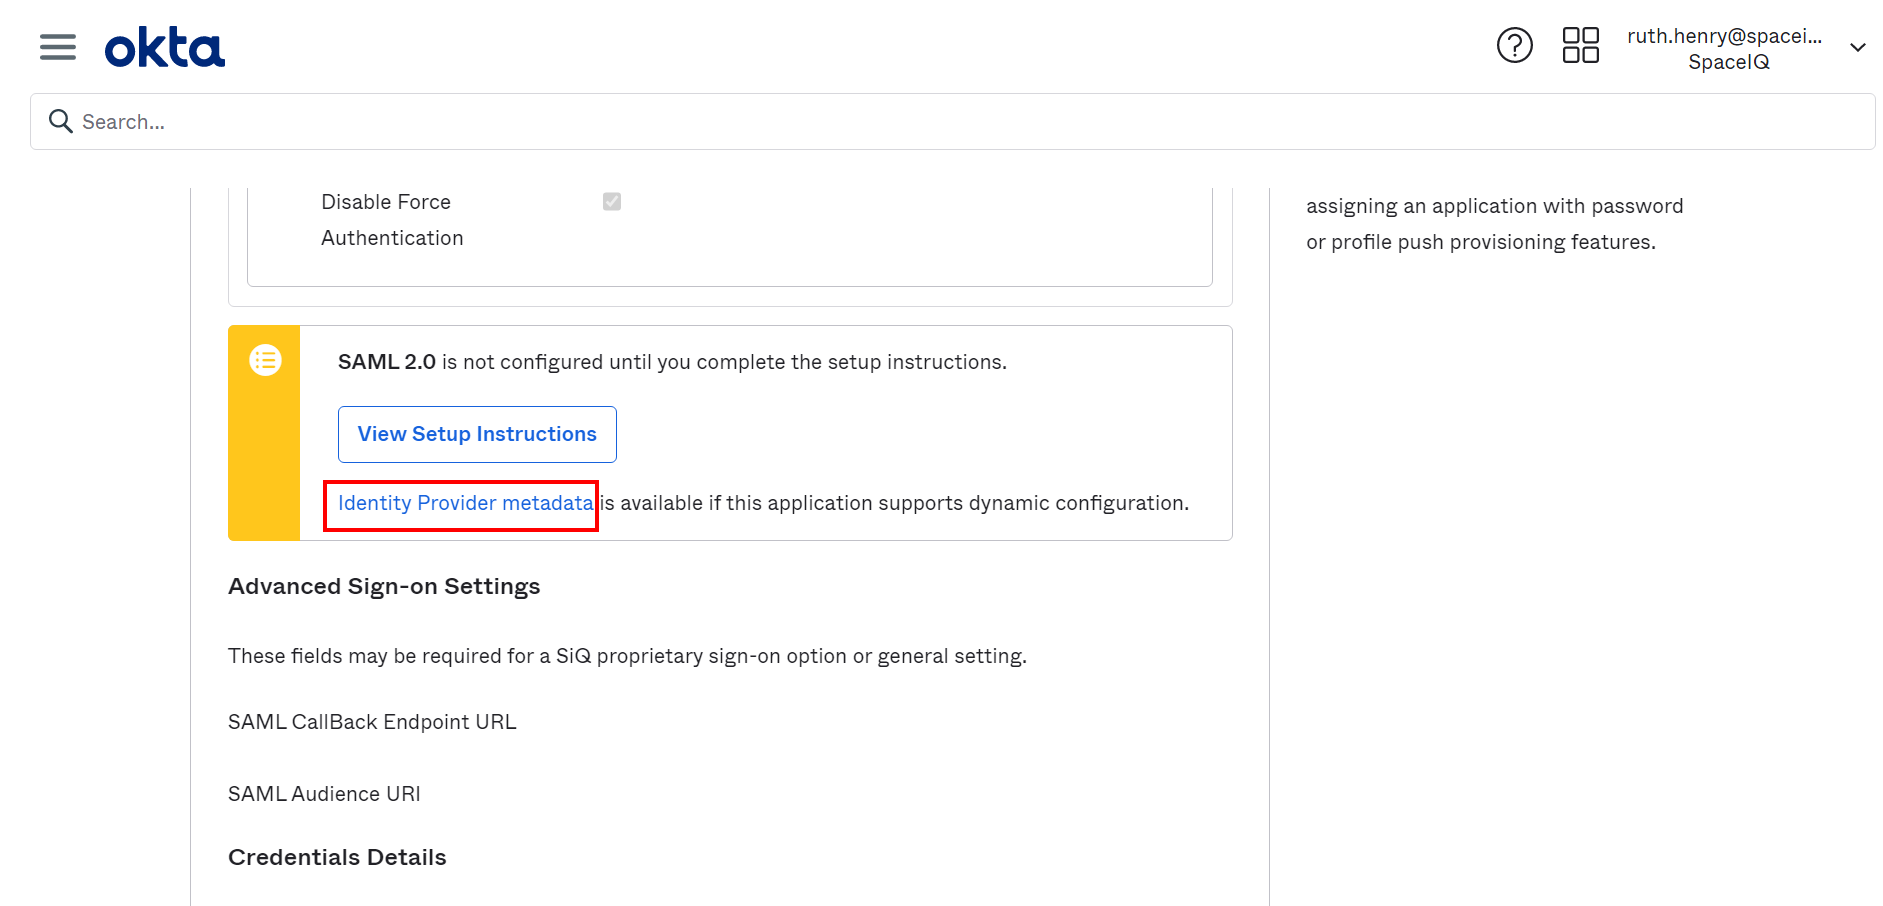
- Click the Identity Provider link to display the XML metadata.
- Locate the URL, and look for the line with SingleSignOnService, with an HTTP-POST method.
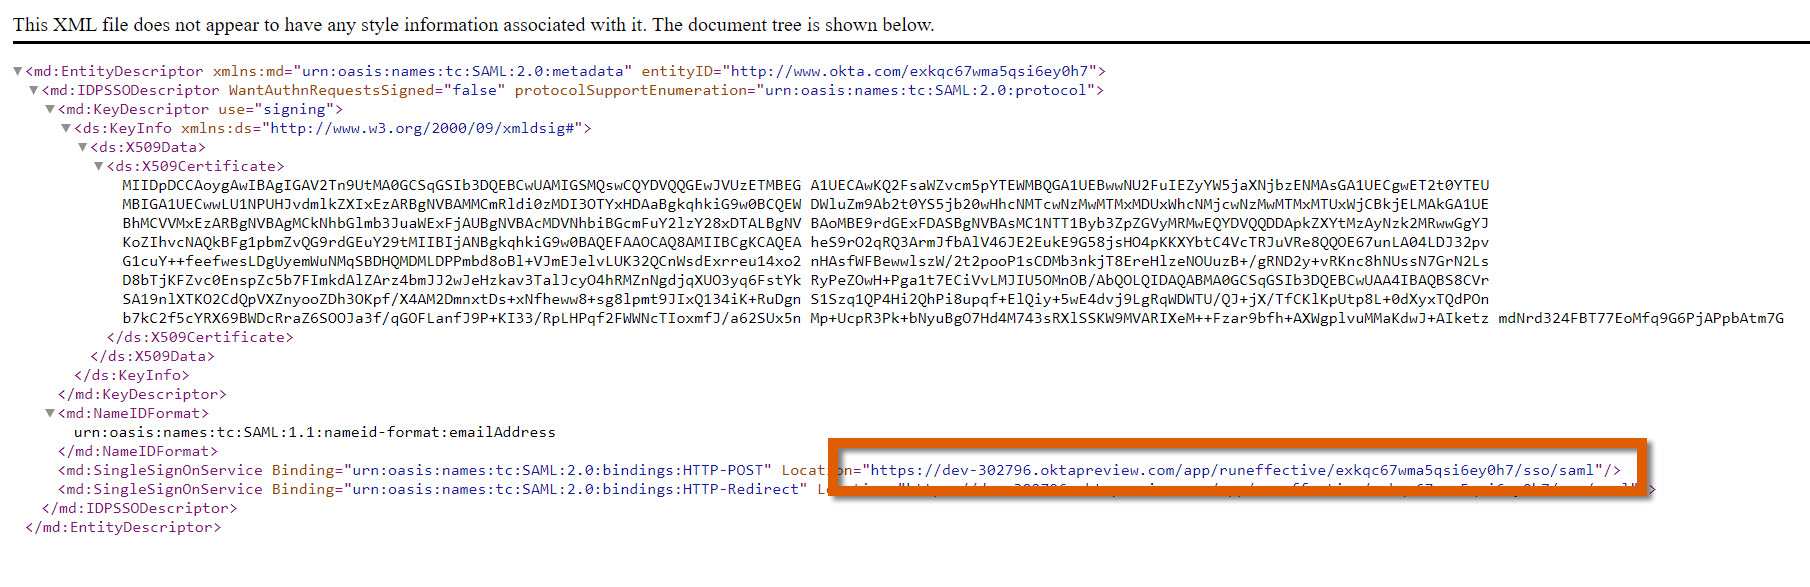
- Copy the URL.
Go to Step 2 below.
Step 2. Paste the URL into SpaceIQ's Okta Integration
From the SpaceIQ Web App's Okta Integration, complete the following:
- Click the SSO tab.
- In the SSO Redirect URL field, paste in the URL.
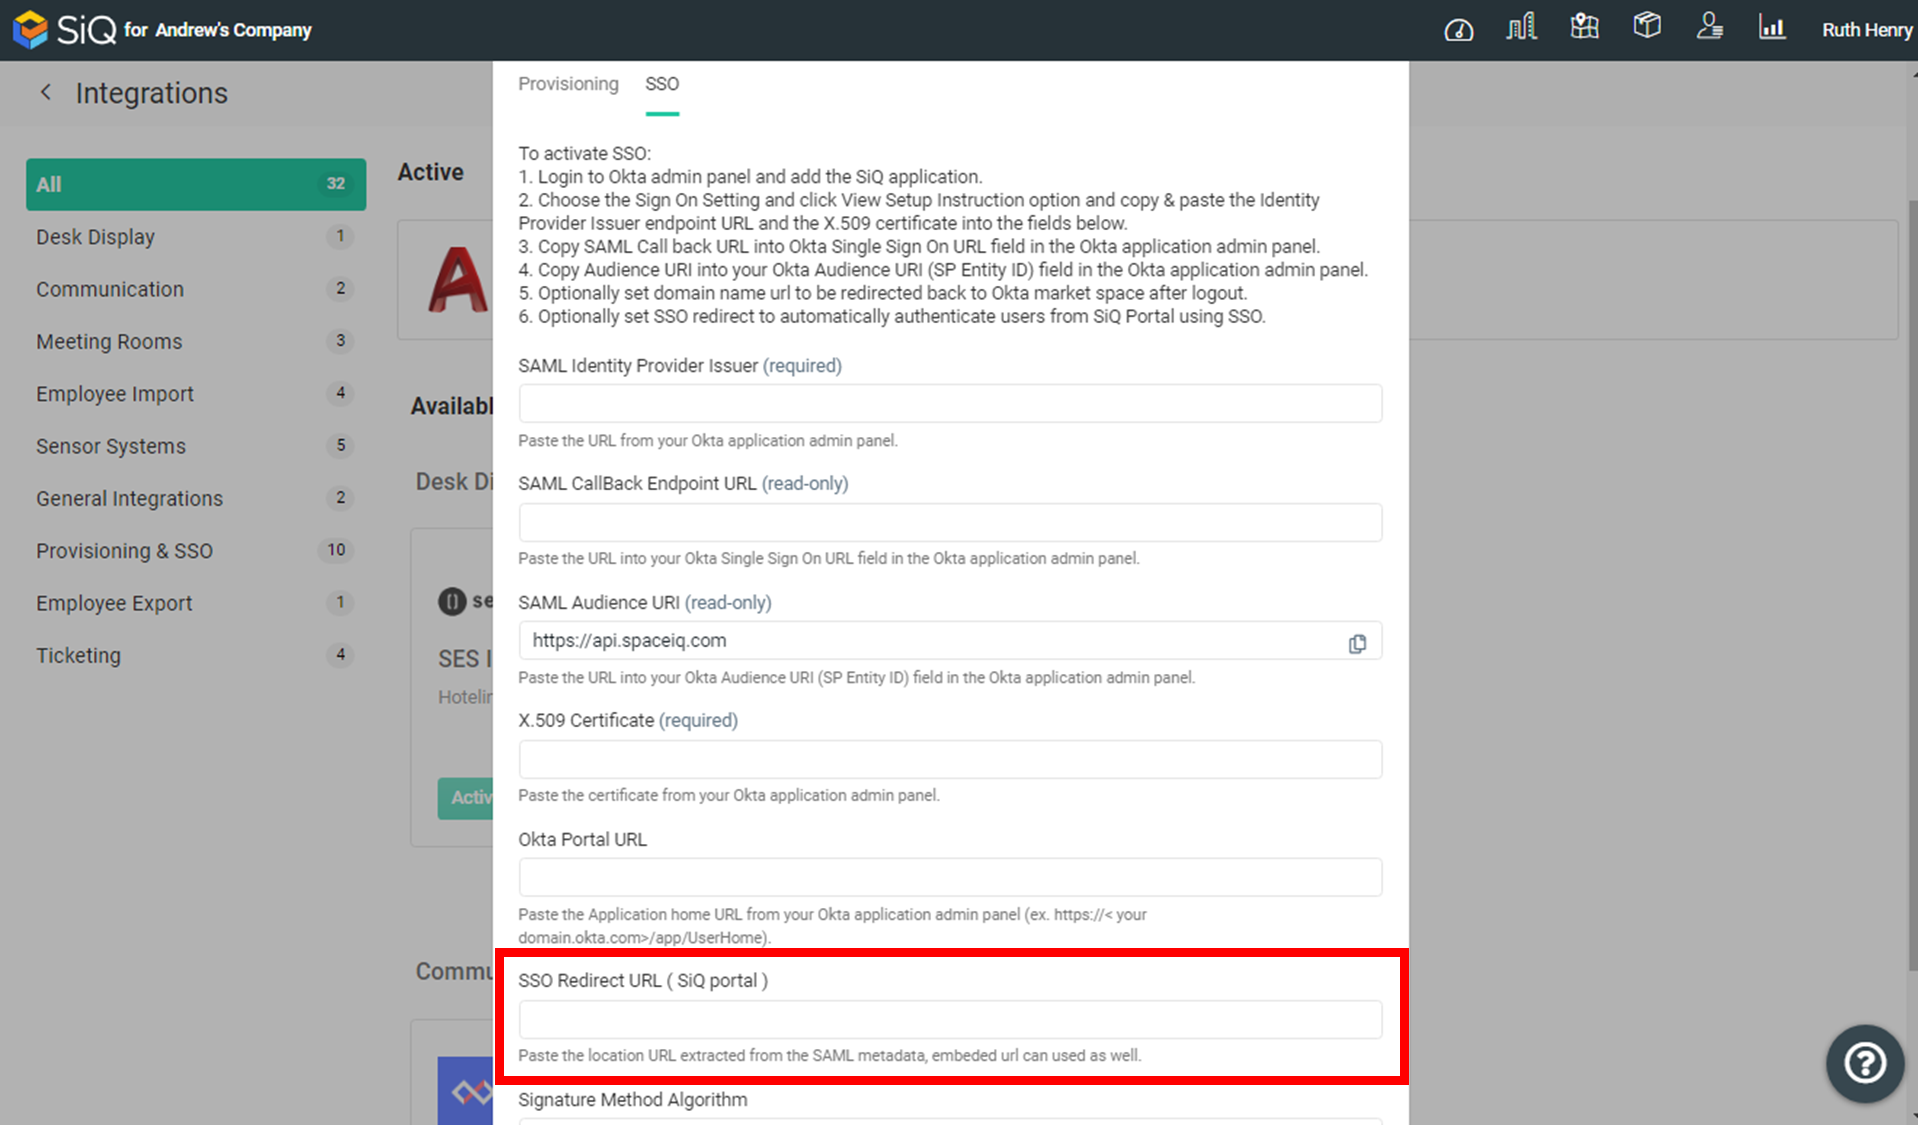
- Click the Activate button.
Attribute Mappings from SpaceIQ to Okta User Profile
As shown in the Okta Universal Directory (UD) Profile Editor, the base profile Okta imports from SpaceIQ consists of 20+ attributes. Some of these attributes are mapped to the Okta user profile by default.
Custom Attributes
Okta's SpaceIQ application has been enhanced to support user-defined custom attributes, which enables Okta to import more than 20 attributes to SiQ.
These attributes must be created and mapped manually in Okta and then define the Custom Field Name mappings in the SpaceIQ app. The recommended mappings from SpaceIQ to Okta are preconfigured in SpaceIQ's base profile. See Okta Custom Attribute Mapping.
Troubleshooting Tips
Users without a First Name, Last Name, or Department in their SpaceIQ profiles cannot be imported to Okta as new users.
In the event that a department also has teams (sub-departments), SpaceIQ expects Organizations/Divisions that contain top-level organization and department details also to contain the Team Name. For example:
| Organization: Engineering with Department: QA |