Wayfinder profiles and settings
The Wayfinder profiles and settings are configured in the Eptura Engage web app. Some settings apply globally to all Wayfinders in your organization, while others are saved to profiles that can be applied to one or more Wayfinders.
Contents
About Eptura Engage Wayfinder settings
The Wayfinder can display both booked meeting spaces and available meeting spaces, or just the meeting spaces that are booked. The Wayfinder display is customizable, so you can choose what information to display, the column order, and how many meeting spaces to display on each page before showing the next page or toggling to a website of your choice. You can also enter text to display in the ticker tape that scrolls across the bottom of the screen.
After a profile is created, you can add directional arrows to help direct guests to the meeting spaces from the Wayfinder.
Two views are possible - the Availability list and the Meeting list. Both views show the check-in status and details of the next bookings, and a green tick indicates meetings that are in progress:
Availability listShows available meeting spaces and the booking details of booked spaces. |
Meeting listShows only booked meeting spaces and the booking details. |
|
|
|


Create or edit a Wayfinder profile
Wayfinder profiles are created and managed in the Eptura Engage web app.
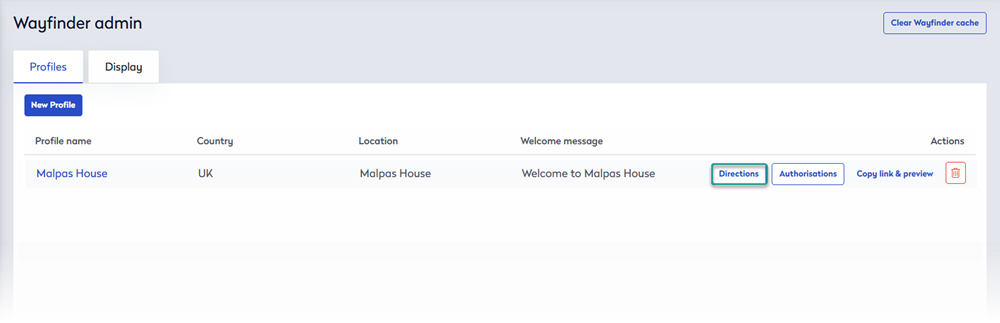
- Sign in to Eptura Engage on the web and go to Advanced setup > Wayfinder admin.
- From the Profiles tab, you can create a new profile or edit an existing profile.

- Create a new profile: Click the New Profile button above the list of profiles.
- Edit an existing profile: Click the profile name in the list.
- Set the options for the Wayfinder profile as described below.

- Profile name and location:
Profile setting
Description
Profile name Enter a unique name for the profile. Country Select the Country where the meeting spaces to display on the Wayfinder are located. Location Select the Location where the meeting spaces to display on the Wayfinder are located. Group Select the Group(s) that manage the meeting spaces to display. Multiple groups can be selected. Floor Select the Floor(s) where the meeting spaces are located. Multiple floors can be selected. Note: the name of the group precedes the floor names - hover over the names in the list to show the full group name and floor name/numbers. - Language and settings:
Profile setting
Description
Language n/a - The Wayfinder currently only supports the English language irrespective of the selection made here. Style Select if the Wayfinder displays either a Meeting List or an Availability list:
- Meeting list: Displays a list of all bookings for the selected location, group(s), and floor(s) in the time period defined by the ‘Time’ option below.
- Availability list: Displays all meeting spaces for the selected location, group(s), and floor(s) and their availability during the time period defined by the 'Time' option below.
Time Select how far ahead to display bookings or meeting space availability (as defined in the 'Style' option above). You can choose from 15 minutes up to a maximum of 10 hours. Note: The 'Show next meeting' global display setting is unaffected by this setting and if enabled, will always show the next booking regardless of the Time setting.
Time format Select the time format to display on the screen. Select either 12 hours (AM/PM) or 24 hours.
Meeting spaces displayed per page Select how many bookings or meeting spaces to display on one page. Select a value from 1 to 30.
Refresh the screen every Select the number of seconds to display a page before the next page is shown. Select a value from 5 to 30 seconds (in 5-second intervals).
Query the database every Select the amount of time before data is cleared and refreshed from the database. Select either 1, 3, 5, 10, 15, or 20 minutes. After this time, cached data is discarded and fresh data is received from the database.
- Ticker tape message:
Enter text to scroll across the bottom of the Wayfinder. Separate messages with ' | ' - additional messages will show when the previous message has scrolled off the screen.
- Display order on screen:
The table at the bottom of the profile shows the information that is displayed on the Wayfinder.
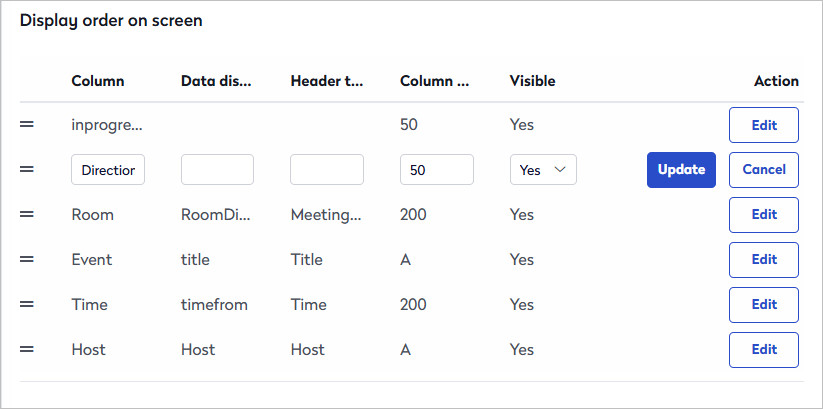
Change the column order: Click and drag the icon on the left of each entry in the table to change its position in the list. Each row in the table displays as a column on the Wayfinder display in the order displayed in the table.
Click Edit to change how and what information is displayed and then click Update to save. The following information is available:
- Column: Lists the information that can be displayed on the Wayfinder. DO NOT EDIT (see values below).
- Data displayed: The name of the data field in the database. DO NOT EDIT (see values below).
- Header text: Column headers are disabled by default. Contact support if you want to add headings above each column on the Wayfinder display.
- Column width: Increase or decrease the width of the column on the Wayfinder. Set 'A' to automatically calculate the width based on the information in other columns and the screen resolution.
- Visible: Select 'Yes' to show the information as a column on the Wayfinder or 'No' to hide it.
The values in the 'Column' and 'Data displayed' columns must not be edited. The correct values for these entries are:
'Column' values
'Data displayed' values
inprogress
[blank] Direction
[blank] Room
RoomDisplayName Event
title Time
timefrom Host
Host
- Profile name and location:
- When you have finished editing, click Save to save the profile.
- When the profile is saved, click Clear Wayfinder cache at the top of the Wayfinder admin page - this ensures any Wayfinders already using the profile are updated as soon as possible.

Delete a profile
Sign in to Eptura Engage on the web and go to Advanced setup > Wayfinder admin.
From the list of profiles on the Profiles tab, click the bin icon for the profile you want to delete.
Set the direction of meeting spaces from the Wayfinder
When your profile is saved, you can add directional arrows to help direct guests to the meeting spaces from the Wayfinder.
- Sign in to Eptura Engage on the web and go to Advanced setup > Wayfinder admin.
- From the list of profiles on the Profiles tab, click the Directions button to add directional arrows to the meeting spaces included in the profile.
- The meeting spaces in the location and groups set for the profile are displayed. For each meeting space, click the Symbol drop-down and select the appropriate directional arrow to display next to the meeting space on the Wayfinder.
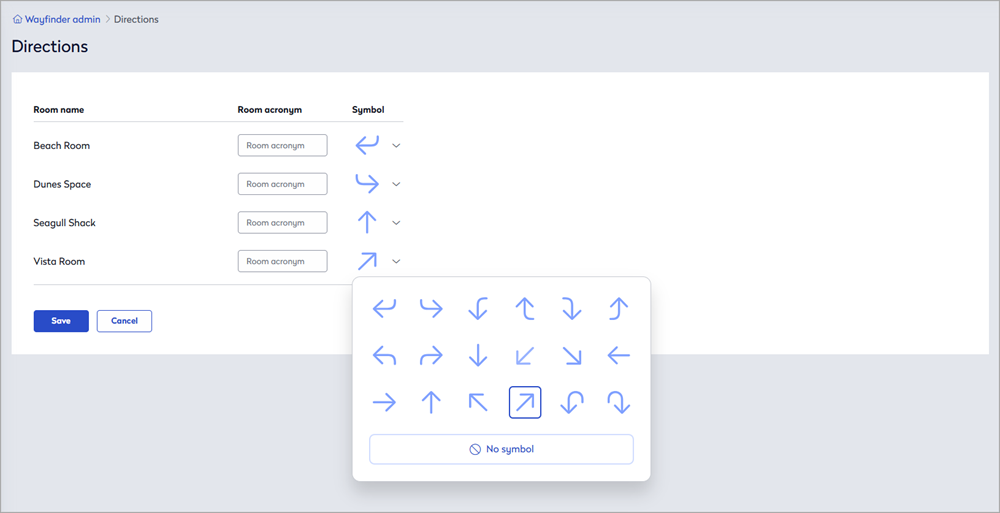
- Click Save when done.
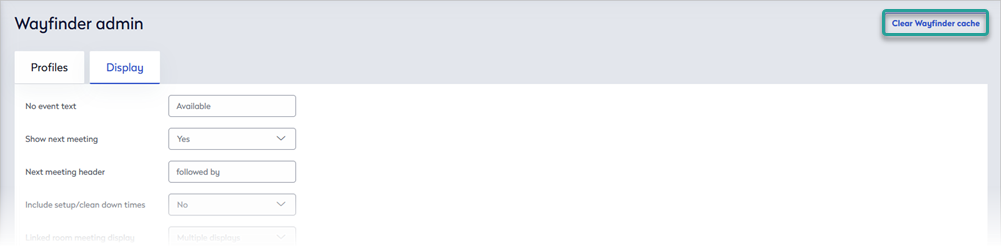
Global display settings
Global display settings enable further customizations and standardize the way information is displayed across all the Wayfinders in your organization.
- Sign in to Eptura Engage on the web and go to Advanced setup > Wayfinder admin.
- Click the Display tab: the settings on this tab are applied to all the Wayfinders in your organization.
- Set the options as described below.

Global setting
Description
No event text
Enter the text that indicates a meeting space is available.
Suggested value: Available.
Show next meeting
Select Yes to show details about the next booking that follows a booking in a meeting space.
Note: This is not restricted to the 'Time' value set in the profile. If the 'Show next meeting' setting is enabled, then the next booking in the day is always shown, regardless of how far ahead it is.
Select No if you do not want to show details about bookings that follow bookings.
Next meeting header If 'Show next meeting' (above) is enabled, enter the text to precede the details of the next booking.
Suggested value: next meeting or followed by
Include setup / clean down times Select Yes to include the setup and clean down times for the meeting space (if set) in the displayed booking information.
Select No to show the start and end times of the actual booking.
Linked room meeting display Select Single to only show the primary meeting space for a linked meeting space booking.
Select Multiple to show all the linked meeting spaces for a booking.
Event column text transform Select Trim to truncate the text displayed in the Event column to the length specified in the 'Truncate event name after' option below.
Select Wrap to set word wrapping on the Event column based on the width specified in 'Event name wrap width' option below.
Truncate event name after
If 'Event column text transform' (above) is set to 'Trim', enter the maximum number of characters to display before the 'Truncation indicator' (below) is shown.
Note: The value is numeric and includes the number of characters in the 'Truncation indicator' (below).
Truncation indicator
If 'Event column text transform' (above) is set to 'Trim', enter the characters to append to the Event text when it is truncated.
Recommended value is an ellipsis (three dots): ...
Note: The number of characters entered here is included in the numeric total set for 'Truncate event name after' (above).
Event name wrap width If 'Event column text transform' (above) is set to 'Wrap', enter the maximum number of characters to display on each line before wrapping to the next line.
Touchscreen idle time This option is no longer supported.
Display splash screen Select Yes to periodically display a website (of your choice) periodically on the screen. Set the website to display in 'Spash page URL' below.
Select No to only display meeting space information on the screen.
Display splash after If 'Display splash screen' is enabled, enter the number of seconds before the selected website is displayed. Display splash for If 'Display splash screen' is enabled, enter the number of seconds to display the selected website before returning to the meeting space information. Splash page URL If 'Display splash screen' is enabled, enter the URL of the web page to periodically display. - Click Save when done.
- When the profile is saved, click Clear Wayfinder cache at the top of the Wayfinder admin page - this ensures any Wayfinders already using the profile are updated as soon as possible.
Display your logo and background
Contact support to find out how to display your own logo and background on the Wayfinder.
Supported dimensions: Logo 230px x 55px | background 1920px x 1080px.