Coming soon!
User group access and Anchor points are expected mid-June 2026
About User group access, Preferential booking windows, and Anchor points
User groups and User group access enable you to apply specific booking permissions and preferential booking windows to groups of users for selected resource groups, overriding the default settings configured for those resources in the resource group.
In addition, if Intelligent Booking is enabled for your organization - the order of the resource groups in the user group's access list determines their priority when Intelligent Booking automatically selects a space for a member of the user group, and Anchor points can be assigned to each resource group within a user group to automatically guide bookings to the same area on a floor. This helps ensure users are consistently placed in nearby or relevant spaces to their team members. Learn more: Intelligent Booking for personal spaces
Customizing the default access permissions set for a resource group from User group access, enables you to easily configure and manage the following access exceptions for groups of users:
|
Access exception type
|
Resource group settings
|
User group settings
|
Description
|
| Exclusive access |
❌ No access (restricted group) |
✔️ Can book |
Only user group members can book spaces managed by the resource group. |
| Excluded access |
✔️ Can book (open group)
|
❌ No access |
Blocks user group members from booking spaces managed by the resource group.
|
| Preferential access |
🕛 Can book 1 day in advance (example)
|
📅 Can book 2 weeks in advance (example) |
Provides user group members preferential access to book personal spaces managed by the resource group.
|
User groups
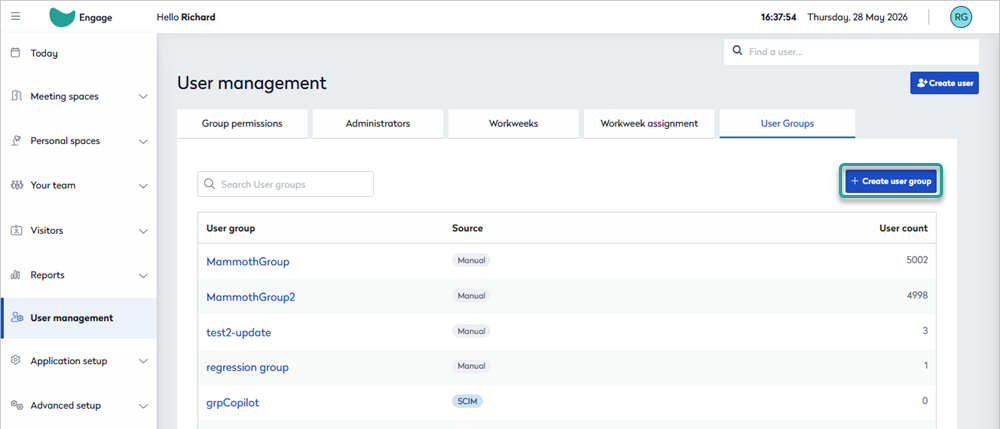
The User groups tab in User Management displays all user groups available to Eptura Engage. This includes groups synchronized from external systems - such as Active Directory (AD) via SCIM - as well as manual user groups created directly in Eptura Engage.
Create manual user groups to manage specific groups of users that are not already covered by the third-party groups, or to manage groups of users specifically for Eptura Engage workflows and booking access.
Viewing user groups
From User management > User groups, you can view all user groups available to Eptura Engage, including those synced from external directories (such as Active Directory), and to create custom groups as needed.
The user group list shows all visible user groups regardless of whether they are being used by Eptura Engage, so the list can be extensive.
- Sign in to Eptura Engage as a Global admin and go to User management.
- Select the User Groups tab to view the available user groups. The list shows where the group originated from (source) and the number of group members (user count). To quickly find a specific group, you can enter its name in the Search box.

- Click a user group in the list to open the side panel and view more details.
- Externally sourced user groups - Third-party user groups are read-only - the member list is displayed in the side panel but the group name and group membership cannot be edited.
- Manual user groups - User groups created in Eptura Engage can be edited (or deleted) via the side panel - you can edit the name of the group and add/remove users from the group.

Creating and editing a manual user group
 |
Eptura platform services
If your organization is using Eptura's platform services, it is not possible to create a manual user group from Eptura Engage - manual groups are created in the Eptura Directory.
Learn more
|
Create a manual user group to manage groups of users exclusively for Eptura Engage workflows and booking access. User groups created in Eptura Engage are not synchronized with external systems.
- Sign in to Eptura Engage as a Global admin and go to User management.
- Select the User Groups tab and either click an existing manual group to edit or click Create user group to create a new manual user group.
- In the user group side panel, enter or edit the group name.
- Adding members - Start entering the user's name in the Search box and tick the check box against their name when it appears. Continue to select users until all members have been added. Note - you might not see the user list in full until you save the group or save the changes.
- Removing members - Users who are members of the group are listed in the side panel. Untick the users to remove from the list. The users are removed when the changes are saved.

- Click Save changes if editing an existing group, or Save group when creating a new user group.
User group access
User group access allows you to:
- Override a resource group's default access settings for a specific user group (allow or deny access to resources).
- Override a resource group's booking window for personal spaces, for a specific user group (days and times resources can be booked).
When Intelligent Booking is enabled, you can also:
- Set the priority order of resource groups for Intelligent Booking.
- Set anchor points on resource groups to guide Intelligent Booking to an area on a floor.
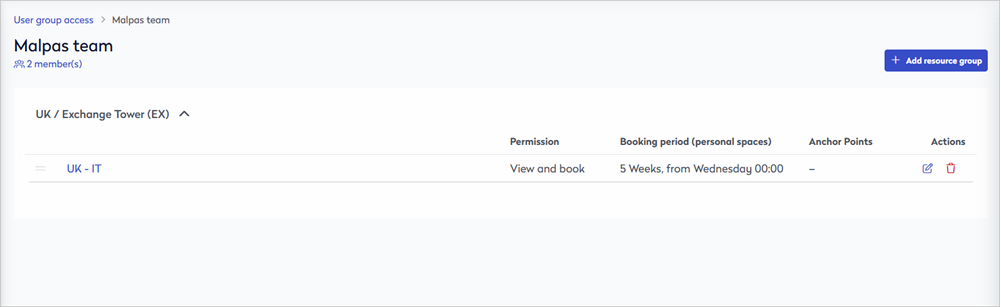
A user group can be granted or denied booking permissions to resource groups (groups that manage the booking rules for assigned resources) and a custom booking window for personal spaces can be set for each resource group. Multiple resource groups can be added to a single user group and each one can have different booking permissions applied.
The user groups list shows the resource groups added to each user group. The permissions applied to each resource group - whether customized for the user group or inherited from the default settings - indicate whether booking access is allowed (green) or denied (red).

Managing user group access to resource groups
From Application setup > User group access, you can view and manage user groups and the resource groups explicitly allowed or denied for each group, set anchor points for Intelligent Booking, and set custom booking windows for personal space resources.
- Sign in to Eptura Engage as a Global admin and go to Application setup > User group access to edit or assign access to resource groups.

- Click Assign access to open the side panel and assign a user group access to a resource group, and set a custom booking window. To edit an existing group, click the user group name - you can filter the list of groups by entering a group name in the Search box.

- User group - Start typing the name of a user group, then select it from the list. User groups that have already had access configured are not available to select.
- Country - Select the Country where the resource group manages spaces.
- Location - Select the Location where the resources for this particular user group are located (a resource group can span multiple locations but only one country).
- Resource group - Select the resource group to assign access permissions for.
- Anchor points - See Anchor points below.
- Permission - The default permissions set for the resource group are shown above the Permission section. Tick the check box to expand the access settings and override the defaults by enabling/disabling the options - View, Book, View others' bookings, Edit others' bookings, Delete others' bookings.

- Booking period - The default booking period for the group is shown above the Permission section. To set a preferential booking window for the user group, tick the check box to expand the section and override the default settings - set the number of days or weeks that spaces can be booked in advance, and select the day and time that the next booking window opens. The booking period is only relevant to personal spaces managed by the resource group (not meeting spaces).
- When done, click Assign access to save the settings for the resource group and close the side panel.
- The user group is displayed, showing the added resource group(s) along with the assigned access and booking window. If Intelligent Booking is enabled, the number of anchor points is shown (if set). To edit the settings for a resource group, either click the resource group name or click the edit icon on the right.
- Click Add resource group to add another resource group and follow the steps above to customize the settings for the user group.
If resource groups from multiple countries or locations are added, they are displayed in the list, organized into sections by country and location.

Prioritizing resource groups for Intelligent Booking
When a user group contains multiple resource groups in the same location, you can order them appropriately to prioritize the groups Intelligent Booking searches when automatically booking personal spaces.
Resource groups can only be prioritized within a single location - you cannot prioritize groups across countries or locations.
To change the order, drag the icon to the left of a resource group up or down to reposition it in the list.

The drag icon is not displayed if Intelligent Bookings is not enabled.
To return to the list of user groups, click the User group access navigational link at the top left.
Anchor points
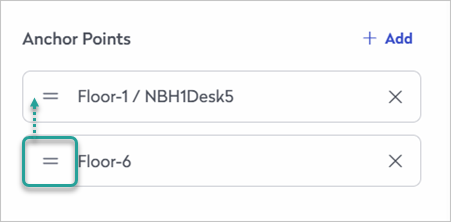
Add an Anchor point for each resource group in the user group that manages personal spaces. The anchor point can be applied to an entire floor or to a specific personal space that is then used as the nodal point for Intelligent Booking. Intelligent Booking uses the anchor points to book the best workspaces for members of the user group, ensuring they are all working in the same area.
- Sign in to Eptura Engage as a Global admin and go to Application setup > User group access.
- Click a user group to view the list of added resource groups.
- Click a resource group or click the edit icon on the right to open the side panel.
- In the side panel next to Anchor Points, click Add to expand the section.

- Select the floor for Intelligent Booking to prioritize.
- Optional - select a personal space for Intelligent Booking to use as the nodal point to focus bookings around.
- Click the Add button to save the anchor point.
- Continue to add anchor points for different floors if required - only one anchor point can be set for each floor. When you have multiple anchor points, drag them up or down the list to set a priority order for Intelligent Booking.
- Click Save changes when done.
|