Group permissions
About Group permissions in User management
The permissions applied in Group Administration (Application setup > Group) that enable or restrict booking actions for the resources - such as making bookings, viewing, or editing other user's bookings - can be overridden for specific users by applying explicit group permissions from the User Management module.

Group permissions tab in user management
By default, all users can perform the actions applied to a group in Group Administration. User Management allows individual users to override a group’s default permissions by setting alternate permissions specifically for them.
Example
A meeting space might be for the sole use of a project team. In this case, it is managed by a group with the Make bookings permission disabled (a restricted group), preventing all users from booking the space by default.
To grant access, project team members are added to the restricted group (via User management > Group permissions) and given the Make bookings permission, overriding the group’s default restriction.
The meeting space is only visible to members of the restricted group.
Contents
View resource group permissions
View the permissions set for a resource group from the Group permissions tab in User Management - select the Country and Location (as required) then select the resource group from the Group drop-down list.
Resource groups are nested under Open Groups or Restricted Groups as appropriate.
The default access permissions for the resource group are displayed. (Default access to book resources is set for the resource group in Group admin).

Users who have been granted access exceptions to a resource group (to override default permissions) are listed in the table below.
If the group manages both meeting space and personal space resources, you can switch between the tabs to view the permissions applied for each resource type.
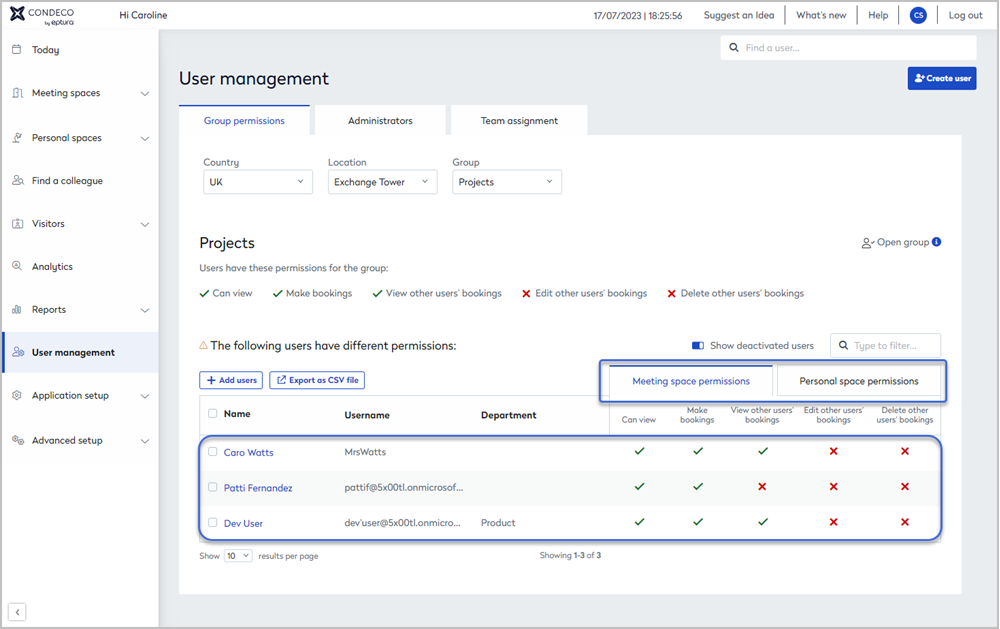
Granting individual users access exceptions to a resource group, allows you to apply different permissions for meeting spaces and personal spaces within the same group. Use the tabs to switch between them.
Grant users access exceptions for a resource group
Add a user to a resource group to provide different permissions from the default group permissions. By adding a user to a group, you can enable or disable specific actions for that user.
Up to 20 users can be applied to a resource group at a time.
- From the Group permissions tab in User Management, select the location and group from the drop-down lists.
- Click + Add users. Enter the name of the user in the search box and continue adding users (up to 20) then click Continue when done.

- Select the required permissions for the selected users and click Continue. If the group manages both meeting spaces and personal spaces, you will see permission options for each space type, enabling you to select different permissions for each type.

- If a selected user has conflicting permissions, for example, if they are an administrator of the group, a Group Permissions error is displayed, and the conflicting user is not added.
- If a selected user is already listed in the group, the new permissions overwrite the previously applied permissions for that user.
Find a user added to a resource group
Use the Filter box above the table to find specific users added to a resource group. Enter a name, username, or department.

Remove users from a resource group
Remove a user from a resource group to reapply the default group permissions.
- Tick the check box to the left of the user(s) you want to remove from the group.
- Click Remove (#) from this group button (the button is only visible when at least one user is selected).

The default group permissions now apply to the removed user(s).
Copy users to another resource group
- Tick the check box to the left of the user(s) you want to add to another group.
- Click Add (#) to another group (the button is only visible when at least one user is selected).

- Select the Country, Location, and Group you want to add the user(s) to, then click Continue.
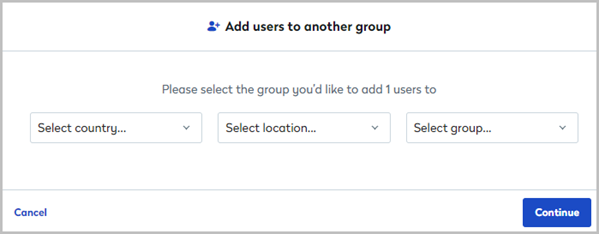
- Select the required permissions and click Continue.

- Review the notice and click Add.
Export to a CSV file
To export all users in the table to a CSV file, click the Export as CSV file button above the table. Note that the button is only displayed when none of the user check boxes are ticked.
