Office 365 Calendar Integration
This article will show you how to integrate your Office 365 Calendar with Teem.
If you use Office 365 for your calendar integration with Teem, then complete these steps before January 31st, 2025 to prevent the integration from breaking:
- Prerequisites
- Create a user account for Teem to access the server
- Create or locate room resources to interface with Teem
- Permission for the Teem Service Account to control the Room Resources
- Connect Office 365 / Exchange to Teem
- Update an existing Office 365 Calendar Account in Teem
- Increase EWS Throttling Policy in Microsoft 365 Admin Center
Prerequisites
In order to successfully integrate an Office 365 calendar, you will need to be a Global Admin user within your Office 365 account.
If you are using a hosted Exchange provider, you may need to reach out to your provider for more details. Additionally, Microsoft 365 Government Community Cloud (GCC) is not supported at this time.
Create a user account for Teem to access the server
To create a user account, follow these steps:
- Sign in to your Office 365 account.
- Select the Admin tab.
- Navigate to Users.
- Click the + Add A User.
- Complete the New User information fields. We suggest creating an easily recognizable email, like teem@domain.com.
- Click the Add button.
You have now created a mailbox for our server to utilize.
Create or locate room resources to interface with Teem
If you already have Room Resources created, skip this section and jump to Changing Room Resource Settings. If you haven't, follow these steps:
- Sign in to your Admin Center, https://admin.microsoft.com/
- Select Resources. If Resources isn't immediately available, click on the Show All option at the bottom of the Admin Center menu.
- Click + Add.
- Complete the information fields.
- Click the Add button.
You have now created a room resource mailbox.
Permission for the Teem Service Account to control the Room Resources
We recommend you use Delegate Access and this acts on behalf of an authorized user with the user’s explicit permission.
Note: It is only recommended to have 10 calendars per service account to avoid throttling from Microsoft.
- From the Office 365 Admin Center, click Admin Center.
- Click the Navigation menu.

The menu displays.

- From the menu, click Show all.
The menu expands.

- Click Exchange.
The Exchange admin center displays.

- Click Resources and the resources display.

- For the room you want to change, click the room’s resource name and the Resources form displays.

- Click the (A) Delegation tab.
- Under the “Read and Manage section”, click the (B) Edit button.
The Manage delegates form displays.

- Click the Add members button.
- Add the Service Account.

- Click the Save button.
- Click the Back button and you are finished.
Connect Office 365 / Exchange to Teem
Now that you have set up access, you are ready to connect an Office 365 / Exchange account to your Teem account.
- Sign in to your Teem account.
- From the menu, click Manage > Calendars.
- Click the + Account icon.

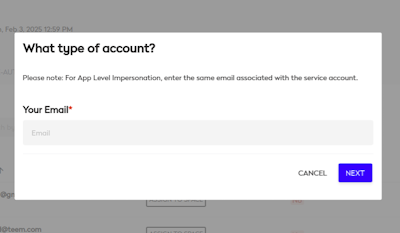
The What type of account? dialog displays.

- Select either:
- Office 365 Oauth - Full Access Delegate: For user-level access.
- Office 365 Oauth - App-Level Impersonation*: For application-level access and to use Microsoft Graph.
When App Level impersonation is selected, you are prompted to enter the service account email used for Microsoft authentication and then click the Next button to continue.
- Sign into Microsoft with the Service Account credentials.
- Click the Sign In button and the Microsoft screen displays with the "Admin Approval".
- Click the "Have an admin account? Sign in with that account" link.
- Now sign in to Microsoft with the Office 365 Global Admin credentials.

- The Permission requested screen displays, click the Accept button.
That’s it! Your Office 365 account is now integrated with Teem, and you can change Room Resource settings. You will receive an email directed to the sync account informing you of which calendars we’ve synced with.
Update an existing the Office 365 Calendar Account in Teem
- Sign in to your Teem account.
- From the menu, click Manage > Calendars and the list of calendar accounts display.
- Click a calendar account and the details display.

- Click the (A) Account Settings tab.
- Under the Account Permission Type, select the (B) Full Access Delegate option.
- (C) Click the Save button.
You have completed the update.
Increase EWS Throttling Policy in Microsoft 365 Admin Center
When you want to increase the EWS throttling policy, complete the following:
- Log into your Microsoft 365 Admin Center.

- Click the Help icon and the Help panel displays.
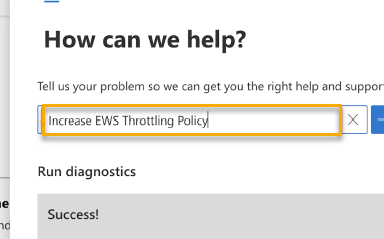
- In the Help Search, enter Increase EWS Throttling Policy and click the search icon.
The search results displays.
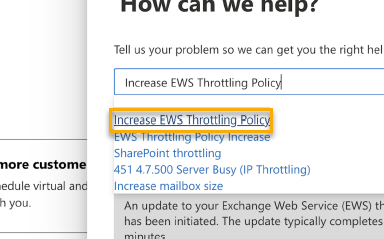
- From the search results, click the Increase EWS Throttling Policy link.
The ESW Throttling Policy screen displays.

- Click the Run Tests button.
 |
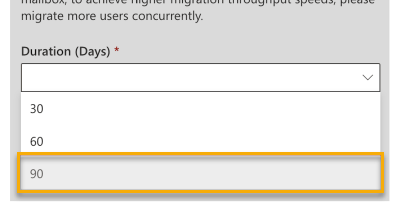 |
- From the Duration (Days) drop-down, select 90.

- Uncheck the I acknowledge clicking 'Update settings' will make the change(s) described above to the tenant configuration check box.
- Click the Update button to save the setting.