Set up a Printer for Visitor Badges
Level: Admin
When your visitors wear a badge, this helps your Security staff and other employees quickly identify who is a visitor to your company. Also, it makes the visitor feel welcome in your office space. With LobbyConnect you can print badges for visitors when they check-in.
Prerequisite
LobbyConnect provides different printed badge options for your visitors. Badge templates can be added to Visitor Types, see Create and Enable Visitor Types and for examples of the badges, see Print Visitor Badges.
Supported Printers
Brother is the supported printer manufacturer to use with LobbyConnect. See the requirements below:
Printers
- Brother QL-820NWB (Ethernet and Wi-Fi)
Some older Brother Printer models may work with LobbyConnect, but are no longer supported. The instructions below are specific to the Brother QL-820NW printer.
Badge Sizes
Paper Roll
Out of the box, Brother printers include a red/blank ink label rolls. These labels do not work with LobbyConnect. You must use a blank on white paper rolls. These are the recommended label models:
Connect Printer to the Network
You can connect your badge printer via Wi-Fi or Ethernet. For a more stable connection, we recommend using Ethernet but both work! Just make sure your Wi-Fi signal is strong in your reception lobby.
The LobbyConnect device and printer must be on the same network for the badge printing to work.
Set up Wi-Fi
-
Follow steps 1-9 of the Brother user manual to initially configure the printer. (install the label, connect power, install battery unit, install coin battery, set language)
- When configured and the device is powered on press Menu.
- Press the ▲ or ▼ buttons and select WLAN. Toggle WLAN to On then press OK.
- Press the ▲ or ▼ buttons and select WLAN > Infra Manual Setting.
- The printer will search for available wireless networks. You will need to connect the printer on the same network as LobbyConnect on the 2.4ghz band.
- Press the ▲ and ▼ buttons and select the correct wireless network then press OK.
- Enter your network password then press OK.
- Look at the top-right part of the screen. Use the Menu button to shuffle between lowercase, uppercase, and other characters.
- Use the ▲ and ▼ buttons to select the desired characters.
- If successful, the display will show "Connected!". Press OK to exit.
Set up Ethernet
If you connect the printer through ethernet, be sure to toggle the WLAN setting to OFF.
- Follow steps 1-9 of the Brother user manual to initially configure the printer. (install the label, connect power, install battery unit, install coin battery, set language)
- Press the ▲ or ▼ buttons and select Menu > Information > Print Configuration > All > Start.
- A series of badges will print. Find the badge that contains "<IP Settings-."
- Locate and note the IP Address beginning with 192.168. <#>.<#>.
Sync Printer with LobbyConnect
After the printer is connected to ethernet or wireless, you will need to pair it to the LobbyConnect device. You can do this using the automatic configuration or manually depending on the network.
Some secured networks require that you have a dedicated IP address for the badge printer. In this case, you will have to do a manual configuration.
Set up LobbyConnect Printer
1. Make sure the iPad is on the same Wi-Fi network as the printer.
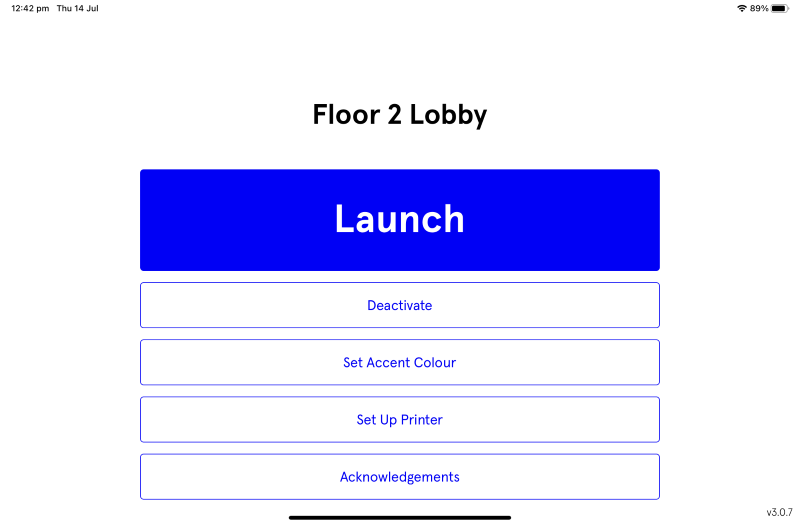
2. From the device's Launch screen, tap the Set Up Printer button.

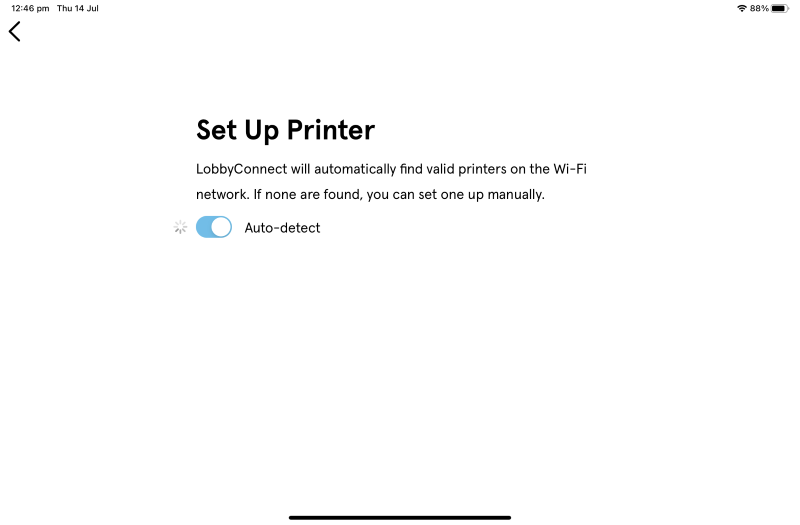
The app will automatically attempt to auto-detect a printer. If any are found, they will show in the list.

3. From the list tap on a printer to connect to it.
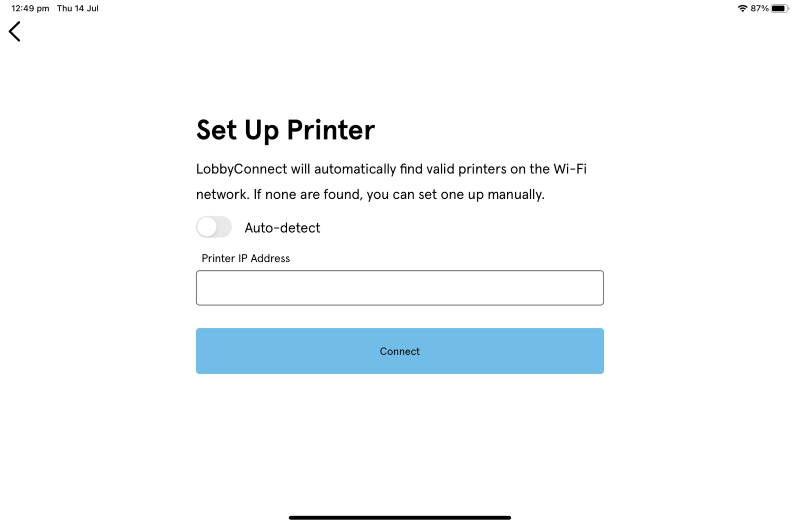
If the printer is not in the list then complete the following:
- Tap the Auto-detect toggle to turn it OFF.
- In the Printer IP Address field, enter the IP address. See the instructions above to find the IP address of the Brother Printer.
- Tap the Connect button.

4. Click the Test button to verify the printer is correctly set up. A badge will print from the Brother Printer if successfully connected.
Manual Configuration
Printers can be manually connected to your local network if you experience issues using the automatic printer detection feature.
- From the Printer Setup page, toggle the Manual Configuration option.
- Enter the printer's IP address by retrieving the printer's IP address. See ethernet configuration instructions above.
- Select the printer model.
- Select the paper badge size.
- Select Test Printer. The printer will print a label that says "LobbyConnect."
- When the print is successful, select Done.
Troubleshooting - Badge Printing Issues
Q: My printer is connected to the network, and so is my device, but it is not printing.
A: Make sure that both the printer and the device are on the same network.
Q: The test print worked, but no badge is printed when a guest checks in.
A: Make sure that your Visitor Types have a badge type selected. Any visitor type without a badge type will not print a badge, even if a badge printer is connected. Verify you have badge tape in the printer.
