ADFS SAML
Teem’s integration with ADFS allows mutual customers to log in to Teem with their Windows Credentials.
Prerequisites
- In order to use ADFS for user management, you will need to have ADFS running on a Windows Server.
- These instructions are for ADFS 3.0 (running on a Windows 2012 R2 server), but should work for ADFS 2.0. In addition, you will need to fulfill a few requirements as listed below.
- SAML is not available with all subscription levels. See our pricing page or reach out to your Teem representative for more information.
- The Teem account you’re using to log in must have admin-level permissions.
- You must be an ADFS administrator to complete ADFS specific steps.
Got all that? Now you’re ready to set up and use ADFS services!
ADFS SAML Integration
Set Your Subdomain
Navigate to teem.com and click on Manage from the left menu. Click on Teem Account, then Company Details. In the field for Teem SSO Sub-Domain, enter your preferred subdomain. This is typically the name of your organization. For example, if my company was called Orca Panda, I'd enter "orcapanda" in the subdomain field, and it would make my subdomain site https://orcapanda.teem.com. Heads up: spaces and symbols are not allowed in subdomains.

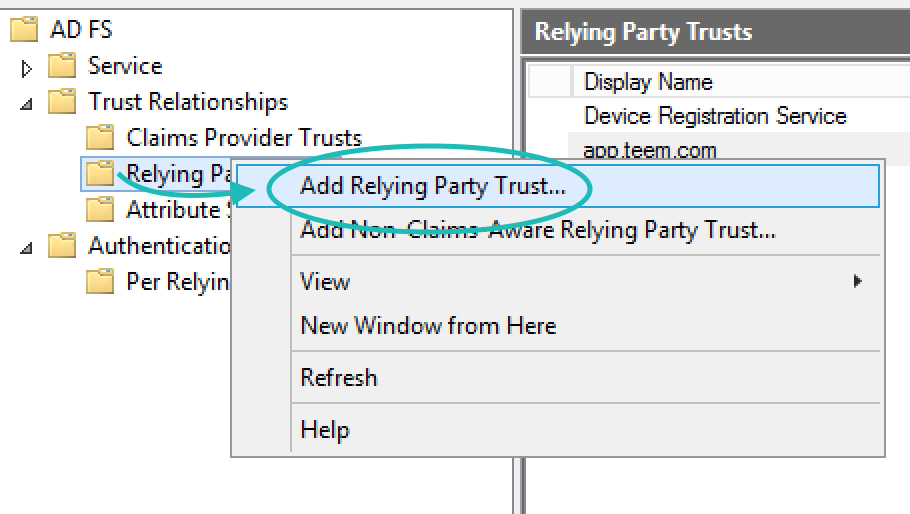
Add Relying Party Trust
Within AD FS Management, under Trust Relationships right click on Relying Party Trusts, and select Add Relying Party Trust
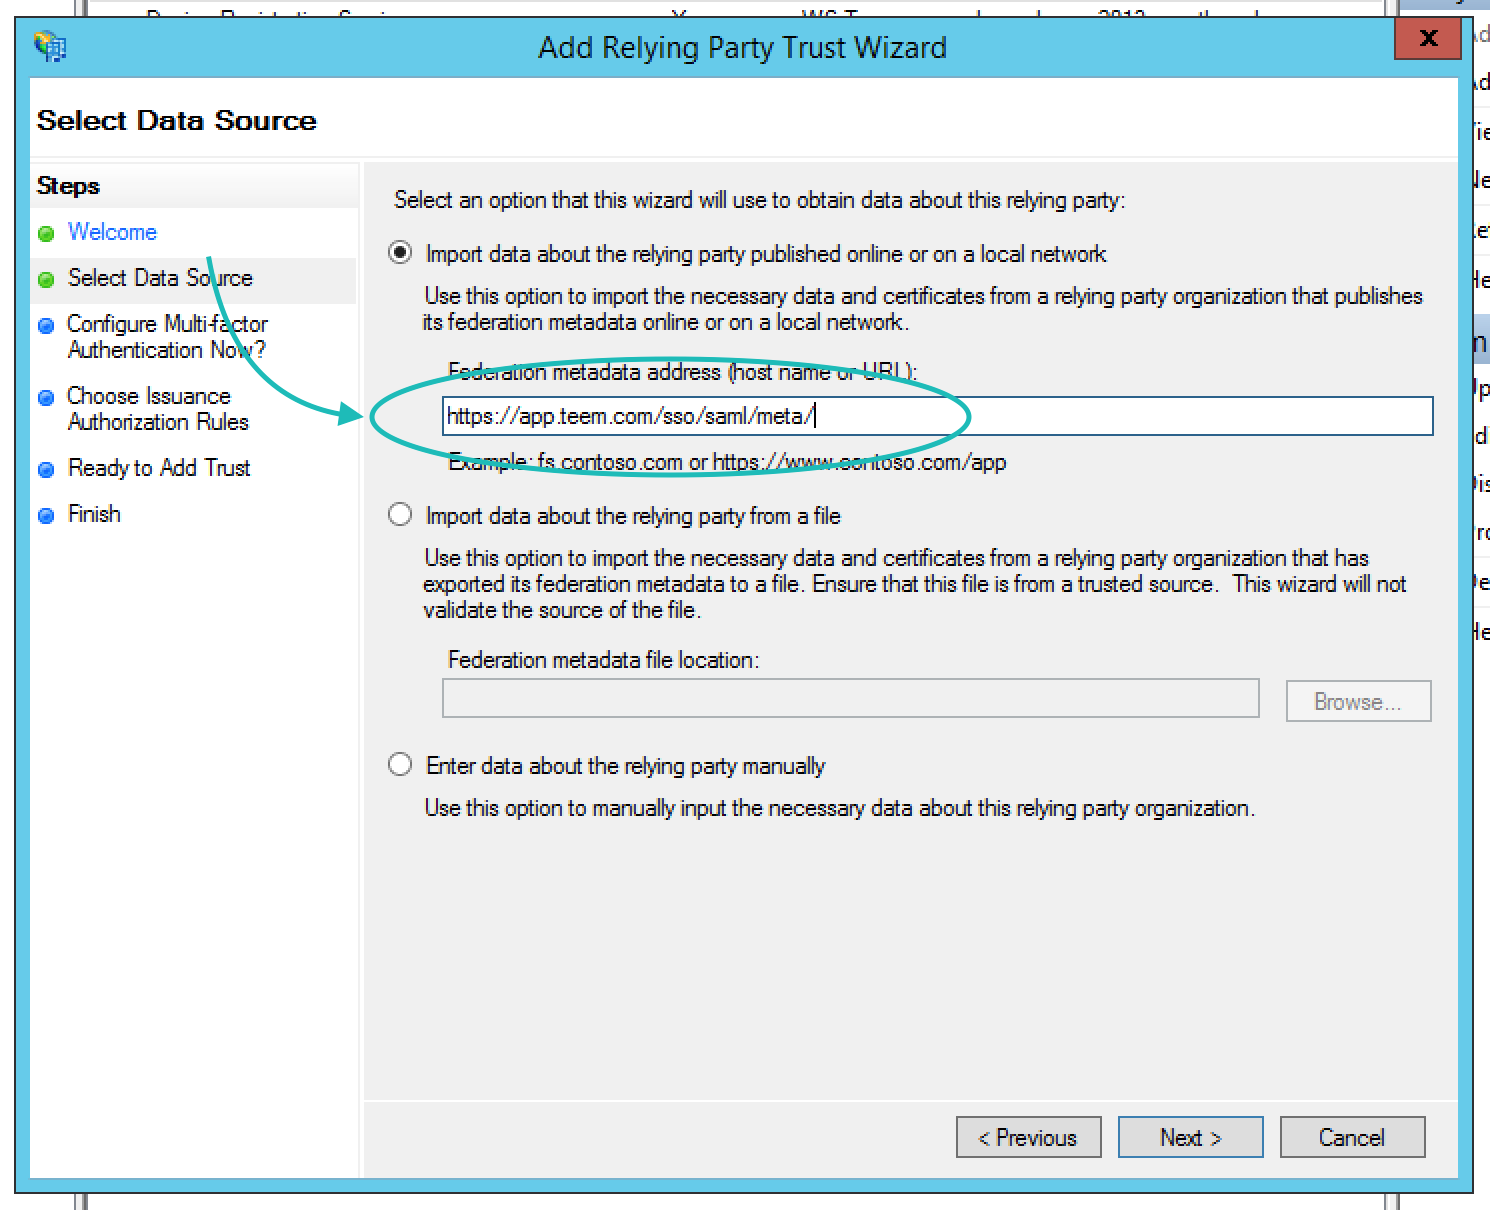
This will open the Add Relying Party Trust Wizard. As you go through this wizard there really is only one thing you need to do, which is fill in the Federation Metadata Address field with our meta URL which is https://app.teem.com/sso/saml/meta/ on the second page of the Wizard. The other items can just be clicked through; unless your organization specifically requires MFA for SAML or only allows certain employees to get to the service, all the other defaults are fine. When this is completed, your next step will be to create claim rules.
Create Claim Rules
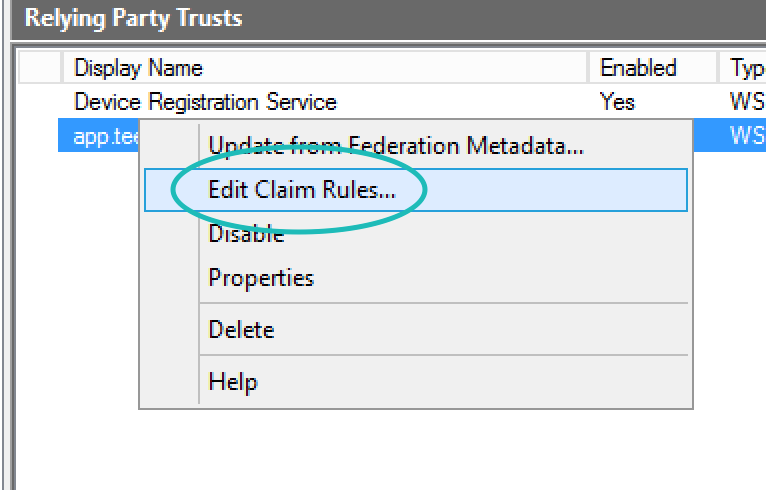
With the Relying Party Trust created, we need to know what to send in the assertion. There is a myriad of ways to create claim rules, but we have found this method to be the simplest. First, get the following LDAP values: Name ID, Email Address, First Name, and Lastname. To do this, right-click on our new Relying Party Trust (named app.teem.com if you did not change the defaults) and select Edit Claim Rules...
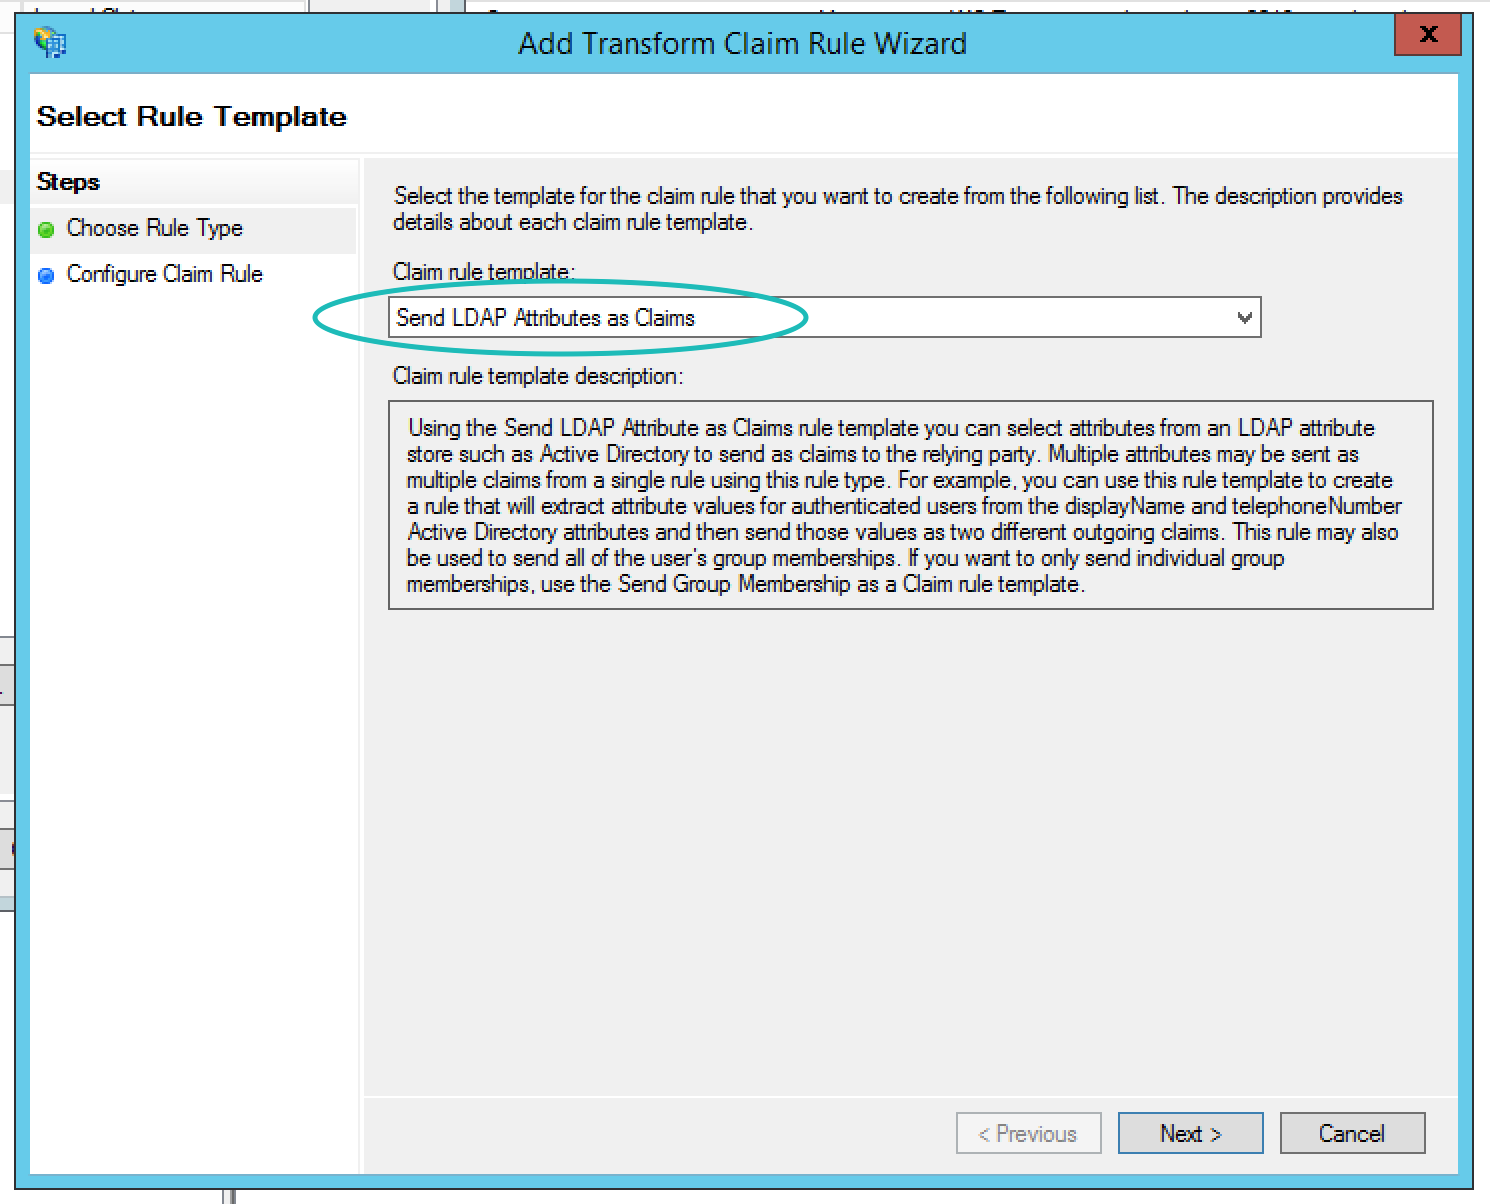
In the resulting dialog box, select Add Rule... and then select Send LDAP Attributes as Claims in the resulting dialog box.
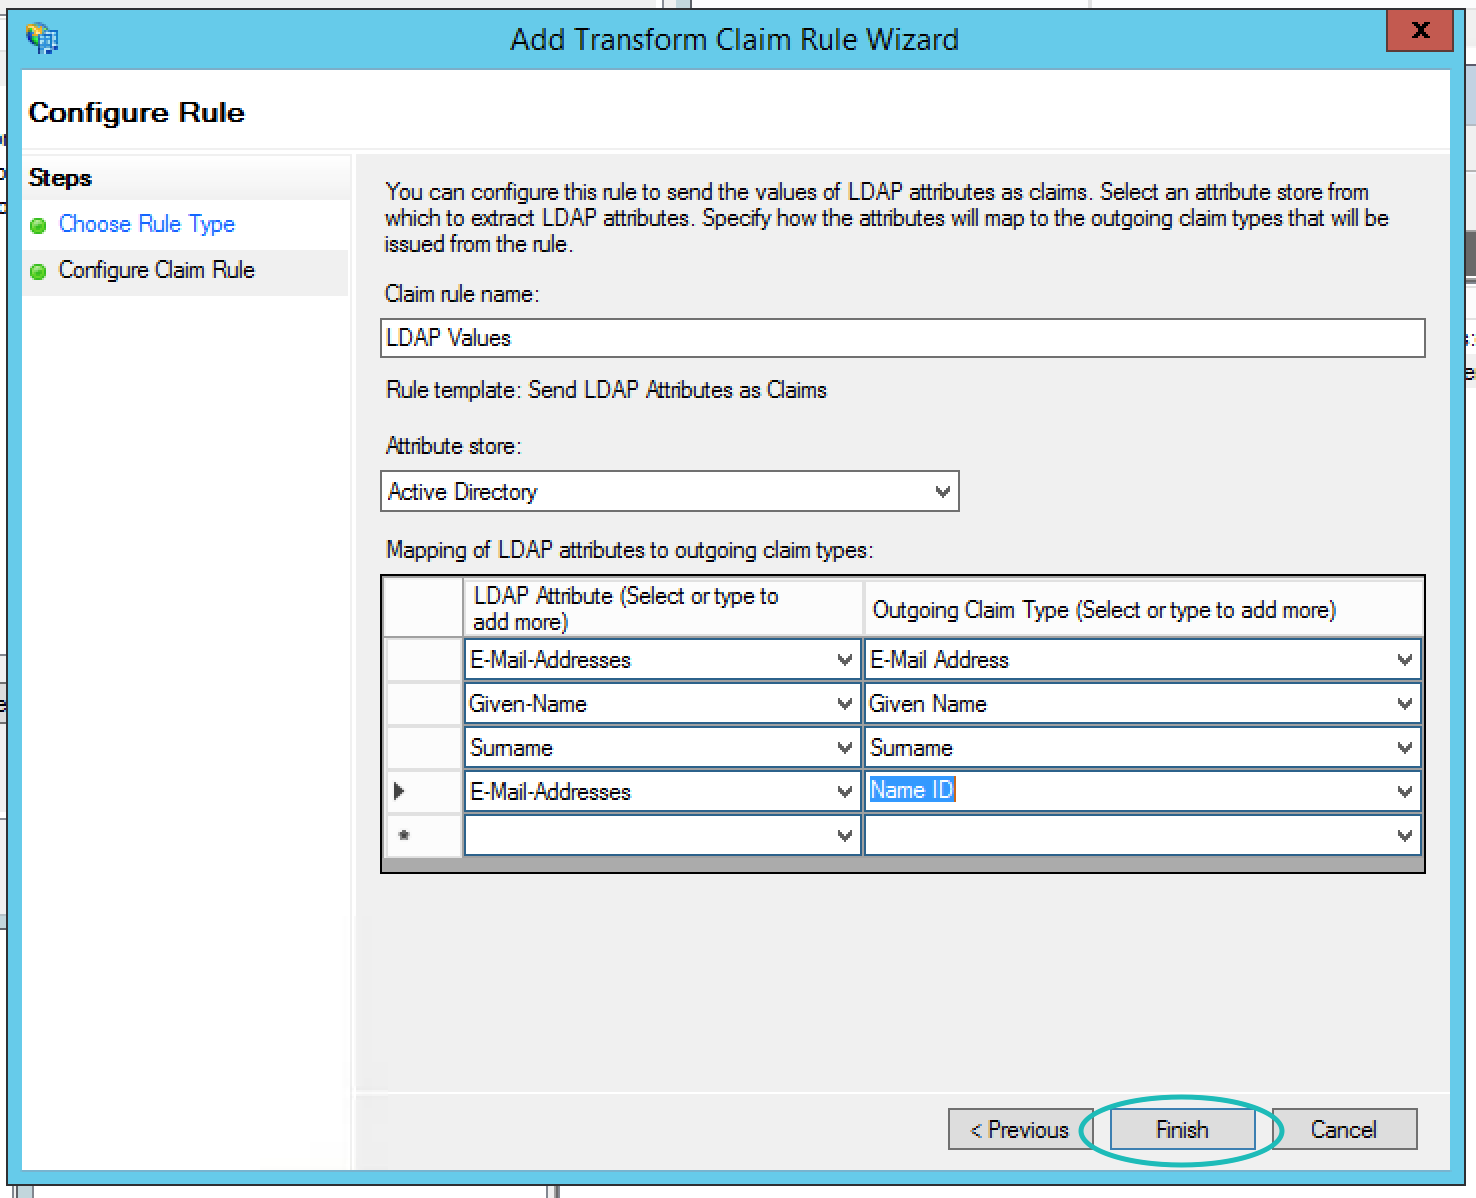
After selecting next, map the following attributes to outgoing claim types: Email Addresses as Email Address, Given-Name as Given Name, Surname as Surname, and Email Addresses as Name ID (Please note, using User-Principle-Name instead of Email Addresses will work also). Don't forget to name the rule whatever you would like and select Active Directory as the attribute store. When you have selected these, the wizard should look something like the screenshot below, and then you can select Finish.
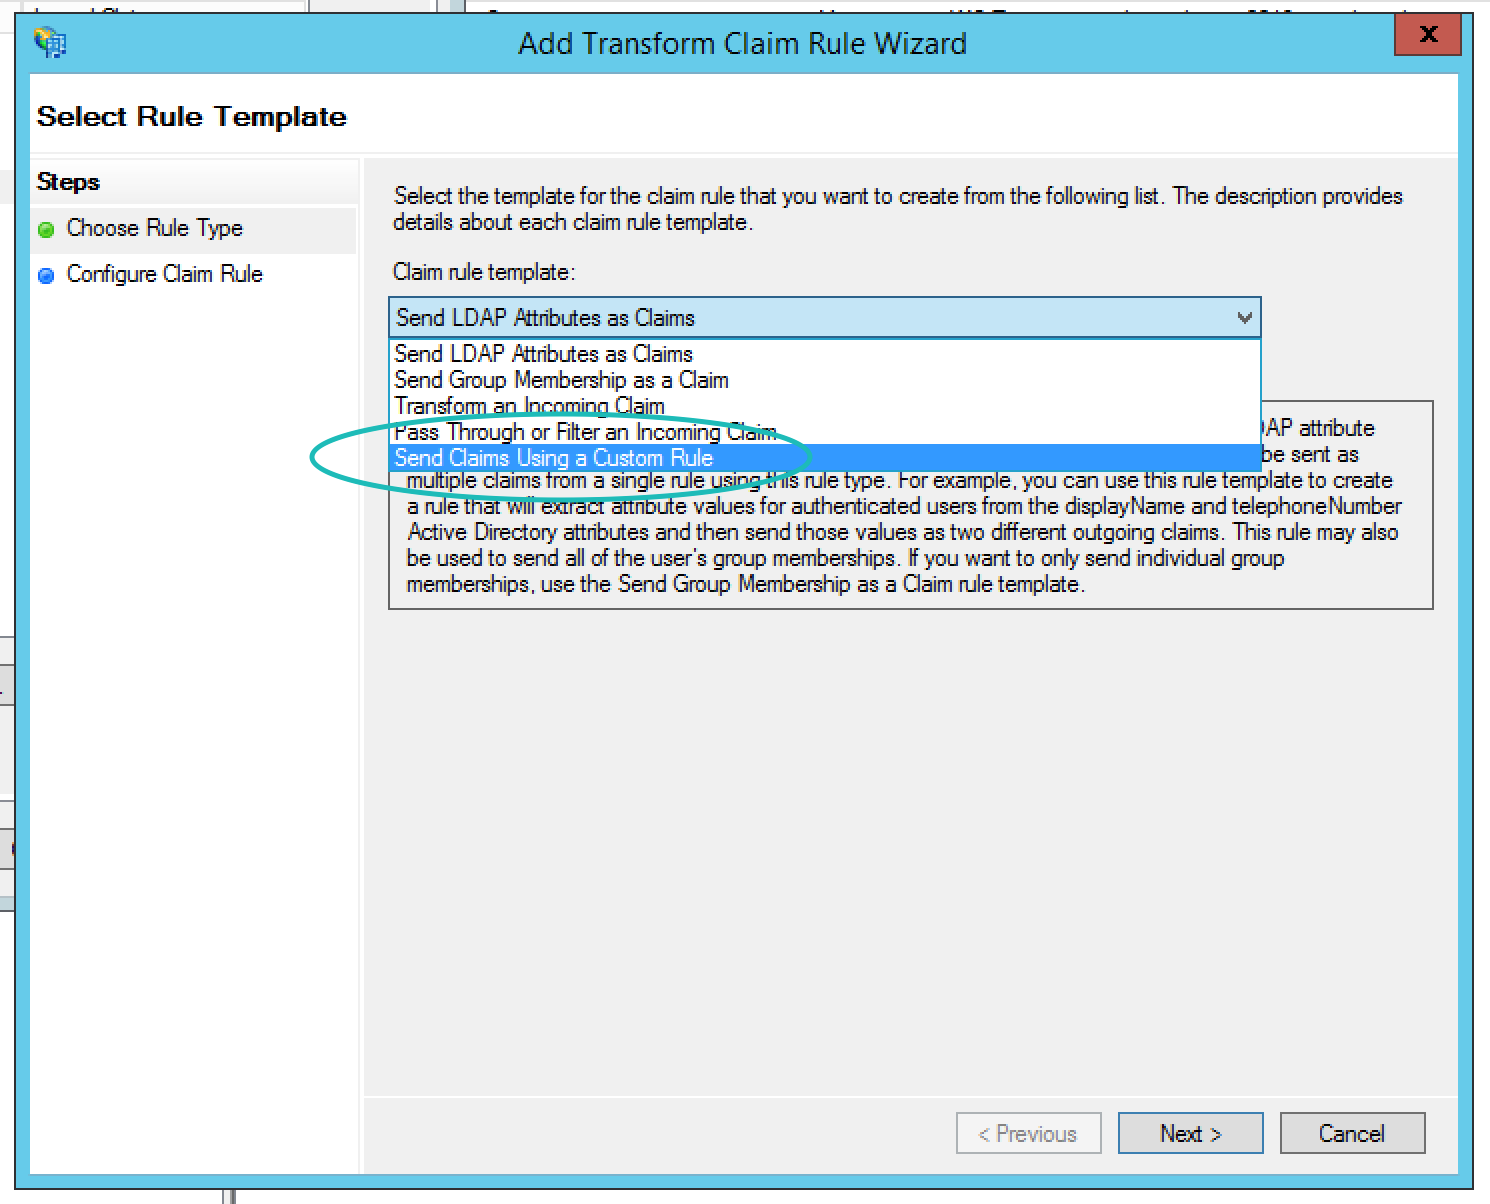
This will send all these items as attributes in the SAML assertion, but Teem does need the names of these to be very specific. While there are a few ways to accomplish this, we suggest creating four more custom rules and adding the specific names to the attribute statement. The following is an example to create one rule, and you can repeat the process for the other three rules. Start by selecting Add Rule then in the resulting dialog box select Send Claims Using a Custom Rule.
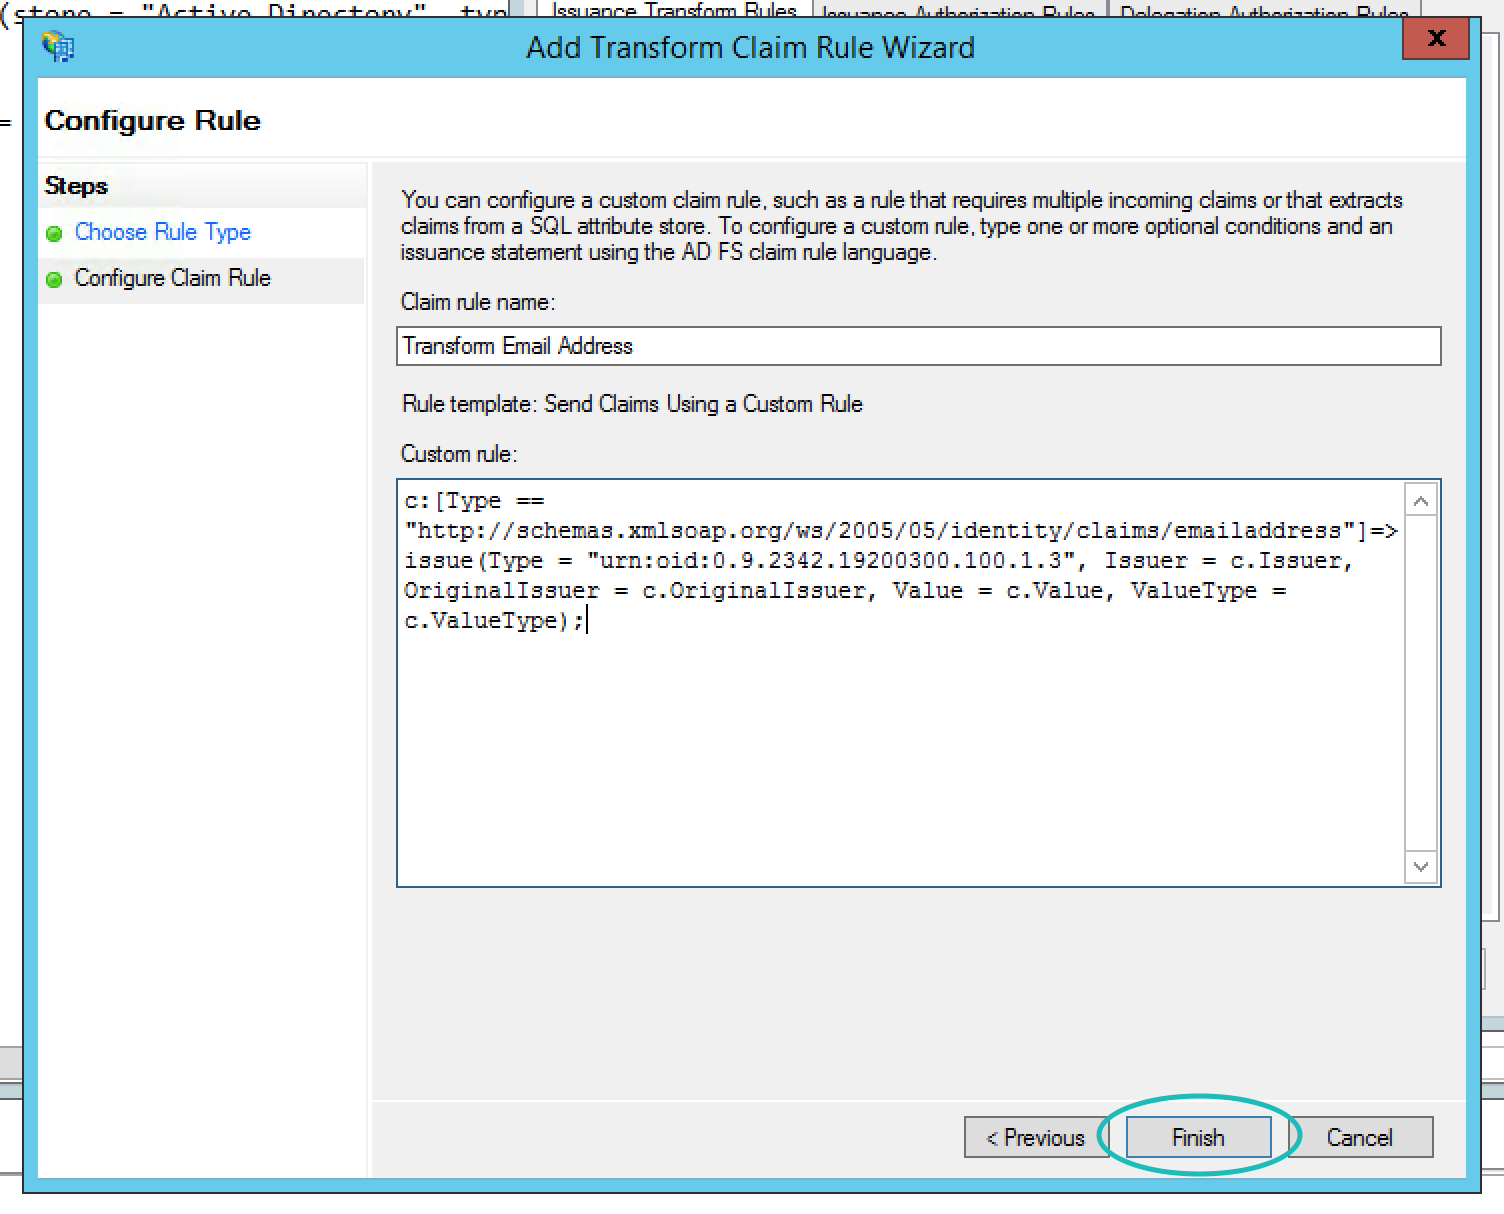
After selecting Next, you will name the rule "Transform Email Address" and then paste in my transform text. Use the table below to get all the rule names and text that you should be able to just copy and paste (you will need to do this process four times to create each of the transform rules in the table). As you do your transform rules will look similar to the dialog below, and then you can select Finish.
| Custom Rule Name | Custom Rule |
|---|---|
| Transform Email Address | c:[Type == "http://schemas.xmlsoap.org/ws/2005/05/identity/claims/emailaddress"]=> issue(Type = "urn:oid:0.9.2342.19200300.100.1.3", Issuer = c.Issuer, OriginalIssuer = c.OriginalIssuer, Value = c.Value, ValueType = c.ValueType); |
| Transform UID | c:[Type == "http://schemas.xmlsoap.org/ws/2005/05/identity/claims/emailaddress"]=> issue(Type = "urn:oid:0.9.2342.19200300.100.1.1", Issuer = c.Issuer, OriginalIssuer = c.OriginalIssuer, Value = c.Value, ValueType = c.ValueType); |
| Transform Given Name | c:[Type == "http://schemas.xmlsoap.org/ws/2005/05/identity/claims/givenname"]=> issue(Type = "urn:oid:2.5.4.42", Issuer = c.Issuer, OriginalIssuer = c.OriginalIssuer, Value = c.Value, ValueType = c.ValueType); |
| Transform Surname | c:[Type == "http://schemas.xmlsoap.org/ws/2005/05/identity/claims/surname"]=> issue(Type = "urn:oid:2.5.4.4", Issuer = c.Issuer, OriginalIssuer = c.OriginalIssuer, Value = c.Value, ValueType = c.ValueType); |
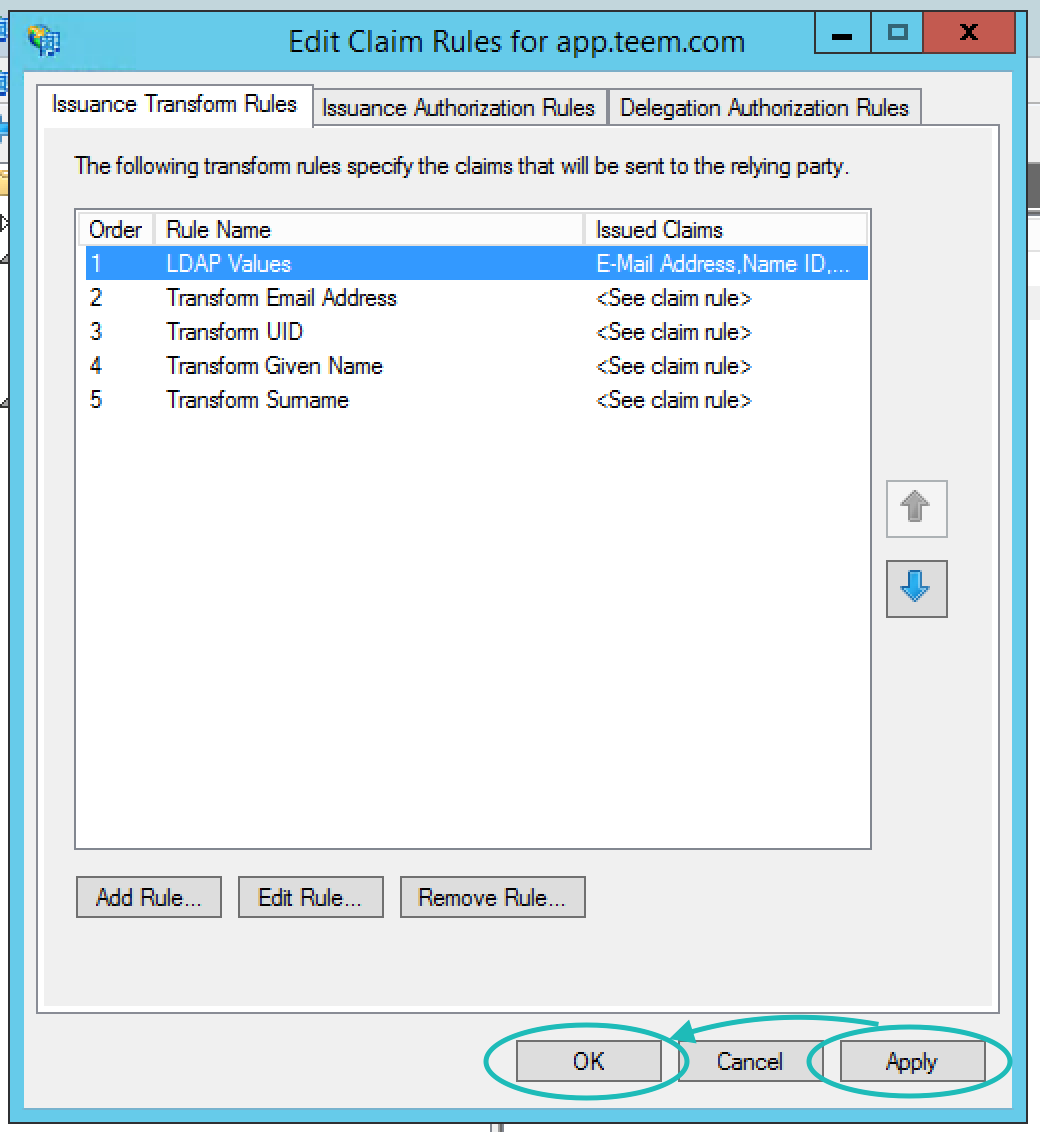
Once completed, your claim rules should look like the screenshot below and you can click Apply then Ok.
Get Entity ID and Certificate
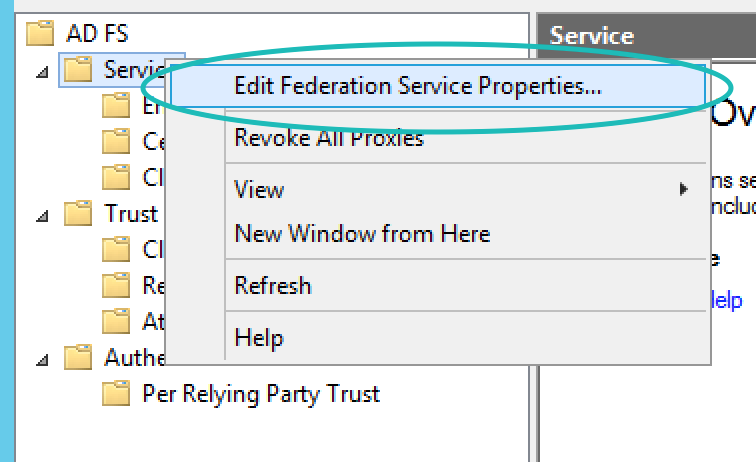
Once claim rules are in place, you will need to get the entity ID and Certificate in order to add the SAML details to Teem. To do this within AD FS Management, right-click on Service and select Federation Service Properties.
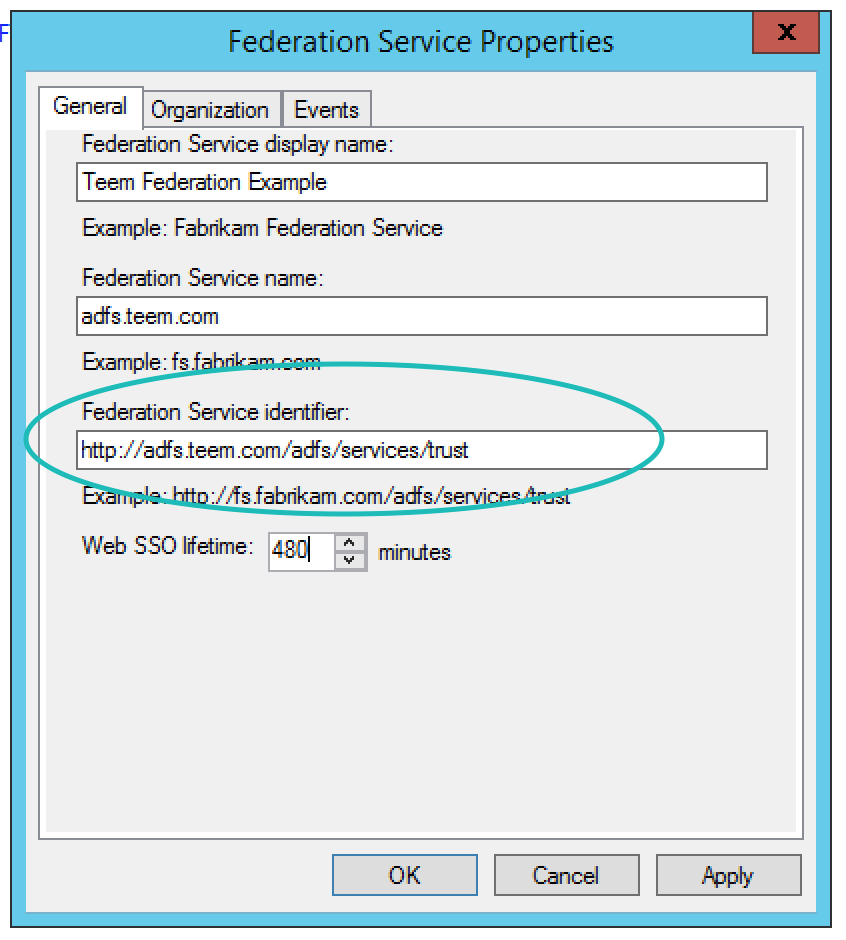
You will need to take note of (copy and paste somewhere) a couple of fields within the resulting dialog box. On the General tab, note the Federation Service Identifier – this will be used as your Entity ID later. Then click Cancel to close this dialog.
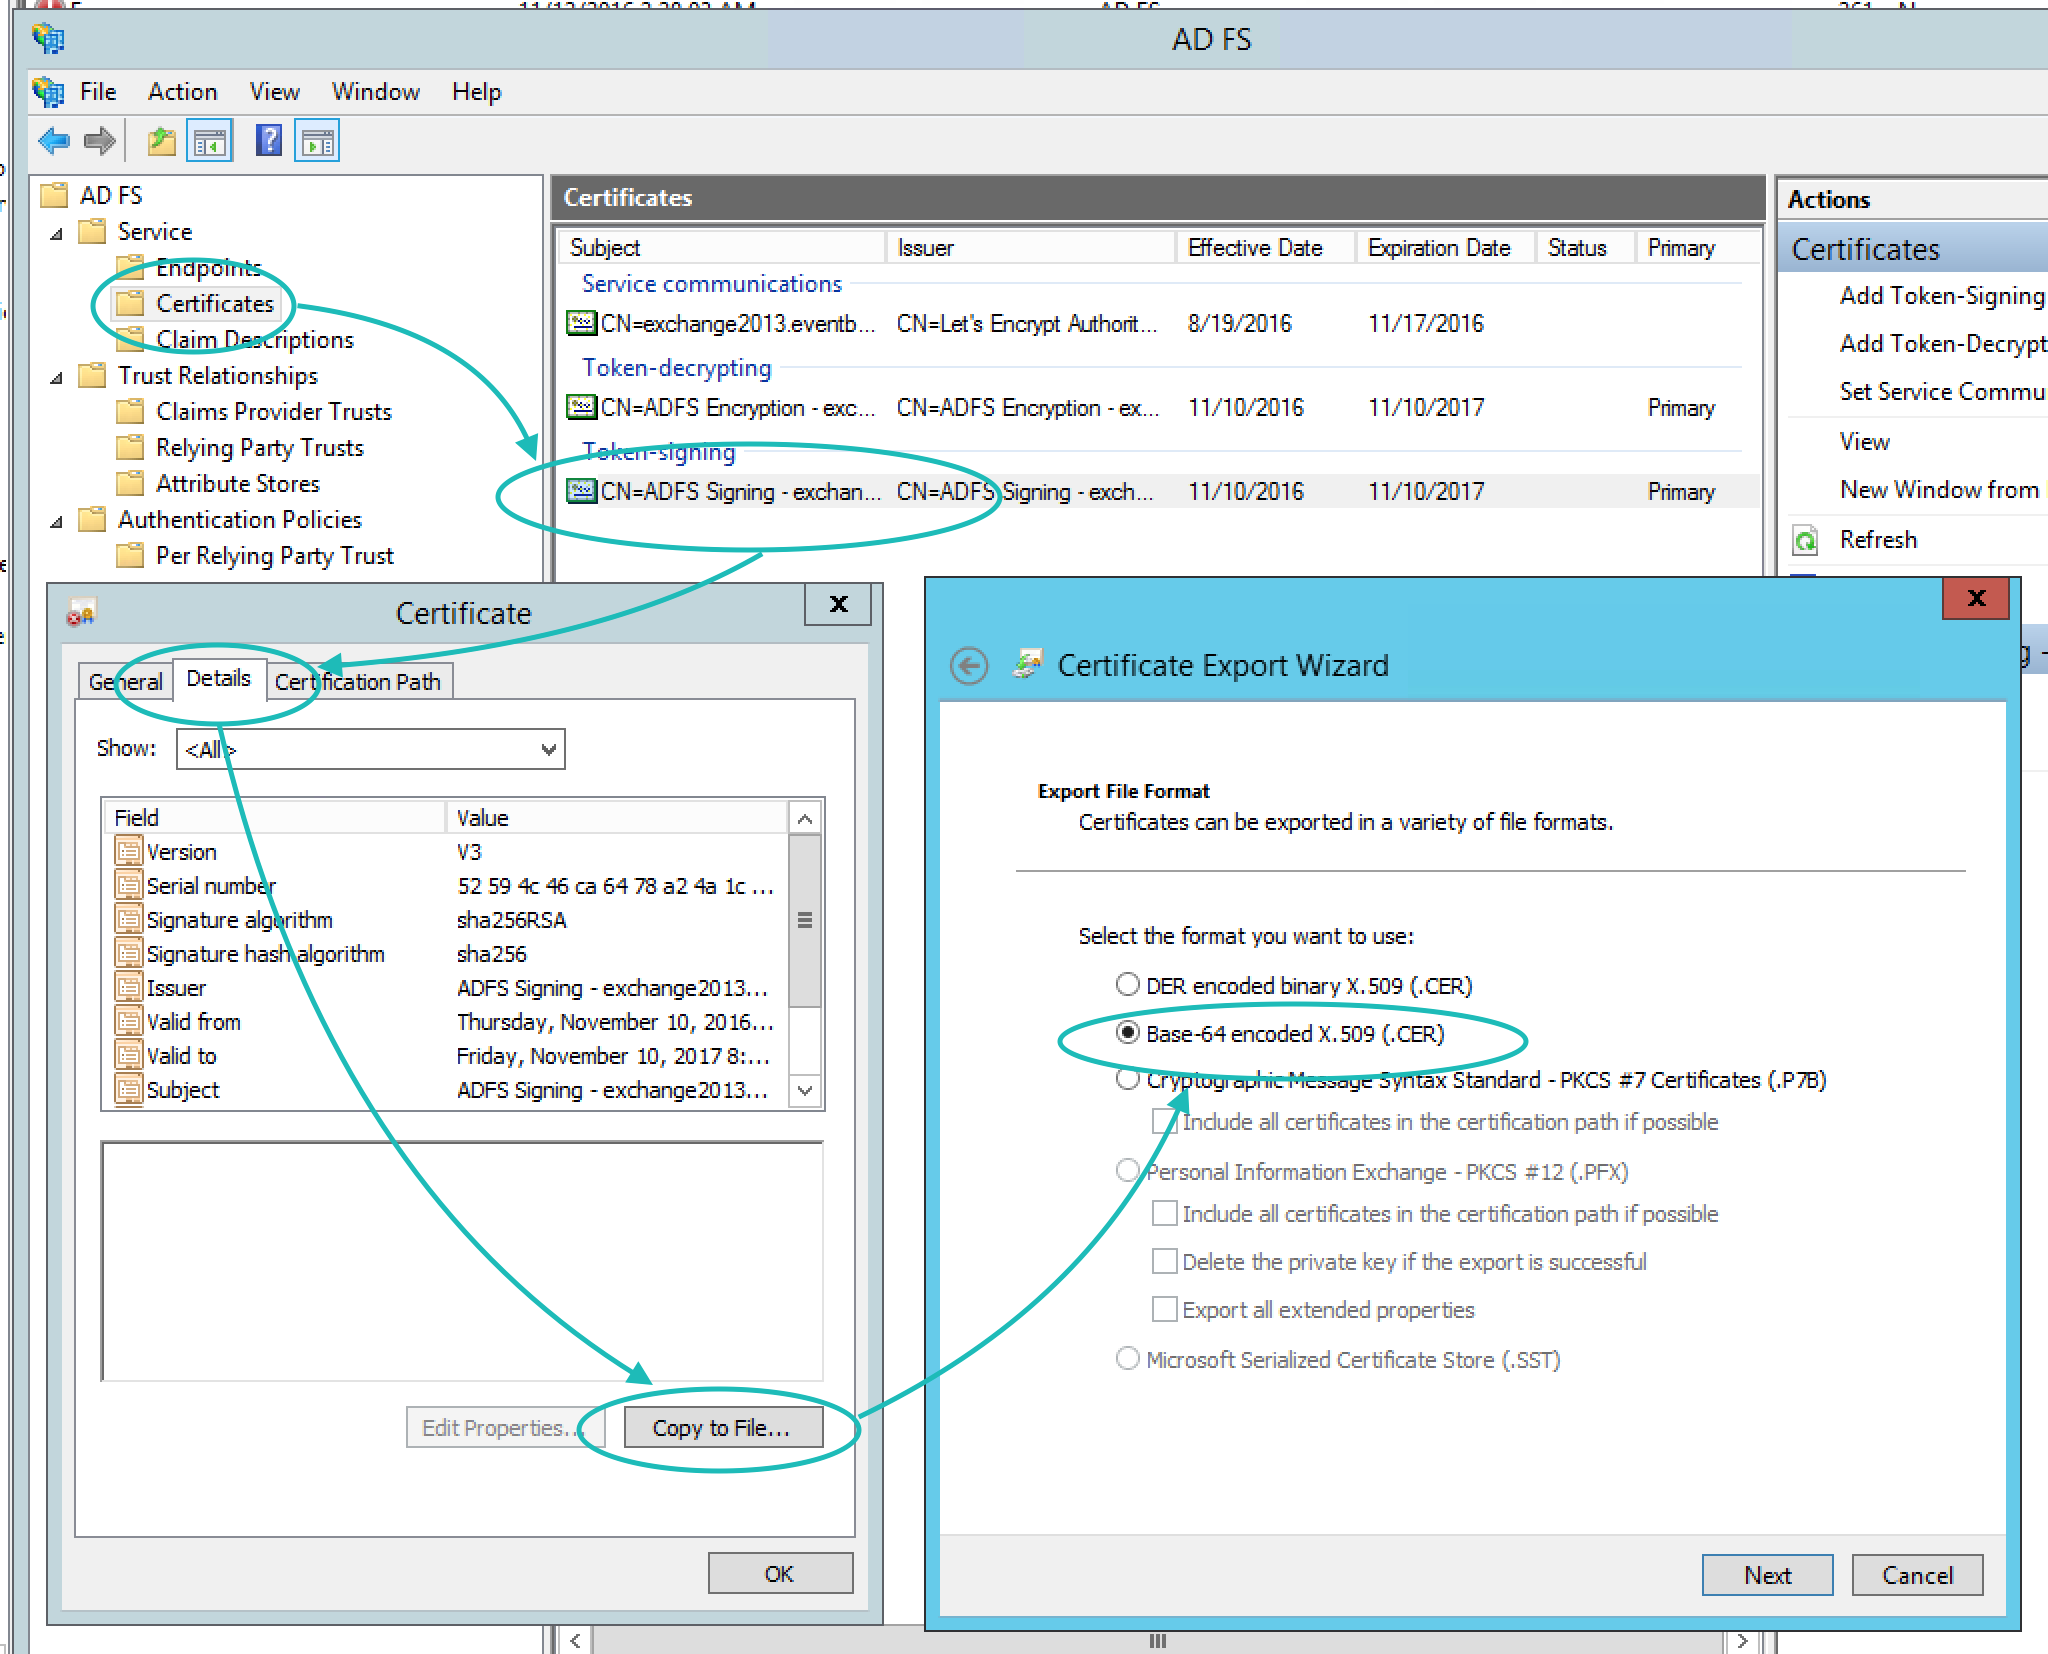
Next, right-click on Certificates, and then double-click on the Token-signing certificate. This will open the Certificate Dialog. From here go to the Details tab, then select Copy to File... In the resulting Certificate Export Wizard be sure to select the Base-64 encoded X.509 (.CER) format. Save this somewhere convenient and open it with a text editor, like Notepad. You will copy the content between -----BEGIN CERTIFICATE----- and -----END CERTIFICATE----- (Do NOT include these markers).
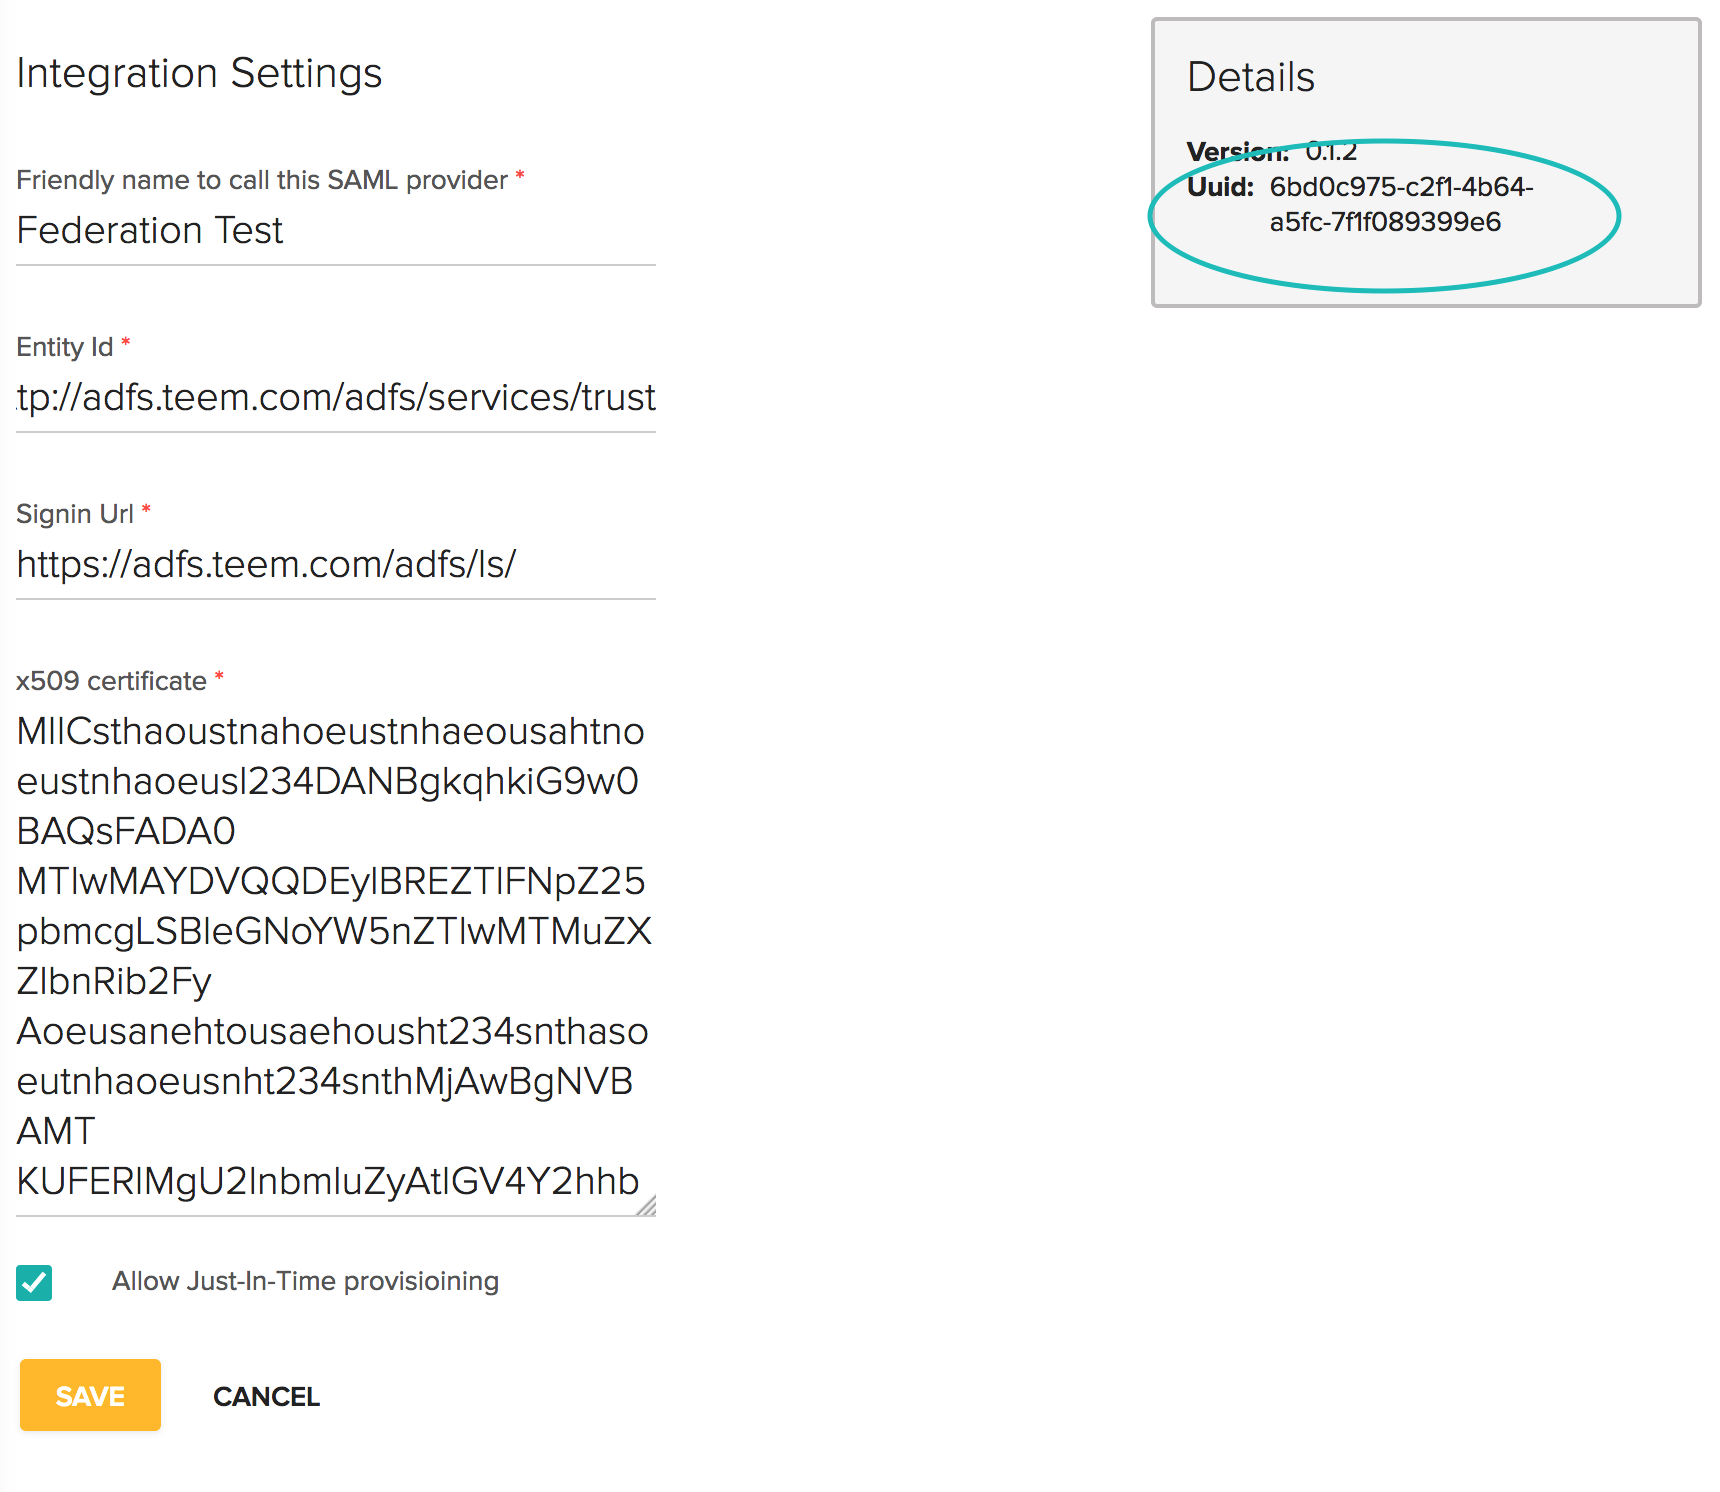
Add the SAML details to Teem
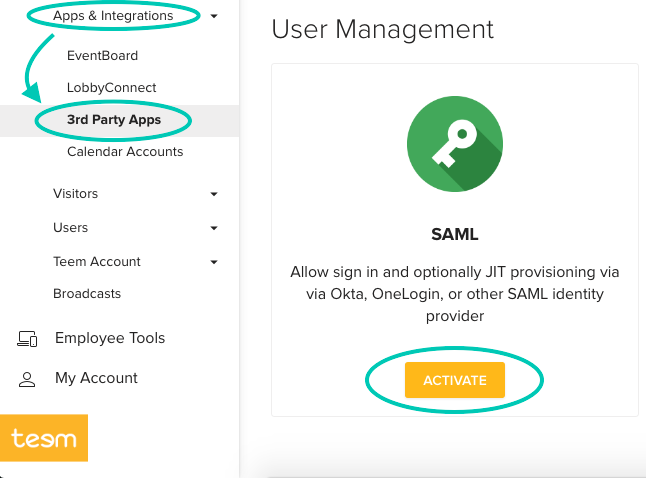
Next, go to the Teem Dashboard, and under Apps & Integrations select 3rd Party Apps. Under User Management select Activate on SAML.
Then add details to the form as follows:
- Friendly name to call this SAML provider can be anything
- Entity ID is going to be the Federation Service Identifier that we collected earlier
- Signin URL is part of the Federation Service Identifier, with a different ending. If my Federation Service Identifier was http://adfs.teem.com/adfs/services/trust, my Signin URL would be https://adfs.teem.com/adfs/ls/
- x509 certificate is the information that we just copied above. Please paste it in exactly.
- Allow Just-In-Time provisioning is optional. Most will check this because that means Teem will automatically create users as they log in.
When that is done your dialog should look something like the screenshot below. After you click Save, the page will update and the details box will populate. The UUID noted here is very important, as it is your RelayState. Copy the value as we will use it later.
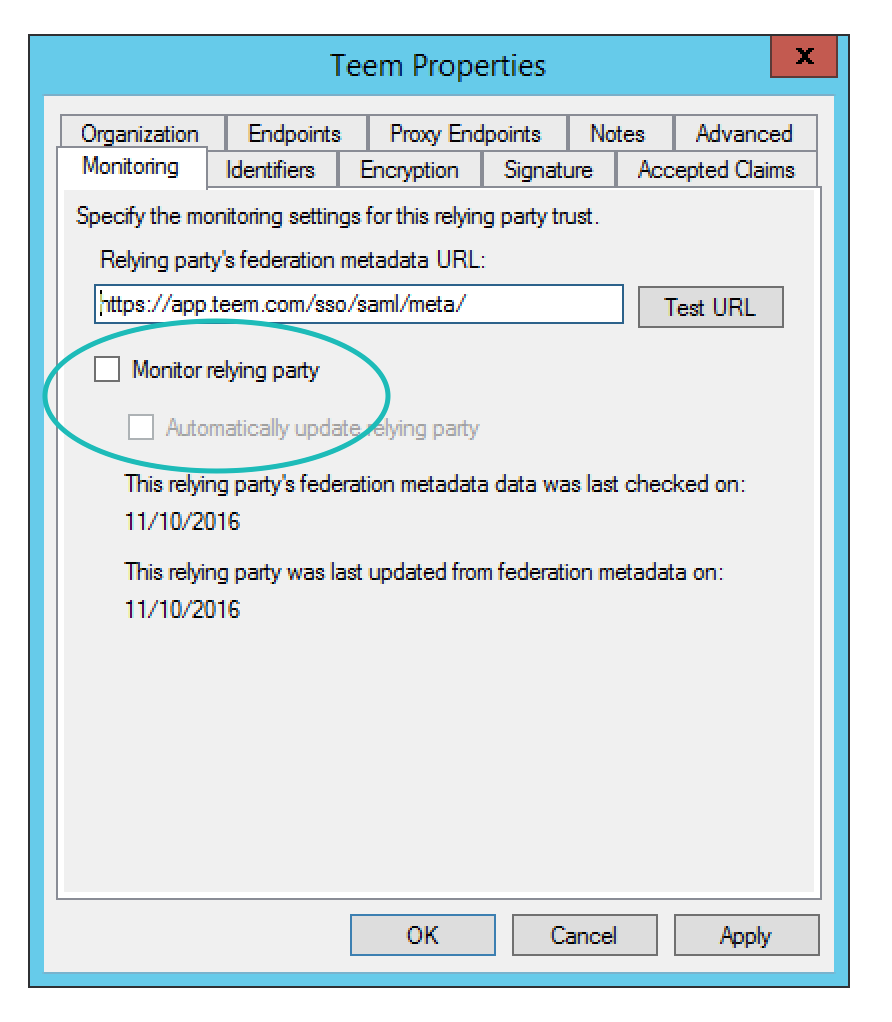
Set Endpoint URLs
Now you'll need to go back to AD FS Management to configure your Endpoint URLs. You will have two of them, one for Identity Provider Initiated Login (IdP) and one for Service Provider Initiated Login (SP). One important thing to note, one of them is already done for you, so you will only be creating one additional URL. To do this, double-click our Relying Party Trust, and in the properties dialog and on the Monitoring tab uncheck the "Monitor relying party" checkbox. Click Apply and OK then the dialog will close.
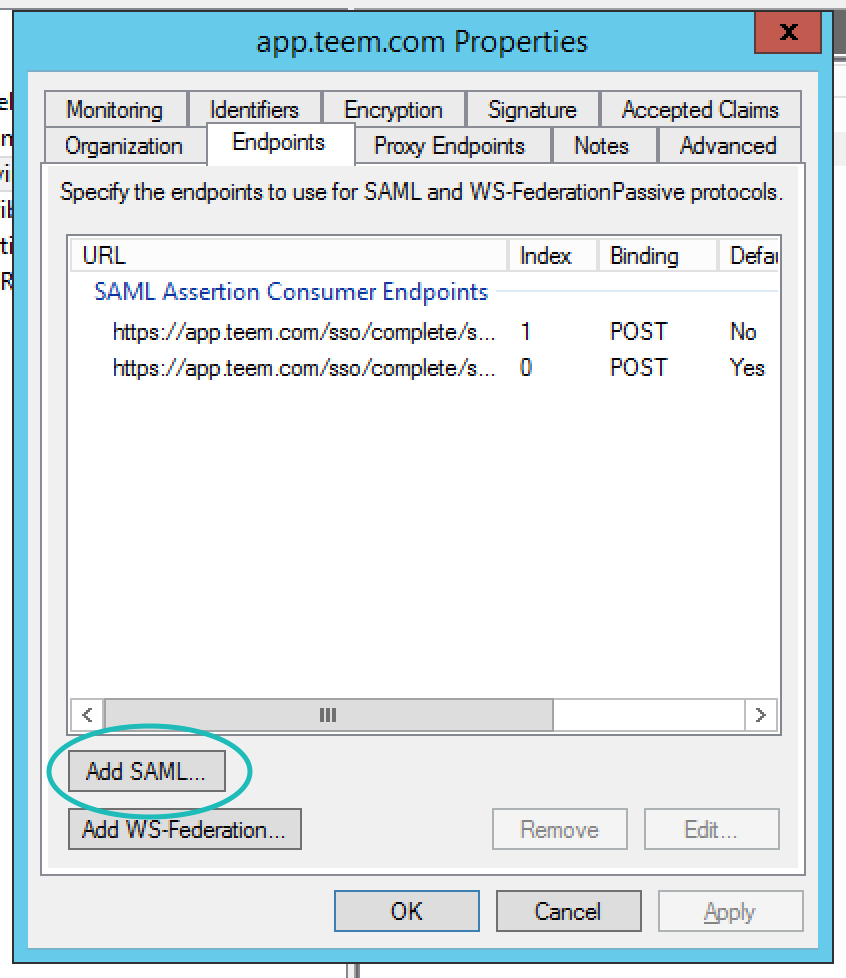
Then, go right back into that dialog by double-clicking Relying Party Trust, go to the Endpoints tab in the Properties dialog and select Add SAML ...
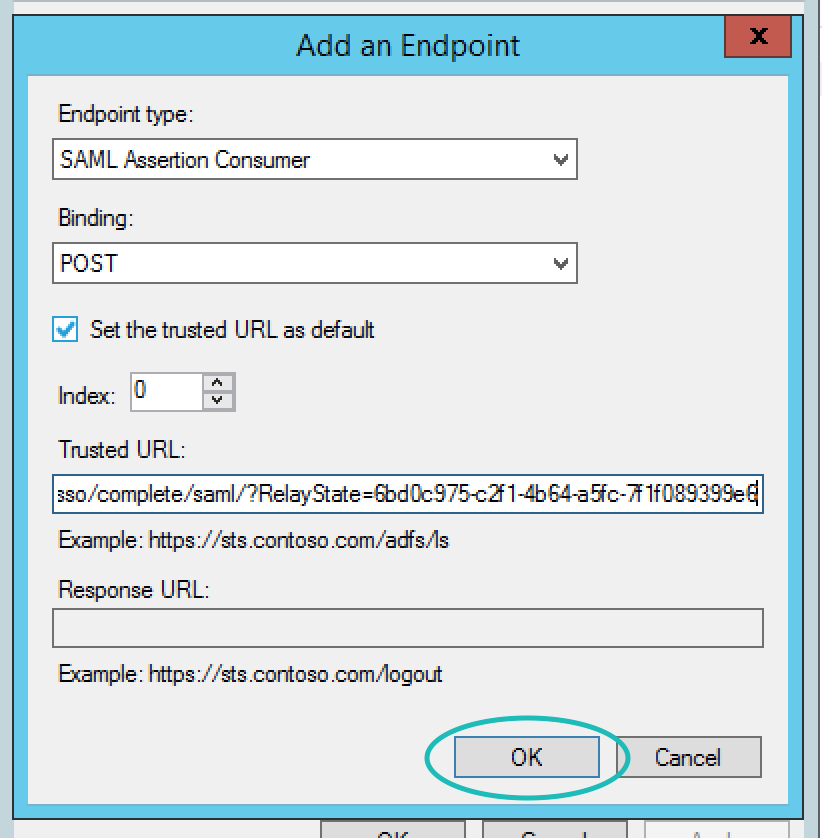
Fill out the resulting form as below. The key here is that your new URL is the default, and will include your RelayState as part of the URL. This will make IdP login possible. The way to format the URL is very simple. If my relay state was 1234-2345-3456-4567 my URL would be https://app.teem.com/sso/complete/sa...2345-3456-4567
When you are done, there should be two endpoints as shown below. You can now select Apply then OK.

Testing
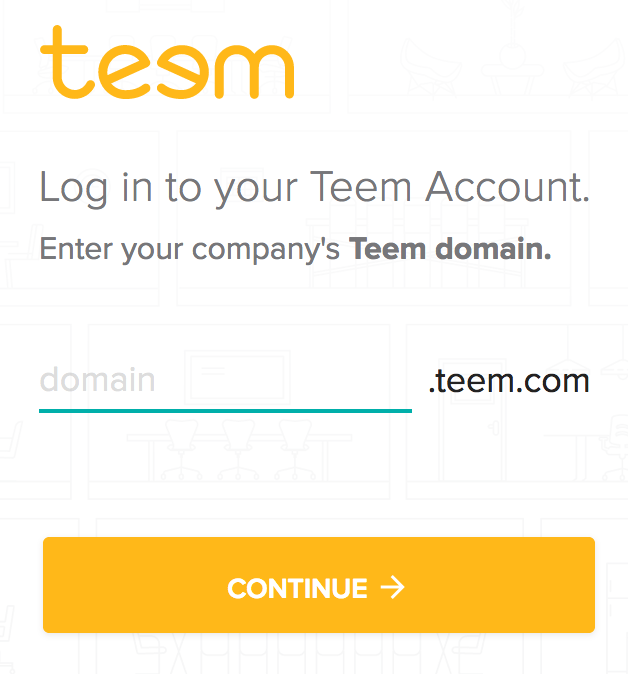
The next step is Testing. To test, go to https://app.teem.com/login/ and select Teem SAML Login. You will then be asked to put in your sub-domain, which you set in the first step of this process, and then select Continue. You should then be sent to your ADFS login page, where you will log in, then will be sent back to Teem. Once this sequence is successfully completed, you are an authenticated user.

Troubleshooting Tips
Here are some hints to troubleshoot a few common errors:
- When I try to log in, I get an error, even before I submit my credentials to ADFS. Make sure that you are not already logged in and try again. If this problem persists, it is likely that you don't have form authentication enabled. Enable this under Authentication Policies in AD FS Management, and then try again.
- I can sign into ADFS fine, but then there is an error and it doesn't send me back to Teem. Double-check your two Consumer Endpoint URLs. You should have one that is not the default and goes to https://app.teem.com/sso/complete/saml/, and another that is the default and goes to https://app.teem.com/sso/complete/saml/?RelayState=. Also, both of these URLs should be set to post. Make any needed changes and try again.
- I can sign in fine, but then Teem says that the user is not found. Make sure that Just-In-Time provisioning is turned on.
- Teem gives an error saying that the Name ID is not found in the assertion. The first claim rule must have the Email Address coming across as the Name ID. Without this, the login will fail. Please adjust the claim rules and retest.
Please also know that there are other possible errors. You can see details of these errors and a myriad of troubleshooting information within AD FS by going to Event Viewer > Application Logs > ADFS > Admin.
We are also here to help. When you reach out to support with needs please have a SAML assertion available to send. It is also most helpful if this assertion is not encrypted, so we can quickly help you.