S2 Netbox Configuration
Within Netbox your visitors will be created as Persons with access levels and credentials to allow your Proxyclick visitors to gain access. The Proxyclick <> S2 Netbox integration has the following prerequisites:
Networking
- The Proxyclick access control client reaches out to Proxyclick servers via port 443. For more information on networking refer to the Deployment Requirements section of the Access Control Overview.
- The access control API listens on port 80 by default but depending on your setup this can change. Confirm the correct port number with your access control administrator.
- The access control client needs to be able to reach the API.
API patch update
On specific Netbox versions (5.x) an API update needs to be run. Contact S2 technical support and mention the error:
<ERRMSG>Failed to retrieve Activation and Expiration dates from person_to_accesslevel_group table</ERRMSG>
Partition
Proxyclick’s integration supports partitioned S2 systems. It can be configured to create persons, access levels & credentials in a specific partition.
The 'Partition Key' will need to be provided during installation.
Create a user for Proxyclick in Netbox
Create an administrative user in the master partition with “Full system setup” rights to use for our integration. This applies even if Proxyclick will only operate in one partition due to the requirements for the S2 Netbox API and will have to stay this way for the lifetime of our integration.
Create a credential format - for QR-based access
Create a card format within Netbox, written exactly as Proxyclick QR code. Make sure to enable it as well (this is a separate toggle within Netbox) - see the sample below.
Make sure to have at least 28 data bits, and the exact Wiegand configuration will depend on the readers used and how they are configured.

Using Physical Credentials - RFID Cards/Fobs
Our Access Card Manager allows physical credentials to be assigned to a visitor via the Proxyclick dashboard. To configure this, we will need to know the Card Format configured for your RFID readers. See Access Card Manager.
QR code setup steps (create and configure the Credential Format) must be completed to enable the use of physical credentials.
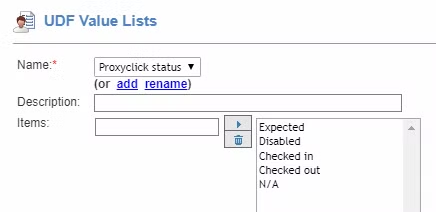
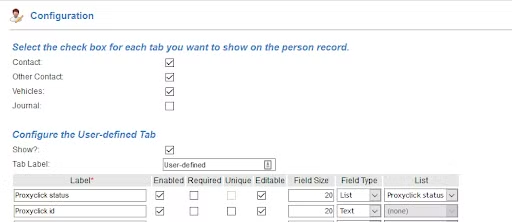
User defined fields
Add two user defined fields to Netbox:
- A list of Proxyclick statuses: Expected, Checked in, Checked out, Disabled, N/A. Use the N/A value for non Proxyclick visitors. All events for a person having one of the above statuses except N/A will be sent to our servers for processing.
- A string field called Proxyclick id - this is not a unique field
Let the Proxyclick representative know the field numbers so they can configure the integration to ensure a correct mapping.
The fields can be marked as non editable for specific users. For your internal data-usage you can ensure your visitor data will stay unchanged. Please refer to your S2 documentation for more information on this.
Enable the API
By default the API is not enabled in Netbox. To enable the API go to: Site Settings / Network Controller / Data Integration tab then select the 'Enabled' checkbox.
Make sure to tick 'Use Authentication' and 'Use Password' as well. The integration does not support the SHA method of authentication.
http://example.com/goforms/nbapi

Ensure the API is reachable from the client machine
On the machine where the Proxyclick client will be installed, the api needs to be reachable.
To confirm this you can access the API via http://example.com/goforms/nbapi - replace example.com with the hostname or IP address of your Netbox installation.
If this returns an APIERROR 3 the Netbox API is reachable for our integration, if it is not enabled APIERROR 2 will be returned.
Access level setup
The Proxyclick integration will automatically manage the setup of access levels.
Refer to the Access Control Overview documentation for more detail on what type of access should be granted for each of these templates.
For Multi-Partition Access Level Groups, see the Notes section.