Locations Overview module
About the Locations Overview module
The Locations Overview module contains two dashboards - an overview of your locations and buildings, and a real-time dashboard where you can monitor the most recent activity happening across multiple locations or tenants from one single page.
- Overview dashboard: View the number of expected visitors in each location, generate emergency lists, and create and edit Buildings.
- Real-time dashboard: Dynamic real-time information about the most recent visitor activity across all the locations you have access to.
The separate Analytics module shows analytical visit data for specific date ranges. Learn more: Analytics
To view the Overview and Real-time dashboards, select the Locations Overview from the icon menu on the left.

Contents
About locations and buildings
In a nutshell, a ‘location’ is a site within your organization that has one or more entrances used by visitors and employees to access the workplace, while a ‘building’ is simply a group of locations. Read on to understand more about locations and the benefits of creating buildings.
Locations:
Each location has its own settings, rules, and users, etc., and can manage visits from multiple entry points and Visitor kiosks. A location can provide the following:
- Visitor logbook: Manage all visits for a location from a single logbook.
- Personalized welcome: Greet your guests in their own language; the Visitor Kiosk app supports a large range of different languages. Contact Support to add more languages.
- Emergency management: Account for visitors and employees during an emergency.
- Customized usage rights: Each user can have different usage rights for different locations. For example, a user might be registered as an administrator in one location and as a standard user in another.
- Reporting: Compare the visit data for your locations and aggregate all your data to analyze your global statistics.
You can have as many locations for your organization that you need. Contact Support if you would like a new location created. New locations can be created using your existing settings, which can provide:
- Consistent branding - When we add new locations for your organization, we can copy your check-in process and settings to your new locations so that each one of your locations displays your brand.
Buildings:
- Visitor logbook for multiple locations: Manage visits for multiple locations from a single logbook; view all expected, checked-in, and signed-out visitors across your grouped locations.
- Emergency list: Generate an emergency list for all the locations added to your building.
- Export all visit data: Export all visit data for all the locations added to your building.
Overview dashboard
The Overview dashboard displays a list of the Locations and Buildings (group of locations) in your organization, showing the expected visitor flow for a selected day - the number of expected visitors, and how many have checked in and checked out - for each location or building. From here you can also access the Visitor logbooks, generate emergency lists, and create and edit Buildings.
To open the Overview dashboard, select Locations Overview from the icon menu on the left.

The Overview dashboard provides:
- Real-time information: Shows the expected visitor flow for a day; the number of expected visitors, and how many have checked in and checked out, for each location or building.
- Access to Visitor logbooks: Click a location or a building to open the related Visitor logbook. Learn more: Visitor logbook
- Building management: Click a building to expand the list and view the locations added to it. Hover over a building to reveal the Edit and Bin icons. Click Add building to create a new building. Learn more: Buildings
- Emergency lists: Click the Emergency list button for a location or a building, to generate an emergency list. Learn more: Emergency lists
Real-time dashboard
The Real-time dashboard shows live information about the most recent visitor activity across all locations you have access to. The dashboard automatically updates as visitors check-in and out, and when comments are added to visits.
To start the Real-time dashboard, select Locations Overview from the icon menu on the left and select the Real-time tab.

The dynamic dashboard only stores events received while the dashboard is open. If it is closed and reopened, the dashboard is refreshed and remains empty until the next event occurs.
Learn more: Real-time dashboard ↗️
Create and manage Locations
Each location has its own settings, rules, and users, and can manage visits from multiple entry points and Visitor kiosks.
New locations cannot be created from Eptura Visitor directly; Contact Support if you would like a new location created.
Adding a new Location
You can have as many locations for your organization that you need. Contact Support if you would like a new location created.
New locations can be created using your existing settings, such as:
- General visit settings: Invitation email, SMS/text reminder; the default visit duration; company preferences regarding check-in notification, check-out notification, check-out reminder, auto-check-out.
- Most kiosk settings: Branding, custom screens, agreements / non-disclosure agreements (NDA), languages. Custom texts and the (local) printer settings cannot be copied.
- Custom fields: Your custom fields can be copied to a new location.
The above settings can only be copied in bulk when the new location is created, not afterwards.
Switch Location
If you have multiple locations, switch between them from the drop-down list at the top of the Eptura Visitor window.

Learn more:
Create and manage Buildings
Create a building to group multiple locations together. This allows you to manage all visits for the grouped locations from one single logbook, generate an emergency list and export all visit data for multiple locations.
Create a Building and add locations
- Select Locations overview from the icon menu on the left and click New building to start creating a new building.

- Enter a name for the building and select a location from the drop-down list.
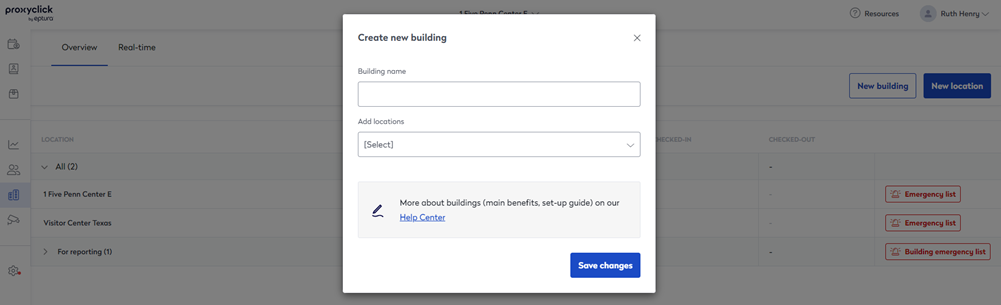
- Continue to add locations as required and click Save changes when done.
Add or remove locations from an existing building
To add additional locations to an existing building or remove locations:
- Select Locations Overview from the left icon menu and hover over the Building to display the Edit icon.
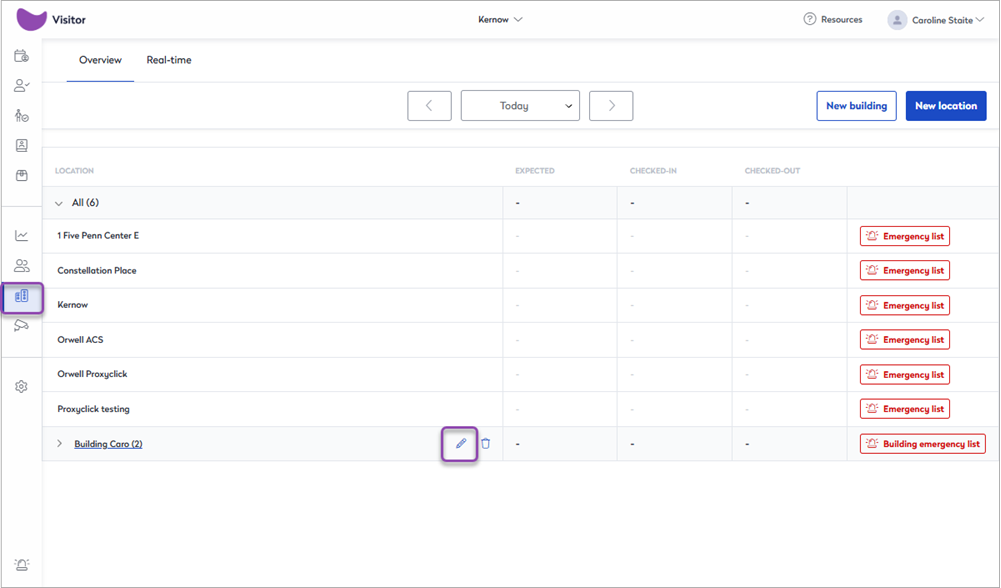
- Click the Edit icon to open the Edit building dialog box.

- Add locations: Select the location to add from the Add locations drop-down list and click Save changes.
- Remove locations: Click Remove for the location you want to remove.
Delete a building
To delete a building:
- Select Locations Overview from the left icon menu and hover over the Building to display the Bin icon.

- Click the Bin icon to delete the building, and click Delete to confirm. This only deletes the building, it does not remove any locations.

Export all visits for a building from the Visitor logbook
You can export all visits for all locations added to a building via the Export visits option from any location's Visitor logbook. You can export up to 180 days of visits within any given time frame.
- Open a Visitor logbook for any location and click the Export all visits icon from the icon bar across the top of the visitor logbook.

- From the 'Export all visits' dialog box, select the From and To dates you want to export, and select the building from the Building or location drop-down list.

- Click Export to export visits from all locations in the building.
You can continue working while the export is running. When ready, a secure link to the exported file is sent via email.
Learn more: Visitor logbook overview ↗️
Open the Visitor logbook for a location or building
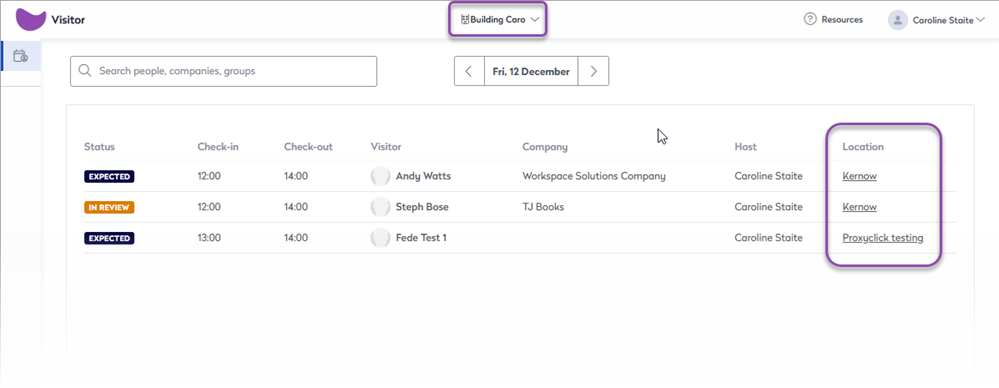
To open the Visitor logbook for a location or building from the Location Overview dashboard, click the Location or Building on the list. The Visitor logbooks for locations and buildings can also be selected from the drop-down at the top of Eptura Visitor.
When a Building is selected, the Visitor logbook shows all visits for all the locations added to the Building, with the visit location displayed in the Locations column on the right:
Learn more: Visitor logbook overview ↗️
Generate emergency list for a location or building
To generate an emergency list for all visitors and employees at a location or at all the locations added to a building, select Locations Overview from the left icon menu, and click the Emergency list or Building emergency list button for the location or building as appropriate.

Emergency lists can also be generated when coordinating a roll call for emergencies and drills.
Learn more: Create a Roll Call for Emergencies and Drills ↗️