Eptura Visitor Access with Access Control
Our approach to managing access to your premises is based around efficiency and security for both you and anyone visiting.
When you integrate Eptura Visitor with your Access Control System (ACS) this will handle the following:
- add visitor details
- make sure visitors have the correct permissions
- take permissions away to make sure they don't have access when they no longer need it.
Access Levels
Access levels is a set of permissions in an ACS that will be applied to a user. It defines which doors, parking barriers, gates, turnstiles, etc. a user is allowed to enter through.
Let's look at how access levels work.
- When a meeting is created the visitor will receive an invitation email that includes their QR code (the QR can instead be provided in the welcome email after check-in, or on a printed badge).
- This QR code includes a unique token number.
- When the invitation goes out, we also automatically create a profile for the visitor in your access control system that we add the same token number to.
- Using QR code readers as part of your ACS will allow visitors to scan their QR code to gain entry wherever you need them to. Learn more in Visitor Access - QR Codes.
- If needed, you can make use of physical RFID access cards. Learn more in Visitor Access - Physical RFID cards and Fobs.
Manage Access
Each visit in Eptura Visitor will have a status of:
- Expected (visitor is due to arrive)
- Checked-in (visitor has arrived and checked-in)
- Checked-out (meeting is complete and visitor has checked-out)
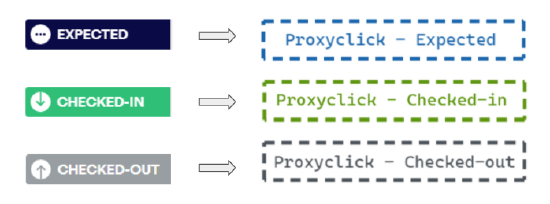
We have a staged access approach: our access control integration adds access levels into your ACS that match the above statuses. As you can see below, when the visit has the status on the left, we automatically apply the access level on the right:

These access levels are created by Eptura Visitor and entered into the ACS, but you have full control over the access they provide. For example:
-
The "Proxyclick - expected" access level may offer access to your car park and entrance so visitors may check-in at the kiosk.
-
The "Proxyclick - checked-in" access level can then elevate their permissions to allow access through turnstiles and anywhere else they need access to during their visit.
-
After they check-out, the "Proxyclick - checked out" access level is applied and you can set this to allow visitors to exit the building and car park or set it to offer no access at all.
The options here are very flexible and can be tailored to the needs of your building.
An additional Eptura Visitor status named On-site can also be activated in the Eptura Visitor settings. This status sits between "Expected" and "Checked-in" and an associated "Eptura Visitor - on-site" access level will automatically be created if this is activated.
Custom Access Levels
Alongside the above, you can use the custom access levels to extend the above functionality, when you have more specific needs for managing access, and have a variety of visitor types that will need distinct access permissions.
Custom Field
You may choose to add a custom field in Eptura Visitor and we can then map this field to create a custom access level in the ACS.
For example, In the image below, there is a custom field named "Access Type" set up as part of the visit creation page. When you set up a visit, you now have the option to select an access type.
.png?revision=1&size=bestfit&width=600&height=180)
In this example, after you map the custom field to create custom access levels, the below access levels are created in your access control system:
- Proxyclick expected - Default
- Proxyclick checked-in - Default
- Proxyclick checked-out - Default
- Proxyclick expected - Contractor
- Proxyclick checked-in - Contractor
- Proxyclick checked-out - Contractor
- Proxyclick expected - VIP
- Proxyclick checked-in - VIP
- Proxyclick checked-out - VIP
The first three could be configured to offer your default levels of access (whatever you choose) for everyday visitors. The Contractor and VIP access levels can be configured however you decide is suitable for each type of visitor. "Contractor" may be selected when a contractor is invited and will need access to staff-only areas of the building. "VIP" can be selected for important visitors that need access to additional areas that everyday visitors usually do not.
- The above is just to illustrate the flexibility that custom access levels offer. The name of the custom field, as well as the options and therefore access levels, is up to you.
- The custom field must be set up as multiple choice with different options listed.
- This must also be set as a mandatory field, as not making a selection will result in no access level being applied.
Company specific access levels
For systems with multiple tenant companies, we can also configure the integration to create access levels per company instead of having all companies using the same access levels. When configured the access levels created will automatically use the tenant company name as part of the access level name. Example:
- Proxyclick expected - Tenant Company Name
- Proxyclick checked-in - Tenant Company Name
- Proxyclick checked-out - Tenant Company Name
The company-specific access levels will sit alongside our default access levels. This provides a lot of flexibility and can be set for all tenant companies (each will have their own access levels) or individual companies as required (others will use the defaults).
All of the above options may be used together
Our staged access approach - applying access at each stage of the visit (Expected, Checked-in, and Checked-out) - is always present, but you can make use of both Custom and Company-based access features to meet the level of complexity you require.
