
Manage Users Across Multiple Locations with SCIM
You can configure all of our native SCIM User Provisioning integrations to manage users across multiple locations from a single Eptura Visitor account. In many cases, you need to configure the sending Identity Provider (IdP) to include a location-mapping attribute if you want to provision users only to specific locations. Our integration-specific articles cover this in more detail for each supported IdP:
- Microsoft Entra ↗️ (Azure AD)
- Okta ↗️
- OneLogin ↗️
- Google Suite ↗️
- Generic SCIM ↗️
Contents
Configure Multi-location mapping
To allow users access to multiple locations, first, connect your IdP to your main location as usual (see the IdP-specific article above), and follow the steps below to set up multi-location mapping. Afterward, you have the option to set the home location for the users provisioned in multiple locations
- Sign in to Eptura Visitor and go to Settings > Integrations.
- Scroll down to your IdP integration and click the Multi-location mapping link. The example in the image shows the link in the Azure AD integration.

Don't see the Multi-location mapping link? You will only see the Multi-location mapping link if you are an administrator for more than one location.
- The User Provisioning: Multi-location mapping options are displayed, showing the locations for which you are an administrator.

- Use the toggle to enable or disable user provisioning for each additional location.
- When enabled, options to either import all users from the directory or only import specific users are shown.
- If Only import specific users is selected, you can filter users by City or Language:

-
- Only import specific users: those that match: Select All or Any from the drop-down
- ...of the following conditions:
- Select either City or Language
- Select either Contains, Equals, or Does not contain
- Enter the appropriate text to find the required users by City or Language.
- To add more conditions, click the plus sign ( + ) to the right of the filter.
- Click Save when done.
-
Set the home location for users provisioned in multiple locations
If your provisioning allows users to access multiple locations, you can define their default home location.
Home locations are used as the landing location for Single Sign-On (SSO) and as the location where any visit created via the generic Calendar integration is registered.
- Sign in to Eptura Visitor and go to Settings > Integrations.
- Scroll down to your IdP integration and click the Multi-location mapping link.
- From the User Provisioning: Multi-location mapping options, click Advanced.
- Select the Specific users should default to.... checkbox to reveal the filters. You can filter users by City or Language:
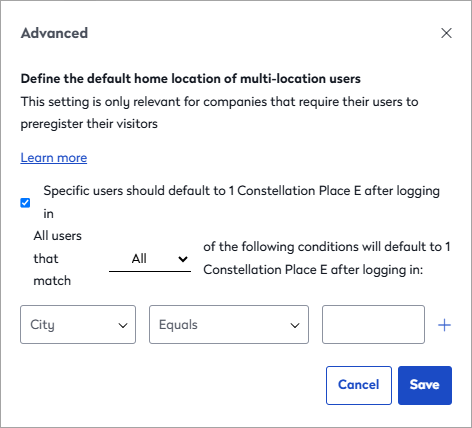
- All users that match: Select All or Any from the drop-down
- ...of the following conditions will default to [location name] after logging in:.:
- Select either City or Language
- Select either Contains, Equals, or Does not contain
- Enter the appropriate text to find the required users by City or Language.
- To add more conditions, click the plus sign ( + ) to the right of the filter.
- Click Save when done.