Start the Eptura Engage Outlook add-in
Eptura Engage for Microsoft Outlook
Contents
How to start the Eptura Engage Outlook add-in
If you have previously logged out or haven’t used the Eptura Engage Outlook add-in in a while, you might need to enter your Eptura Engage URL and your user credentials, when launching the add-in. See: Starting the add-in for the first time
The steps to start the Eptura Engage Outlook add-in depend on the application you are using.
Microsoft Outlook for Windows or Mac
How to start the Eptura Engage Outlook add-in using Microsoft Outlook for Windows or Mac.
- Open the Outlook calendar and start a New Appointment or New Meeting.
- Click Eptura Engage from the ribbon.

If this is the first time you are using the Eptura Engage Outlook add-in or have previously logged out, you will need to verify your email. See: Starting the add-in for the first time
Microsoft Outlook Web Access (OWA)
How to start the Eptura Engage Outlook add-in using Microsoft Outlook Web Access (OWA) from a compatible web browser.
- Open the Calendar and click New Event.

- Click the three dots menu and select Eptura Engage or click the Eptura Engage icon from the ribbon.

If the Eptura Engage Outlook add-in is not visible on the Outlook event ribbon, click the three dots to reveal more menu items
If this is the first time you are using the Eptura Engage Outlook add-in or have previously logged out, you will need to verify your email. See: Starting the add-in for the first time
Starting the add-in for the first time
The first time you start the Eptura Engage Outlook add-in, you must verify your email and set your favorites. After starting the add-in as described above, follow the steps below to set up the add-in.
Verify your email
If this is the first time you are starting the Eptura Engage Outlook add-in or previously logged out, you will need to verify your email.
- Enter your Eptura Engage URL in the Subscription URL field then click Verify email. Your Eptura Engage URL is in the format
[yourcompany].condecosoftware.com

Your URL may be automatically detected if your organization has implemented the Eptura Engage Microsoft 365 integration. The Eptura Engage Outlook add-in for Microsoft 365 uses the active email address to find the Eptura Engage URL for your organization. This auto-detection is not possible with the Exchange Sync service.
- Check your mailbox for the verification email and copy the Access Code.

- Paste the Access Code into the Eptura Engage Outlook add-in and click Verify email.

Didn't receive the code? Click the link at the bottom of the screen to resend the code to your email.
- When your email is successfully verified, click Get started.

Setting your favorites during the initial configuration
After successfully entering the access code and allowing access to your calendar, the Eptura Engage Outlook add-in opens and displays the default location saved on your profile. You can select different Location and Floor preferences and set attributes that you choose regularly when booking meeting spaces. The settings saved as your favorites are selected by default each time you use the Eptura Engage Outlook add-in.
The settings saved as favorites in the Eptura Engage Outlook add-in do not change the default settings stored in your profile.
- Select your Location preferences and Preferred floor, from the drop-down lists. If appropriate, select a specific Workspace type to search for. Note that no other workspace types will appear in the search results if you set a specific type.
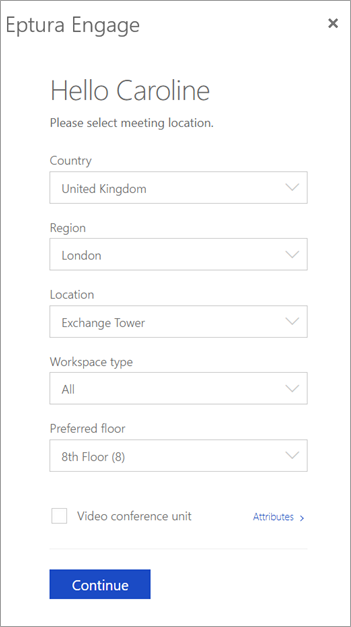
- Tick Video Conference Unit if you want it selected by default each time you search for a meeting space.
- Click Continue when done.
Edit your favorites
Favorites can be changed at any time by clicking Filter at the top-right of the Eptura Engage Outlook add-in. Make your selections then tick Save as my favorite and Search.
The settings saved as favorites in the Eptura Engage Outlook add-in do not change the default settings stored in your profile.