Power BI Example Reports
To help your data analysts get started, Eptura Engage provides example reports for meeting room and desk bookings created in Microsoft Power BI. These example reports provide an opportunity to explore how you might report on your meeting rooms and desks and see how well individual rooms and desks are utilized. To request access, contact your Eptura representative.
Conditions of use
These example reports are provided as templates only and do not form part of Eptura's services. Accordingly, no support or customization is provided.
About the example reports and creating your own
The example reports in this guide were developed by our partner, kleene.ai. We recommend contacting kleene.ai if you require assistance creating your own reports.
![]()
Technical requirements
- Eptura Engage Analytics version 1.6.0 or later.
- The latest version of Eptura Engage.
- Power BI desktop application with an appropriate license.
- The account name or URL of your Azure Table storage.
- The Account Key for the database.
It is expected that an experienced data analyst will follow these instructions.
How to load the example reports
These example reports are provided as templates only and do not form part of Eptura's services. Accordingly, no support or customization will be provided.
Sample data
The following Power BI templates and sample data are needed to build the example reports.
File |
Description |
|---|---|
| Condeco Desk Booking Reports ATS v1.6.0.pbix | Power BI example template for Eptura Engage desk bookings. ATS version 1.6.0. |
| Condeco Meeting Room Booking Reports ATS v1.6.0.pbix | Power BI example template for Eptura Engage meeting room bookings. ATS version 1.6.0. |
| Condeco Example Data.xlsx | Sample data for the Power BI example reports. |
| Condeco Time Lookup.xlsx | Time Lookup spreadsheet required for the efficiency calculations. |
Download the Power BI templates and sample data
You need a password to download the sample data – contact your Eptura representative to request access.
When you have the password, download the sample data.
![]()
Open the example reports
- Start Power BI and open either of the PBIX files.
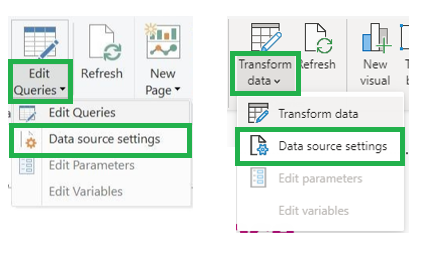
- Depending on your Power BI version, click the Edit Queries or Transform Data drop-down from the home ribbon, then select Data source settings.
- Select Condeco Example Data.xlsx from the list and click Change Source.
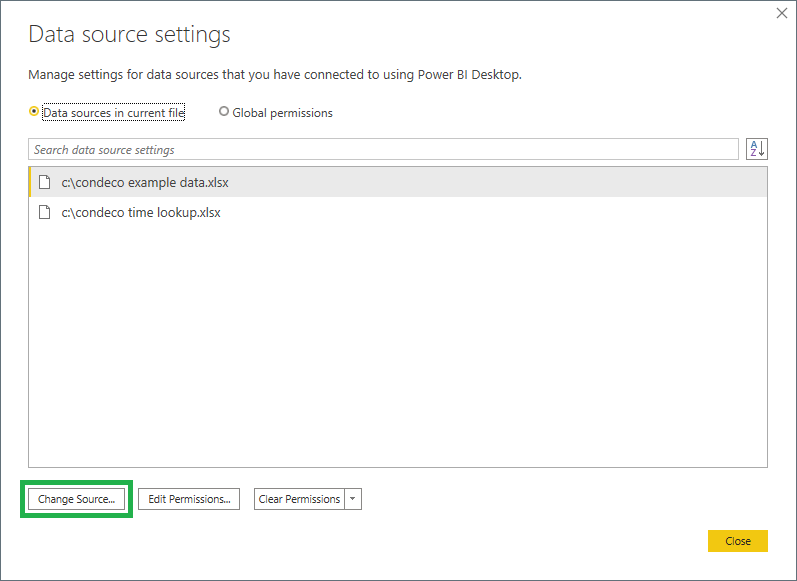
- Click Browse and navigate to the corresponding file that you downloaded. Click OK.
- Repeat the previous step for Condeco Time Lookup.xlsx.
- Click Close to close the data source settings window.
- Click Apply Changes on the yellow banner advising that pending changes haven’t been applied.

- Wait a few minutes for the changes to be applied.
Apply your Azure data
When you have loaded the example reports designed and created by kleene.ai, you can apply your own data by connecting to your Azure data store.
It is expected that these instructions will be followed by an experienced data analyst.
Open the Power Query Editor
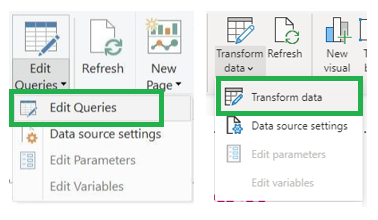
Depending on your Power BI version, click Edit Queries or Transform Data from the home ribbon.
The Power Query Editor window will open.
Change the data source to read your Azure table storage
When you have completed the following for the Booking query, repeat the steps for the Booking vs Time query.
- Select the Booking query from the Queries list on the left and select Source from APPLIED STEPS on the right.
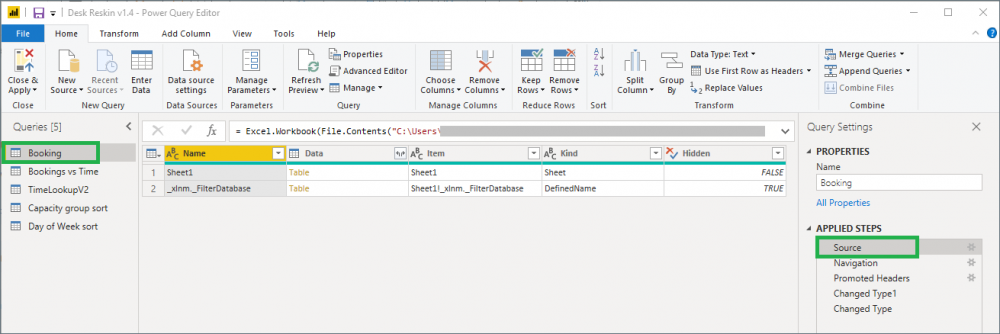
The data source of the selected query is shown in the formula bar. Currently, it is reading from the sample Excel file.

If the formula bar is not displayed under the ribbon bar, click the View menu and tick Formula Bar from the ribbon.
- Delete the entire Excel.workbook command from the formula bar.
You may need to click the down arrow to the right of the formula bar to display the entire formula as it may extend to two or more lines.
- Enter your Azure table storage source in the formula bar, in the format:
= AzureStorage.Tables("[https://myazuretables]")
Replace [https://myazuretables] with the URL for your data.
- The first time you follow these steps, you will see “Please specify how to connect” in a yellow banner:
- Click Edit Credentials.

- Enter your Account key and click Connect:
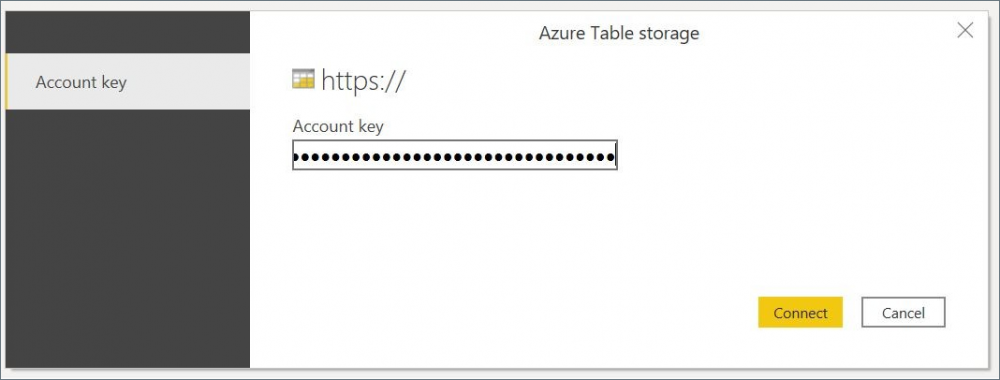
- Click Edit Credentials.
- Repeat the steps above for the Bookings vs Time query.
Configure the table and query
Point query to the right Azure table
There are likely to be many tables in your Azure table storage area so you need to tell Power BI which table to use.
When you have completed the following for the Booking query, you will need to repeat the steps for the Booking vs Time query.
- Select the Booking query from the Queries list on the left, then select Navigation from APPLIED STEPS on the right.
- Click Edit Settings in the yellow Expression.Error box.
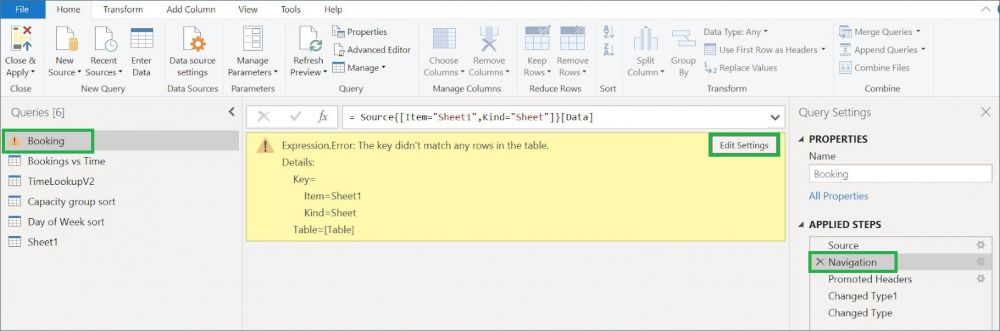
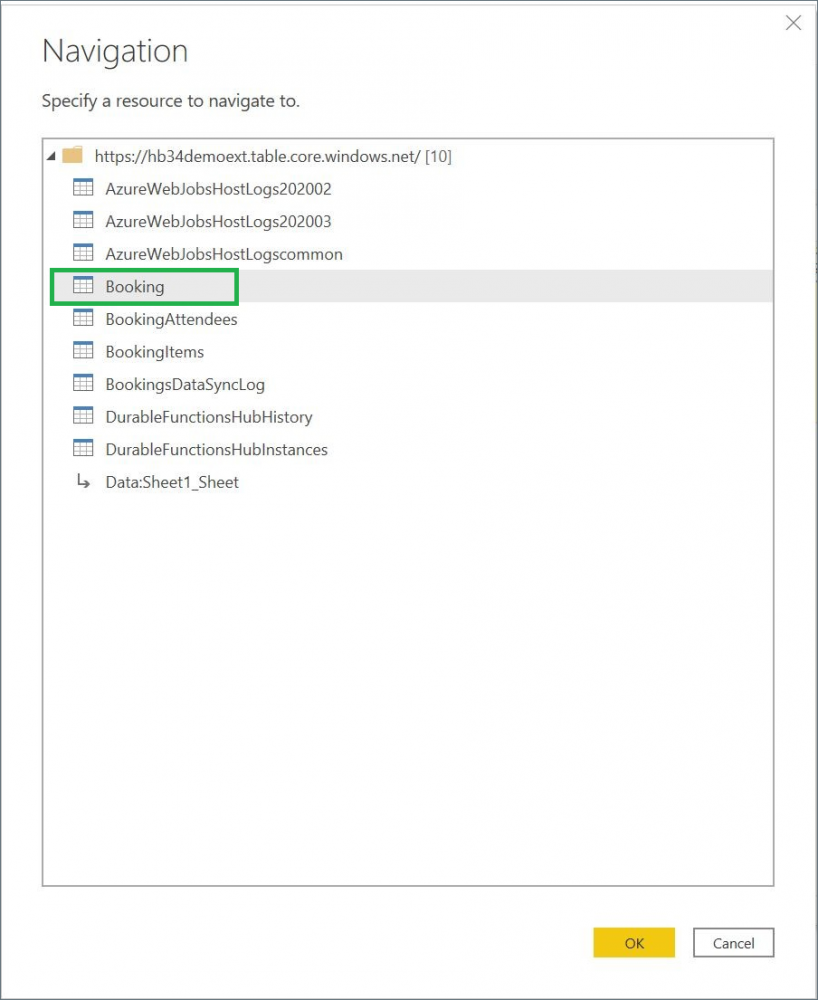
- In the Navigation popup window select Booking and click OK.
When you repeat these steps for the Booking vs Time query, select Booking from the above list again.
Load all columns in the Azure table
Power BI doesn’t automatically read the entire contents of a table so you need to tell it which columns to import.
- Click the two-arrow icon to the right of the Content column.

- Make sure Use original column name as prefix is not ticked then click Load more.
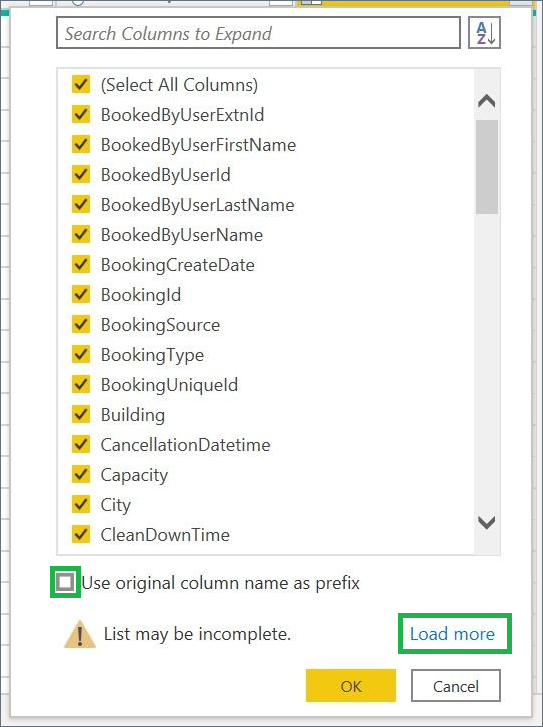
You might see the message Limit of 1000 scanned rows reached, which can be ignored.
- Click OK.
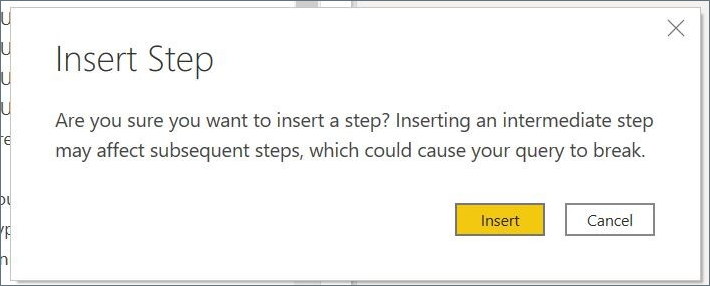
- If you see the Insert Step warning, click Insert.
Delete the Promoted Headers step from the query
Your Azure table storage has column names built-in so we don’t need the Promoted Headers step of the query.
- Select the Booking query from the Queries list on the left, then in APPLIED STEPS on the right, click the X next to Promoted Headers to delete the step.
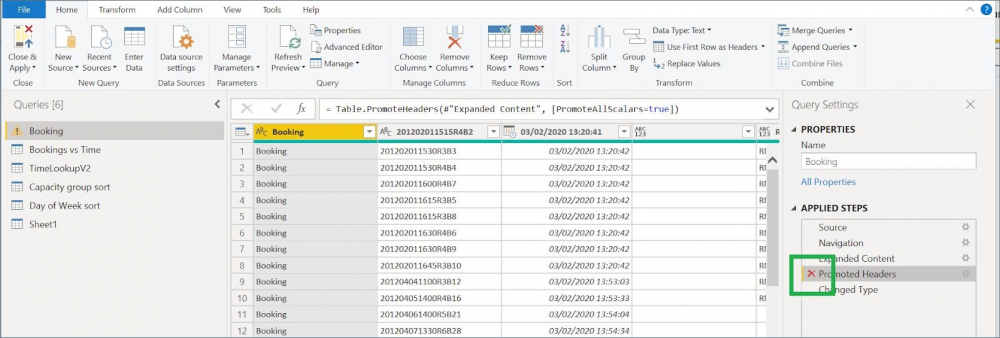
- Click Delete to confirm you wish to delete the step.
- Repeat the steps above for the Bookings vs Time query.
When the steps have been completed for both queries, continue to the next topic to set privacy levels and apply changes.
The Booking vs Time query may show a yellow warning triangle for a few minutes whilst the query is updated. You do not have to wait for it to complete before continuing with these instructions.
Set privacy levels and apply changes
Privacy levels must be assigned when a data source query in Power BI gets data from two separate sources. The Bookings vs Time query gets data from the bookings data source and appends a column from the time lookup data source.
Setting privacy levels to Private may affect performance so we recommend setting the privacy level for the bookings data source to Private and the time lookup data to Public. Alternatively, you can choose to set the privacy levels to None.
Read more about Privacy Levels at Microsoft docs.microsoft.com/en-us/power-bi/admin/desktop-privacy-levels/
How to set privacy levels
- Click Data source settings from the home ribbon.
- Select your Azure table storage and click Edit Permissions… then choose the required Privacy Level.
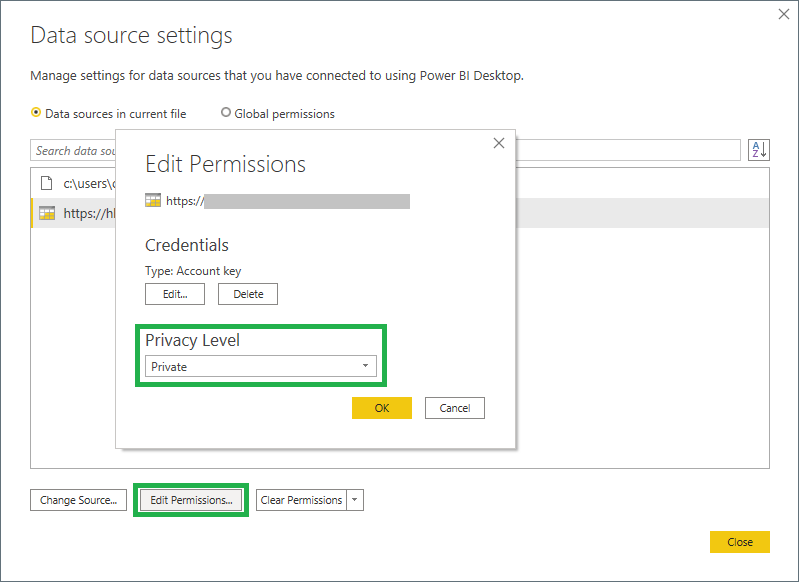
- Select the time lookup data source and click Edit Permissions… then choose the required Privacy Level.
Apply changes
To save all changes, click Close & Apply from the Home ribbon.
It can take several hours to apply the changes, depending on how much data you have.
Congratulations! Power BI is now reading your Azure table storage source.
Publishing the reports and refreshing the data
Publishing the reports
Information about publishing your Power BI reports is available at Microsoft docs.microsoft.com/en-us/power-bi/create-reports/desktop-upload-desktop-files/
Refreshing the data
When the report has been published you can schedule an automatic refresh of the data. Because the refresh can take a very long time, we recommend the refresh occurs overnight and the schedule corresponds to your reporting granularity. For example, if you report on monthly data, then schedule an automatic refresh once a month.
Information about refreshing data is available at Microsoft docs.microsoft.com/en-us/power-bi/connect-data/refresh-data/
Troubleshooting
Account key
If you entered an incorrect account key, clear the credentials as follows:
- Click File then Options and Settings.
- Select Data source settings.
- Select Global permission then select your data source from the list.
- Click Clear permissions then Delete to confirm.
The next time you enter your data source you will be prompted to enter your account key.
The URL to your Azure table storage is not accepted
Make sure the quotation marks that surround the text are not the curly type. If you are unsure, delete the quotes and enter them again whilst in the formula bar. This issue can occur when you copy the string from an editor such as MS Word and paste it into the formula bar.
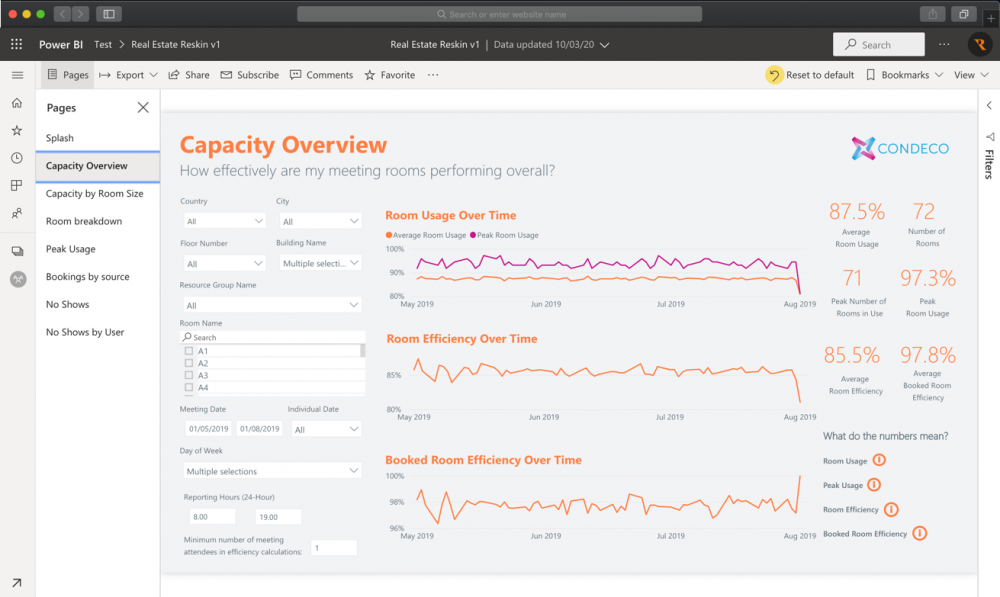
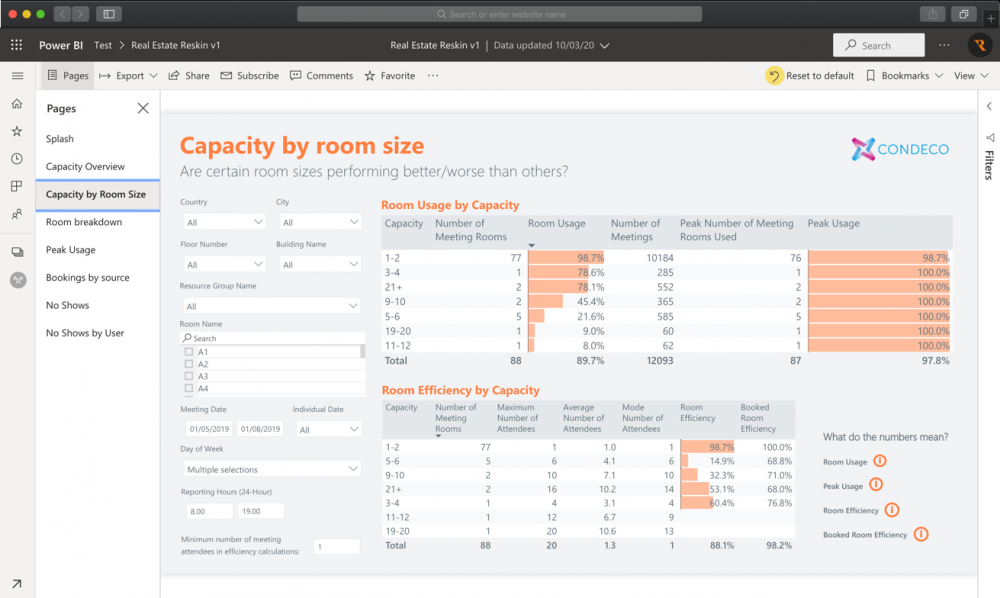
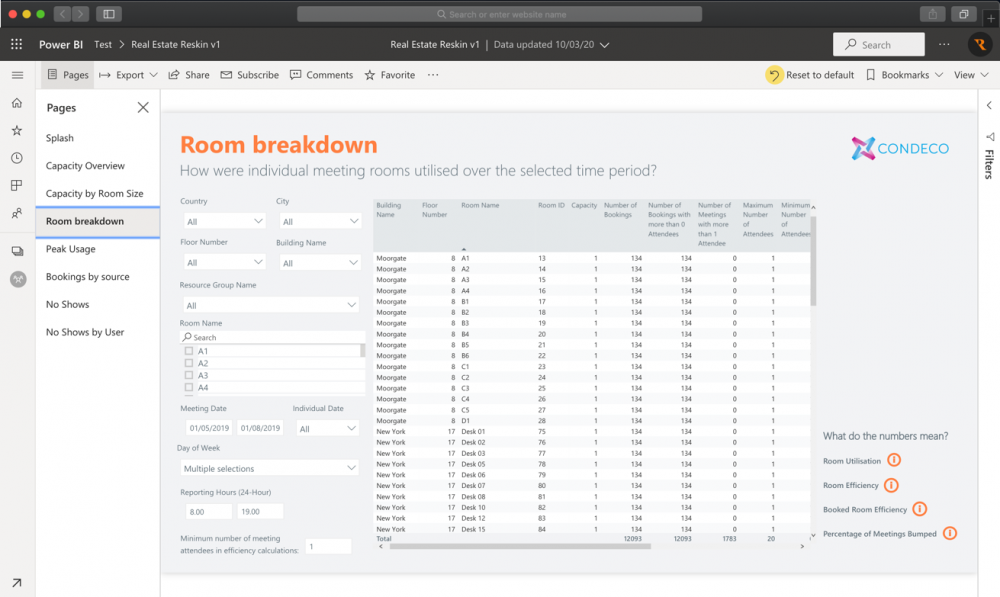
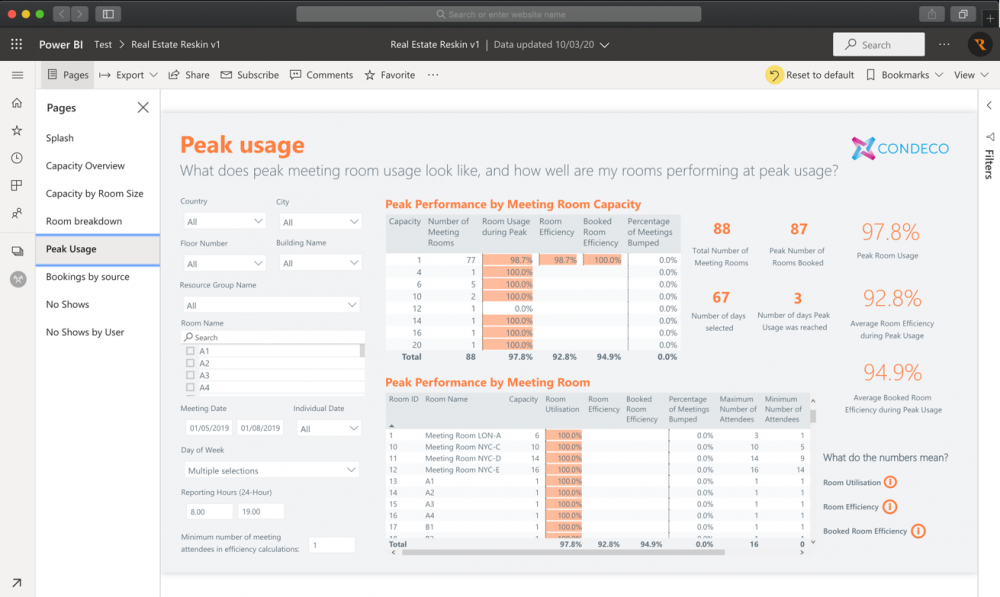
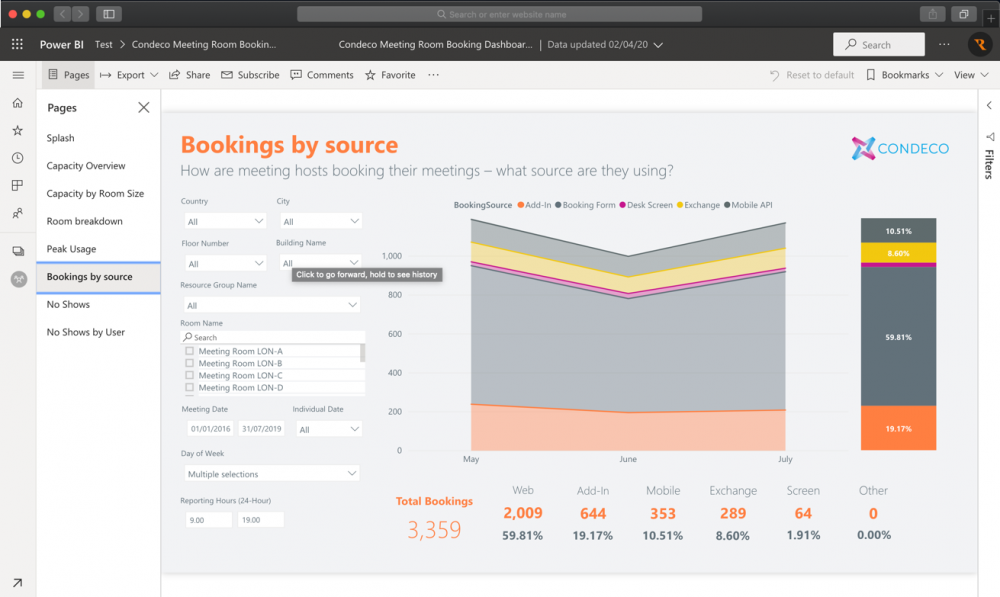
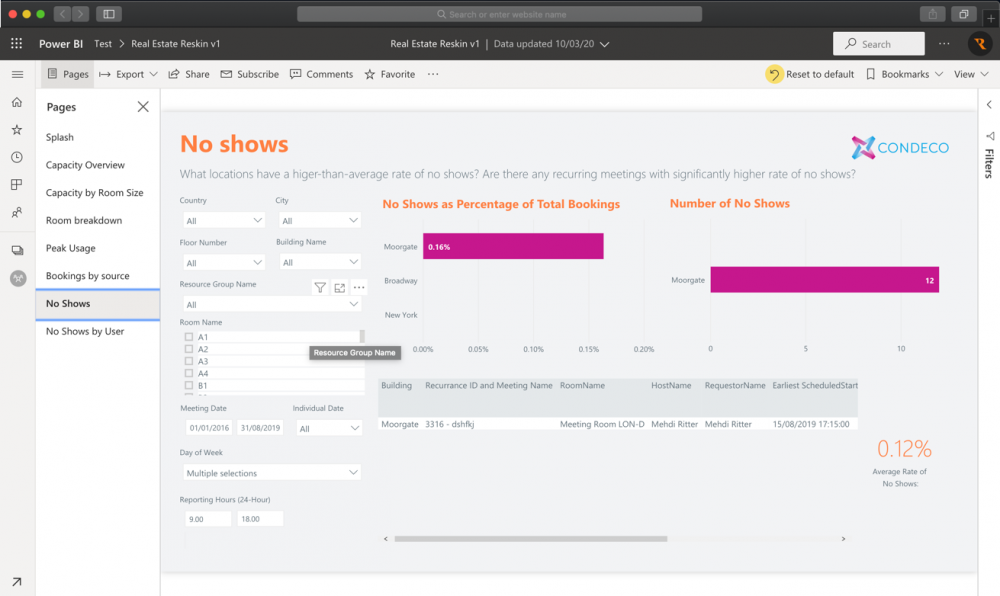
Screenshots of example reports
Example reports for meeting room bookings
These example reports are provided as templates only and do not form part of Eptura's services. Accordingly, no support or customization will be provided.
If you would like assistance creating your own dashboards, we recommend discussing your requirements with our partner, kleene.ai/.
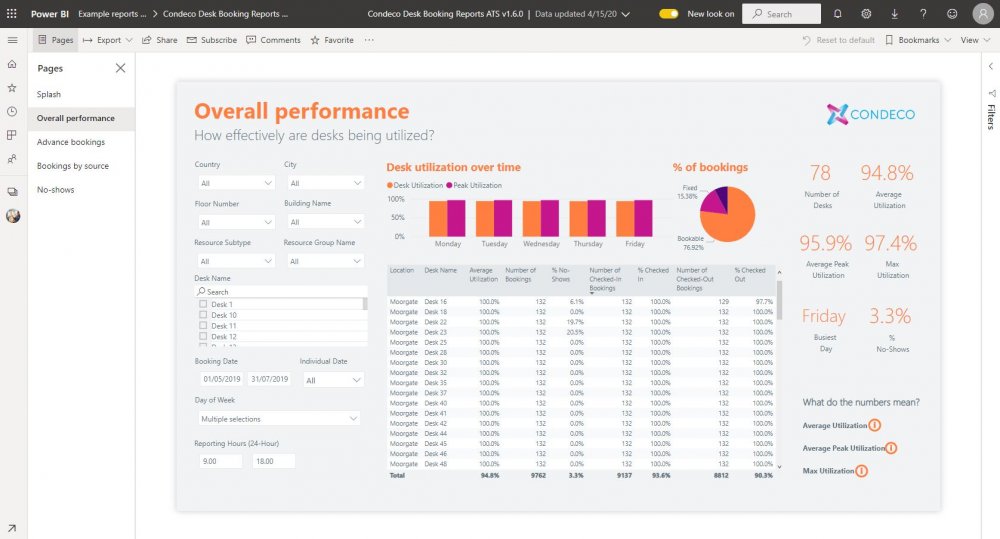
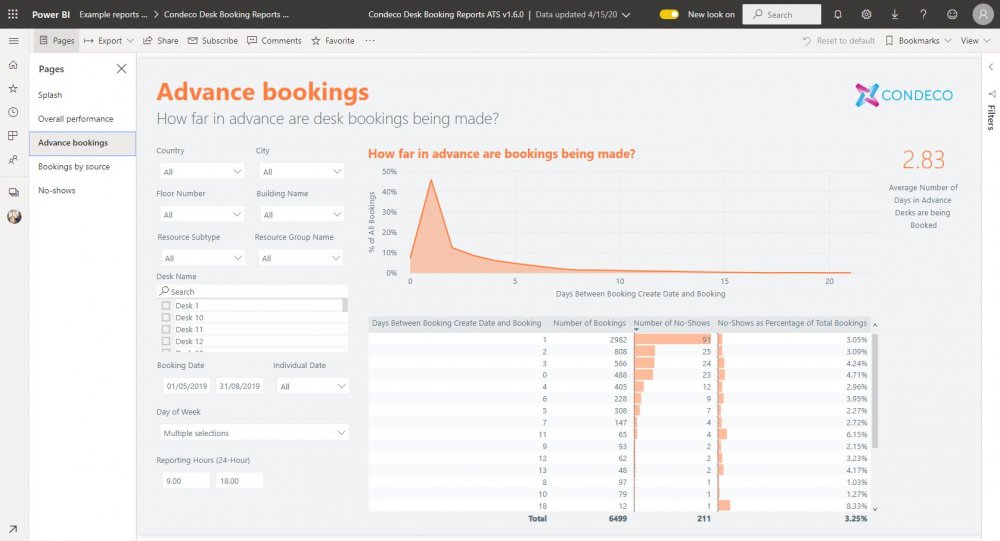
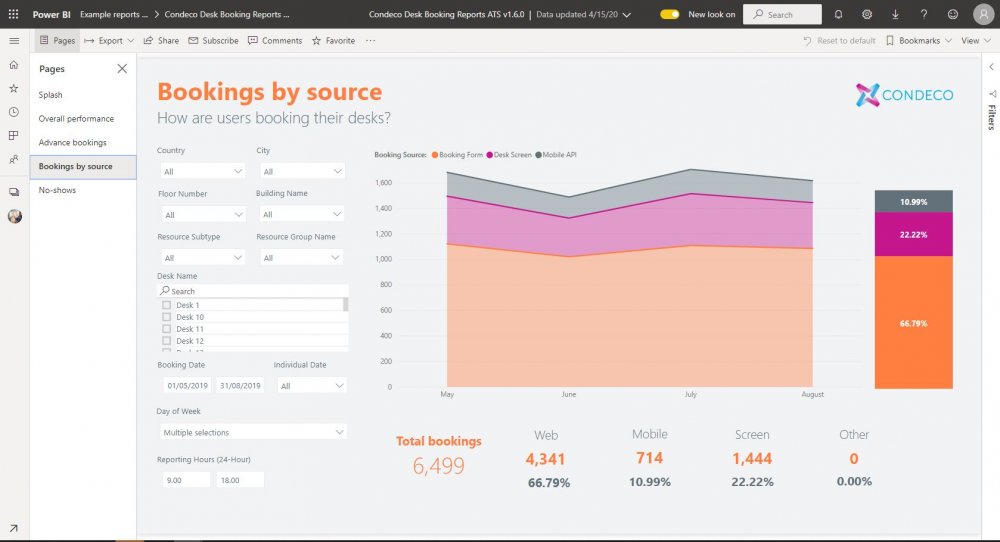
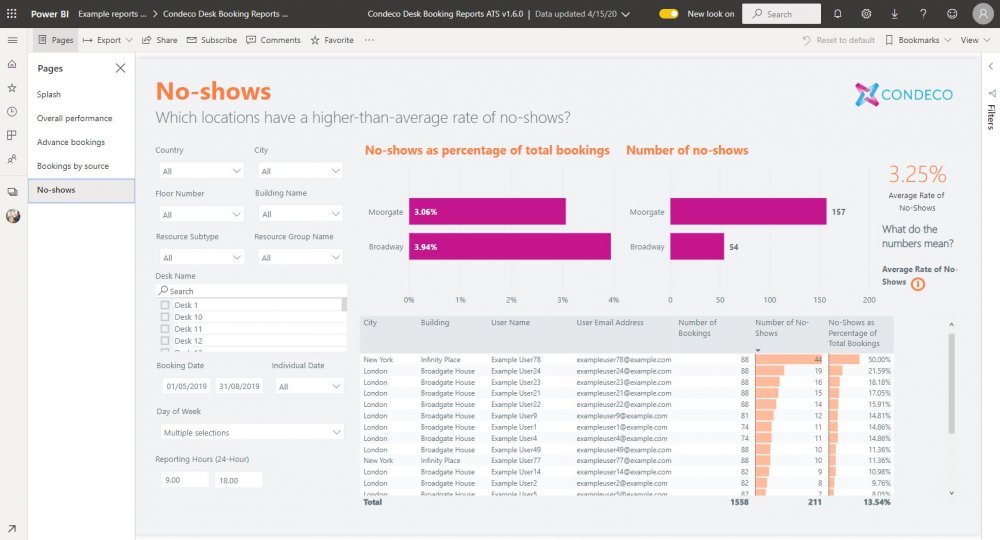
Example reports for desk bookings
These example reports are provided as templates only and do not form part of Eptura's services. Accordingly, no support or customization will be provided.
If you would like assistance creating your own dashboards, we recommend discussing your requirements with our partner, kleene.ai/