Legacy article: Control access to calendars
Legacy configurationMicrosoft is ending support for Role Based Access Control (RBAC) for Application Impersonation in Exchange Online. Eptura Engage Exchange Sync customers still using this old technology must now implement RBAC for Applications in Exchange Online, which does not use the Application Impersonation role. Learn more: RBAC for Applications in Exchange Online The steps in this article are for the legacy configuration for Application Impersonation. For current information, see Control access to calendars Control access to calendars with a mail-enabled security groupGranting consent during the onboarding process allows Graph API access to all calendars in a Microsoft 365 tenant. We recommend applying an Application Access Policy and Management Scope to restrict access to specific calendars only. The Application Access Policy can either restrict or deny Graph API access to members of a mail-enabled security group. There are two types of permissions that can be applied to the Application Access Policy, depending on whether you wish to allow or deny access to the mailboxes added to the mail-enabled security group. a) Use DenyAccess to deny access to mailboxes in the group and allow access to all other mailboxes. Learn more about New-ApplicationAccessPolicy at Microsoft https://docs.microsoft.com/en-us/powershell/module/exchange/new-applicationaccesspolicy?view=exchange-ps/ ContentsHow is it done?The following steps refer to the legacy configuration for Application Impersonation. For current information, see Control access to calendars Use the following PowerShell scripts to create a new mail-enabled security group, create an Application Access Policy and create the Management Scope, to restrict access to specific mailboxes.
1. Connect-ExchangeOnline
Get-ManagementRoleAssignment -RoleAssignee "Enter service account name" There should not be results with Role “ApplicationImpersonation“ and RoleAssigneeType “User“.
New-DistributionGroup -Name "Enter the name of new security group" -Alias "Enter the Alias" -Type security
New-ApplicationAccessPolicy -AccessRight RestrictAccess -AppId "Enter Token Provider AD App ID" -PolicyScopeGroupId "Enter Email Enabled Security Group Mailbox ID" -Description "Restricted Access Group Policy" -AccessRight: Replace “RestrictAccess” with “DenyAccess” to deny access to the calendars in the security group and allow access to all other calendars.
$DG = Get-DistributionGroup -Identity "Enter Group Mailbox ID"
New-ManagementScope "Enter new name of management scope" -RecipientRestrictionFilter "MemberOfGroup -eq '$($DG.DistinguishedName)'"
New-ManagementRoleAssignment -Name:"Enter new name of role assignment" -Role:ApplicationImpersonation -User:"Enter service account mailbox id" -CustomRecipientWriteScope:"Enter name of management scope created in the previous step" Microsoft 365 takes at least one hour to replicate changes to the Application Access Policy. Test the Application Access policyUse the following PowerShell command to list mailbox permissions. Test-ApplicationAccessPolicy -Identity "Enter the mailbox id to test" -AppId "Enter Token Provider AD App ID" Verify impersonation changesVerify if the Microsoft 365 service account is able to impersonate the mailbox room calendar that was either added or removed from the group. Impersonation can be verified either using the EWS Editor or via the Microsoft Remote Connectivity Analyzer online tool:
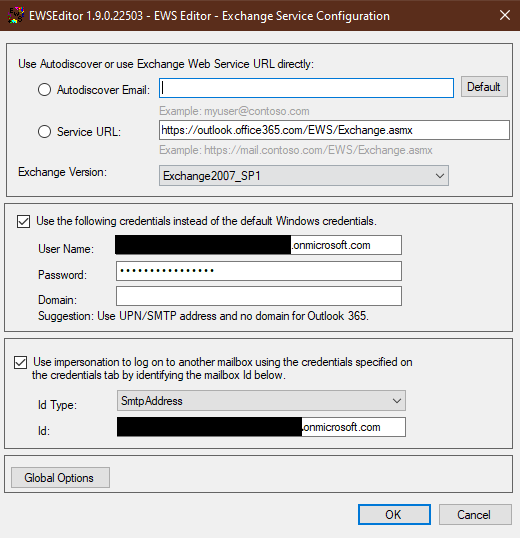
Verify impersonation using EWS EditorOpen the Exchange Web Services Editor
If you use the EWS Editor to verify that the Microsoft 365 Service account access to the Exchange room calendar has been revoked you would expect to see an error after adding the credentials.
Verify impersonation using the Microsoft Remote Connectivity AnalyzerIf downloading and running EWS Editor is not an option, Microsoft also has a browser-based utility page for limited verification that is sufficient to verify impersonation access.
|


.png?revision=1)
.png?revision=1)
.png?revision=1)
.png?revision=1)