Exchange room mapping
To synchronize an Exchange room with an Eptura Engage meeting space, the Exchange room mailbox is mapped to the corresponding Eptura Engage meeting space resource using the Exchange room mapping module in Eptura Engage.
When you initially map an Exchange room and an Engage resource, a readiness check is performed to ensure all events and bookings for the next 3 years are compatible. If no conflicts or incompatible events are identified, the room and resource are mapped and the events and bookings are synchronized. If any conflicts or incompatible events are found, then the room and resource are not mapped and a Readiness Report is sent via email, highlighting the events/bookings that need attention.
Eptura Engage Microsoft 365 integrations only. Learn more: Eptura Engage and Microsoft
Contents
Create a new mapping
Create and manage mappings between your Exchange rooms and Eptura Engage meeting space resources from the Exchange room mapping module in Eptura Engage. The process performs a readiness check before rooms and resources are mapped, identifying any conflicting bookings or incompatible events, which will prevent a Microsoft event and an Engage booking from being synchronized. Learn more: The readiness check
Before you start
To prevent conflicts during the mapping process:
- We recommend that future events or bookings be removed from either the Exchange room or the Eptura Engage resource before starting.
To ensure bookings are successfully synchronized to users' calendars:
- The user's Exchange calendar must be subscribed to Eptura Engage. If a user's calendar is not subscribed, any events that cannot be synchronized will appear in the Readiness Report. We therefore recommend that all users launch the Eptura Engage Outlook add-in before beginning the mapping process. This action subscribes their calendar to Eptura Engage and enables synchronization.
Do not map the following Eptura Engage meeting space types, which are not supported by the Microsoft 365 integration:
- Blind-managed meeting spaces
- Linked meeting spaces
To map your Exchange rooms and Eptura Engage resources, sign in to Eptura Engage as a Global admin and go to Application setup > Exchange room mapping.
Multiple mapping requests are automatically processed in batches of 10, with any requests above the batch limit queued and completed in the background.
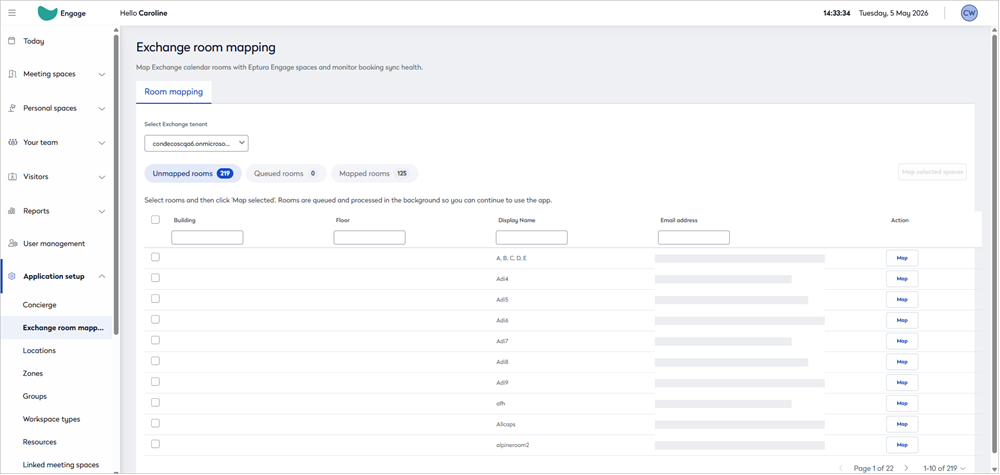
- In the Exchange room mapping module, select the Exchange tenant and then select Unmapped rooms to display the list of Exchange rooms in the tenant available to map to Eptura Engage resources.
If this is the first time the tenant has been selected, follow the steps in First-time event: Allow access and map existing associations before continuing.
- Your unmapped Exchange rooms are listed along with their display name and email address. Building and floor information is shown if the Exchange room is configured with additional location metadata.
If the building and floor columns are empty, this means your Exchange rooms are not configured with additional location metadata. The missing information is not essential, and does not affect functionality, but it can be added with the PowerShell 'Set-Place' command if required.
Learn more: Find out more about configuring Exchange room location data at Microsoft: https://learn.microsoft.com/en-us/powershell/module/exchange/set-place?view=exchange-ps
- Use the filter at the top of the list to display all the Exchange rooms in a building or on a floor, or to find a specific Exchange room by entering its name or email address.
- To map an individual Exchange room, click Map to the right of the room in the list. Or, to map multiple rooms, tick the room boxes to the left of each room you want to map and click Map selected spaces at the top.
- The side panel opens and displays options to find the Eptura Engage resources. Select the Eptura Engage country and location from the drop-down lists, and select a floor and group if required.
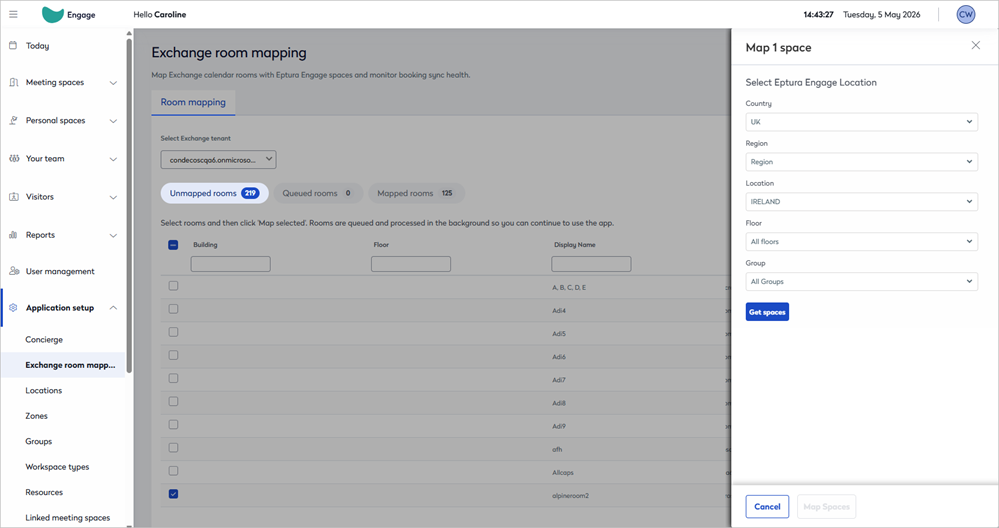
- Click Get spaces to display the selected Exchange room(s), alongside a selectable list of the Eptura Engage resources at the location that are not already mapped.
- For each Exchange room, select the Eptura Engage resource to map it to from the drop-down list. If you don't want to map a particular Exchange room, select 'Don't map this room'.

- Click Save to begin the mapping process and start the readiness check.
- Click Close to return to Exchange room mapping.
Good to know
- Mapping requests are automatically processed in batches of 10, with any requests above the batch limit queued and completed in the background.
- Three filter buttons are available at the top - Unmapped, Queued, and Mapped:
- Unmapped rooms - All unmapped Exchange rooms.
- Queued rooms - Exchange rooms and Eptura Engage resources that are waiting to be processed, and their current queue status.
- Mapped rooms - Mapped Exchange rooms and Eptura Engage resources. Learn more: View and manage mappings.
- The mapping process can take some time - an email is sent to the initiator when the process is complete.
What happens next?
When the mapping process is initiated, a readiness check runs to check for conflicting events/bookings and incompatible events. Learn more: Conflict resolution and the readiness check
No conflicts found: If the readiness check does not identify any conflicts or incompatible events, the room and resource are mapped immediately, and events for the next 3 years are synchronized. When the process is complete, an email notification is sent to the administrator who started the process. Learn more: Events and bookings synchronized during the mapping process
Conflicts and/or incompatible events found: If the readiness check identifies conflicts and/or incompatible events, the room and resource is not mapped and a Readiness Report is sent via email in an Excel workbook. Learn more: The readiness check
Events and bookings synchronized during the mapping process
When the readiness check does not find any conflicts or incompatible events, the synchronization process starts. Exchange events and Engage bookings up to 3 years in the future are synchronized.
Events and bookings are synchronized in the following order:
1. Single-day / single-room events and bookings
Any single-day / single-room Exchange event and Engage booking that start and end at the same time, and were created by the same (subscribed) user, are linked. No changes to the individual event or booking are made; different titles (for example) are retained. However, if the linked event or booking is subsequently edited, the update is synchronized to both the Exchange event and the Engage booking.
An Exchange event and Engage booking are assumed to represent the same meeting and are linked if the following is true:
- Both the Exchange event and Engage booking are single-day meetings in a single room.
- The start and end time of the Exchange event is the same as the actual start and end time of the Engage booking (any set up or clean down time for the Engage resource is ignored).
- The same user created both the Exchange event and Engage booking. (The user's Exchange calendar must be subscribed to Eptura Engage).
2. Engage bookings > Exchange events
Bookings for the Eptura Engage resource are synchronized to the Exchange room.
- Multi-room bookings in Eptura Engage are created as separate events in Exchange, so only the booking and event for this mapped pair are synchronized.
- Recurring bookings are synchronized, however, Smart Alternatives (that automatically assign meeting spaces when a resource is not available for all instances of a recurring booking), is disabled during the mapping process.
- Any set up or clean times applied to Engage bookings are not added to the Exchange event. The start and end of the Exchange event will be at the actual start and end time of the Engage booking.
- A calendar event is automatically created directly in the mapped Exchange room calendar for any existing Eptura Engage booking not linked to a user's calendar event. This ensures that the Eptura Engage resource and Exchange room calendars are in sync.
- When an Engage resource was previously added to a user's calendar event, and the event does not exist in the Exchange room calendar, the Exchange room is added as an attendee to the event. This triggers an update to be sent to all the event attendees.
3. Exchange Events > Eptura Engage bookings
Events in the Exchange room are synchronized to the Eptura Engage resource.
- When an Exchange event is synchronized to Engage for a resource that requires set up or clean down time, the Engage booking is only created if there is enough space before and after the booking to accommodate the extra time. If set up and clean down times cannot be accommodated, then the booking is declined by Eptura Engage. (These bookings are not included in the readiness report).
Conflict resolution
The readiness check
When you have selected the Exchange rooms and Engage resources to map and started the process, Eptura Engage first performs a readiness check to identify any conflicts or incompatible events that will prevent a Microsoft event and an Engage booking from being synchronized. If any are identified, the room and resource are not mapped and a readiness report is sent via email in an Excel workbook. All identified issues must be resolved before mapping the room and resource again.
Only when no conflicts or incompatible events are identified, the room and resource are mapped and the events and bookings synchronized. Learn more: Events and bookings synchronized during the mapping process
Readiness report
The readiness report is an Excel workbook that provides details for each conflicting or incompatible event and booking. Each room report is displayed on a separate sheet in the workbook.
The readiness report details conflicts and incompatibilities with Exchange events and Engage bookings:
- Conflicts: A conflict occurs when the appointment time of an Exchange event and an Engage booking overlap. We recommend deleting either the event or the booking.
- Incompatibilities: Exchange events that do not meet the booking rules of the associated Eptura Engage booking group, or contradict Eptura Engage's general or global settings, are considered incompatible and must be edited appropriately or removed.
The following events and booking types cannot be synchronized and are included in the readiness report:
- Events and bookings that conflict (overlapping date/time)
- Events and bookings created in different time zones.
- Recurring events/bookings with more than 450 instances.
- All-day events are not supported.
- Instances of a recurring event/booking that conflict with an existing booking.
- Eptura Engage booking with a 'specific' recurrence pattern. (The Eptura Engage 'specific' recurrence pattern is not supported by Exchange).
- Multi-room events/bookings with more than 8 rooms.
- Exchange events that do not comply with the booking rules set in the Eptura Engage group.
- Exchange events that do not comply with Eptura Engage general or global settings.
- Exchange events at times that do not allow for any set up and clean down time required by the Engage resource.
- Eptura Engage no-show bookings are not supported by Exchange, and are not synchronized. (Since past bookings are not synchronized, any impact is limited to bookings in progress at the time of the mapping process).
The readiness report shows the following descriptions of conflicts and incompatibilities:
Reason |
Suggested action |
|---|---|
|
Exchange and Eptura Engage bookings overlap. |
Delete either the Eptura Engage booking or the Exchange event. |
|
User is not subscribed. |
The Microsoft calendar of the user listed as the Exchange organizer in the report, must be subscribed to Eptura Engage |
|
Recurrence has [x] instances, exceeding the 450 limit. |
Reduce the number of instances in the Exchange recurring event to 450 or below. |
|
Has [x] rooms, exceeding the 8-room limit. |
Reduce the number of rooms added to the Exchange event to 8 or less. |
|
Infinite recurrence (no end date). |
Reduce the number of instances in the Exchange recurring event to 450 or less. |
|
Booking is beyond the advance booking period of [x] days. |
Delete the Exchange event or extend the advance booking period set for the Eptura Engage group that manages the meeting space resource. |
|
Created only [x] hours before start, requires at least [x] hours notice. |
Delete the Exchange event or extend the notice period set for the Eptura Engage group that manages the meeting space resource. |
|
Outside business hours [business hours] |
Delete the Exchange event or change the business hours for the Eptura Engage group that manages the meeting space resource. |
|
Eptura Engage booking exceeds 450 instances. |
Reduce the number of instances in the Eptura Engage recurring booking to 450 or less. |
|
Eptura Engage booking uses more than 8 rooms. |
Reduce the number of rooms in the Eptura Engage booking 8 or less. |
|
Eptura Engage booking has specific recurrence. |
Change the recurrence type of the Eptura Engage booking, or delete the booking. |
|
Eptura Engage booking is a no-show booking. |
Delete the Eptura Engage booking. Exchange does not support no-show bookings. |
|
All-day Exchange bookings are not supported. |
Unselect the 'All day' option in the Exchange event and set a start and end time. |
|
Meeting time slot is available but conflicts with setup time of [x] minutes before the Engage booking. |
Either remove the setup/clean down times from the booking in Eptura Engage, or adjust the event time in Exchange to allow for the setup/clean down times. |
|
Meeting time slot is available but conflicts with clean down time of [x] minutes after the Engage booking. |
Either remove the setup/clean down times from the booking in Eptura Engage, or adjust the event time in Exchange to allow for the setup/clean down times. |
|
Room invited by another Exchange room |
Create separate events in Exchange for each room. |
View and manage mappings
- In the Exchange room mapping module, select the Exchange tenant and then select Mapped rooms to display all the mapped spaces in the tenant.

- Use the filters at the top of the Exchange room list or Eptura Engage spaces list to find specific mappings.
Exchange rooms are shown on the left, along with their display name and email address. Building and floor information is shown if the Exchange room is configured with additional location metadata.
If the building and floor columns are empty, this means your Exchange rooms are not configured with additional location metadata. The missing information is not essential, and does not affect functionality, but it can be added with the PowerShell 'Set-Place' command if required.
Learn more: Find out more about configuring Exchange room location data at Microsoft: https://learn.microsoft.com/en-us/powershell/module/exchange/set-place?view=exchange-ps
The associated Eptura Engage space is shown on the right, along with the Country, Location, Floor, Group, Space (resource name), Last synced time, and Status.
Stopping a sync
To stop the synchronization between an Exchange room and an Eptura Engage resource, click Stop.
When a sync is stopped, the 'Stop' button is grayed out (disabled), and the status shows Sync Stopped. However, the Exchange room and the Engage resource remain mapped, and the synchronization history is preserved.
To restart the synchronization, contact Support
First-time event: Allow access and map existing associations
When selecting a tenant for the first time, a Microsoft notification is displayed advising that Eptura Engage is requesting access. Click Accept to grant consent to the Microsoft Graph endpoint Place.Read.All, which is shown in the permission request as Read all company places.

Good to know
- Eptura Engage will not subscribe to any Exchange room calendars until the Place.Read.All permission has been granted.
- It can take up to an hour for rooms to start appearing in the Exchange room mapping table.
- Consent must be granted for each Exchange tenant.
When the permissions are accepted, refresh the Exchange room mapping page to display your Exchange rooms in the table (this can take up to an hour).