Book a meeting space from the mobile app
- Last updated
- Save as PDF
From the Eptura Engage mobile app you can find and book a meeting space to accommodate a specific number of attendees and one that provides specific attributes, such as a Microsoft Teams enabled space, or a TV, whiteboard, etc. If your organization has enabled QR codes, you can scan the QR code displayed at the meeting space to check availability and book.
When you want to enter attendee details, request services and equipment, or request changes to the room layout, etc. open the booking form on the Eptura Engage on the web. If the booked meeting space offers services, you can click the link in the services email to go directly to the booking form to make your choices. Learn more: Booking form for meeting spaces
Find and book a meeting space
Follow the steps to find and book a suitable meeting space from the Eptura Engage mobile app.
Set the search criteria

Choose the requirements for your meeting space booking
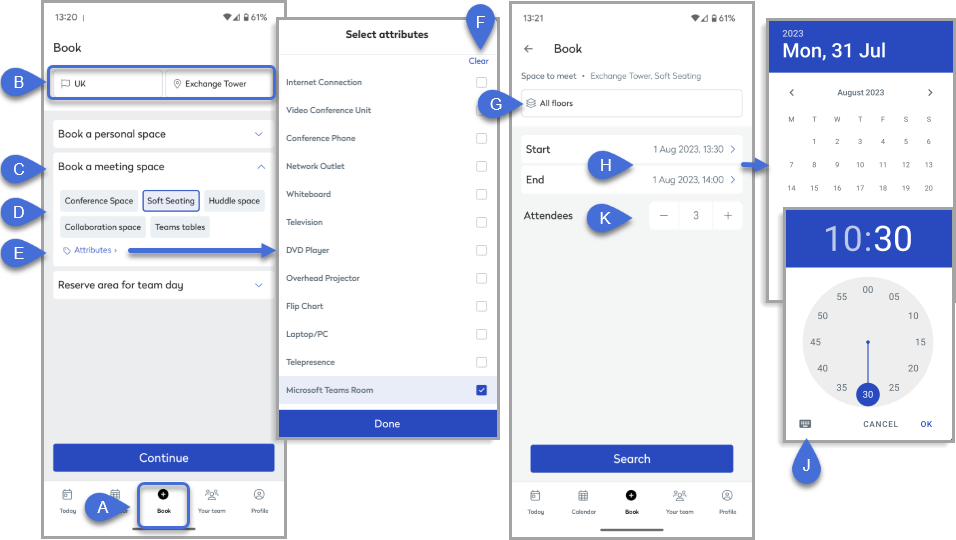
- To start a new booking for a meeting space tap Book (A) at the bottom of the screen.
- Your default location is displayed (B). Tap the options to select an alternative location.
- If not already selected tap Book a meeting space (C) to expand the section.
No meeting space booking option? The ‘Book a meeting space’ option is only visible if your organization has configured meeting spaces in Eptura Engage and you have the relevant access to make bookings.
- Tap the workspace type (D) you want to find. (Available options depend on your organization’s configuration).
- If you would like your meeting space to provide particular equipment such as a Microsoft Teams room, a TV, or a VCU, tap Attributes (E) and select your preferred options from the list (F). (Available options depend on your organization’s configuration).
- Tap Done to return to the booking page then tap Continue.
- By default, all floors of the location are searched. To restrict the search to a specific floor tap All floors (G) and select the floor to search.
- Set the Start and End date and times for your booking (H). To set the date and time, tap Start or End to open the date popup. Tap the required date and tap OK. Then, on the time popup, tap the hour followed by the minutes and tap OK. Alternatively, tap the keyboard icon (J) to enter the time manually.
- Tap the + and – (K) to set the number of attendees the meeting space must be able to accommodate.
- Tap Search to find available meeting spaces fitting your criteria.
Search results

Select the meeting space that suits your requirements and book it
- The search results are initially presented in a list and only meeting spaces available at the selected time slot and with the required capacity are shown on the list. By default, meeting spaces matching your selected attributes are listed first (best match).
- Tap Sort by (L) to change the order of the search results. Sort by best match, capacity, or meeting space name.
- Tap Calendar (M) to see the availability of all meeting spaces with the required capacity throughout the day. Tap the left and right arrows (N) above the calendar to navigate through the spaces. Existing bookings are indicated in red on the calendar. Tap an available time slot to choose an alternative time for your booking. The selected time slot turns green.
- From the List view, tap the meeting space (P) to view more information about the space, such as available attributes and services, and see a photo of the space.
- Click the Report Issue (S) button to report a problem with the meeting space. Learn more: Report an issue with a meeting space.
- Click the Floor plan icon (R) from the List view (or Floor plan tab from the details view), to see available meeting spaces on the floor plan. Available workspaces are displayed as square green icons. Tap a meeting space to select it.
- Tap Book to book your chosen space.
Meeting spaces that can be booked immediately show a Book button. Managed meeting spaces that an administrator must approve before a booking is secured, show a Request button. Learn more: Book or Request a meeting space
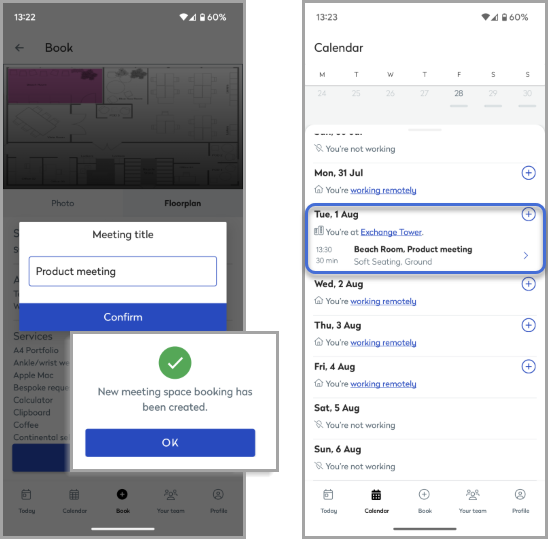
- Enter a title for your meeting and tap Confirm then OK. The calendar opens and displays your booking.

Bookable meeting spaces are booked immediately, whilst requests for managed meeting spaces are generated and sent to the administrator to approve or reject. Managed meeting spaces show ‘Meeting space requested’ in the booking information until approved.
Eptura Engage Microsoft 365 integration: If you have subscribed to Eptura Engage through the Eptura Engage Outlook add-in, a Microsoft Teams enabled calendar event is also created in Microsoft Outlook. Attendee numbers can be managed in the Microsoft Outlook event. Using the Eptura Engage Outlook add-in, you can mark attendees as on-site or remote, and external attendees as visitors. Learn more: Eptura Engage Outlook add-in.
Good to know
- The ‘Book a meeting space’ option is only visible if your organization has configured bookable personal spaces in Eptura Engage and you have the relevant access to make bookings.
- The meeting space search from the mobile app looks for available meeting spaces in all groups you have access to.
- If the booked meeting space offers services, you can click the link in the services email to go directly to the booking form to make your choices.
- Booking a meeting space automatically changes your status to ‘in the office’ for the date of the booking, however, canceling the booking does not automatically change your status and you will continue to show as ‘in the office’ until you choose a different status.
- If the Eptura Engage Microsoft 365 integration is implemented and you have subscribed to Eptura Engage through the Eptura Engage Outlook add-in, a Microsoft Teams-enabled calendar event is also created in Outlook when a meeting space booking is created using the Eptura Engage mobile app.
Scan QR code to check availability and book
If your organization has enabled QR codes, you can check if a meeting space is available and book it directly from the space, by scanning the QR code from the Eptura Engage mobile app.

QR codes created after November 2024 can also be scanned directly from the device camera.
- When you have identified a meeting space in the workplace you'd like to book, open the Eptura Engage mobile app and tap the QR icon from the top of the Today screen.
- When prompted, tap Allow Access to allow Eptura Engage access to your camera to scan the QR code.
- Position the QR code displayed at the meeting space in the frame on the mobile device, for Eptura Engage to scan.
- Available: If the meeting space is available:
- Tap Book to book the space.
- Enter a Meeting title and tap the 'To' time wheel to select the end time for your booking. (If your booking is for later in the day, set the From time).
- Tap Done to set the time then Confirm to complete the booking.

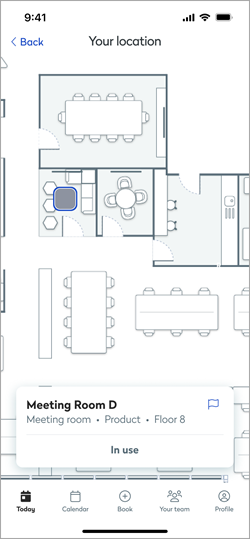
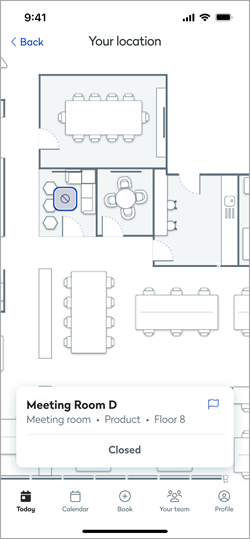
- Unavailable: If the space is in use or is closed, a message is displayed and the icon on the floor plan is gray.
Space in use

Space closed

Scan a QR code directly from the mobile device camera app
If the URL for the Eptura Engage mobile app was included with the QR code value when the QR code was printed, the QR code can be scanned directly from the mobile device camera app. Scanning the code opens the Eptura Engage mobile app and displays the availability of the space. Learn more: Printing QR codes
