Global Settings
Introduction
In this guide, a User will learn about the many features of Global Settings. Global Settings is a System Admin permission that allows that User to make a variety of top level decisions about the Hippo program. It is only visible to a System Admin User, and is located at the Enterprise Admin level.
Definitions
System Admin: the highest level of permissions that a User can have to Hippo
Default Days (Priority Levels): the customized amount of days set for each priority level before a Demand work order becomes due
Depreciation Calculation Type: the date on which your depreciation reports are based on either Purchase Date or Install Date
Depreciation Module: a calculated method to determine the decrease in value of an asset over several years or a lifetime
Equipment Downtime: the period during which an asset or equipment is not functional or cannot work
Equipment Transfer: to transfer an asset or equipment from one facility to another
Work Order Request Priority: the priority level of a work order chosen by a Requester
Strong Password: a password that is not easy to access by trial or guesswork and contains a variety of characters
File Format: the type of file that stores your data or information
Printing Start Setting: to determine if a work order will change status once initially printed
Instructions
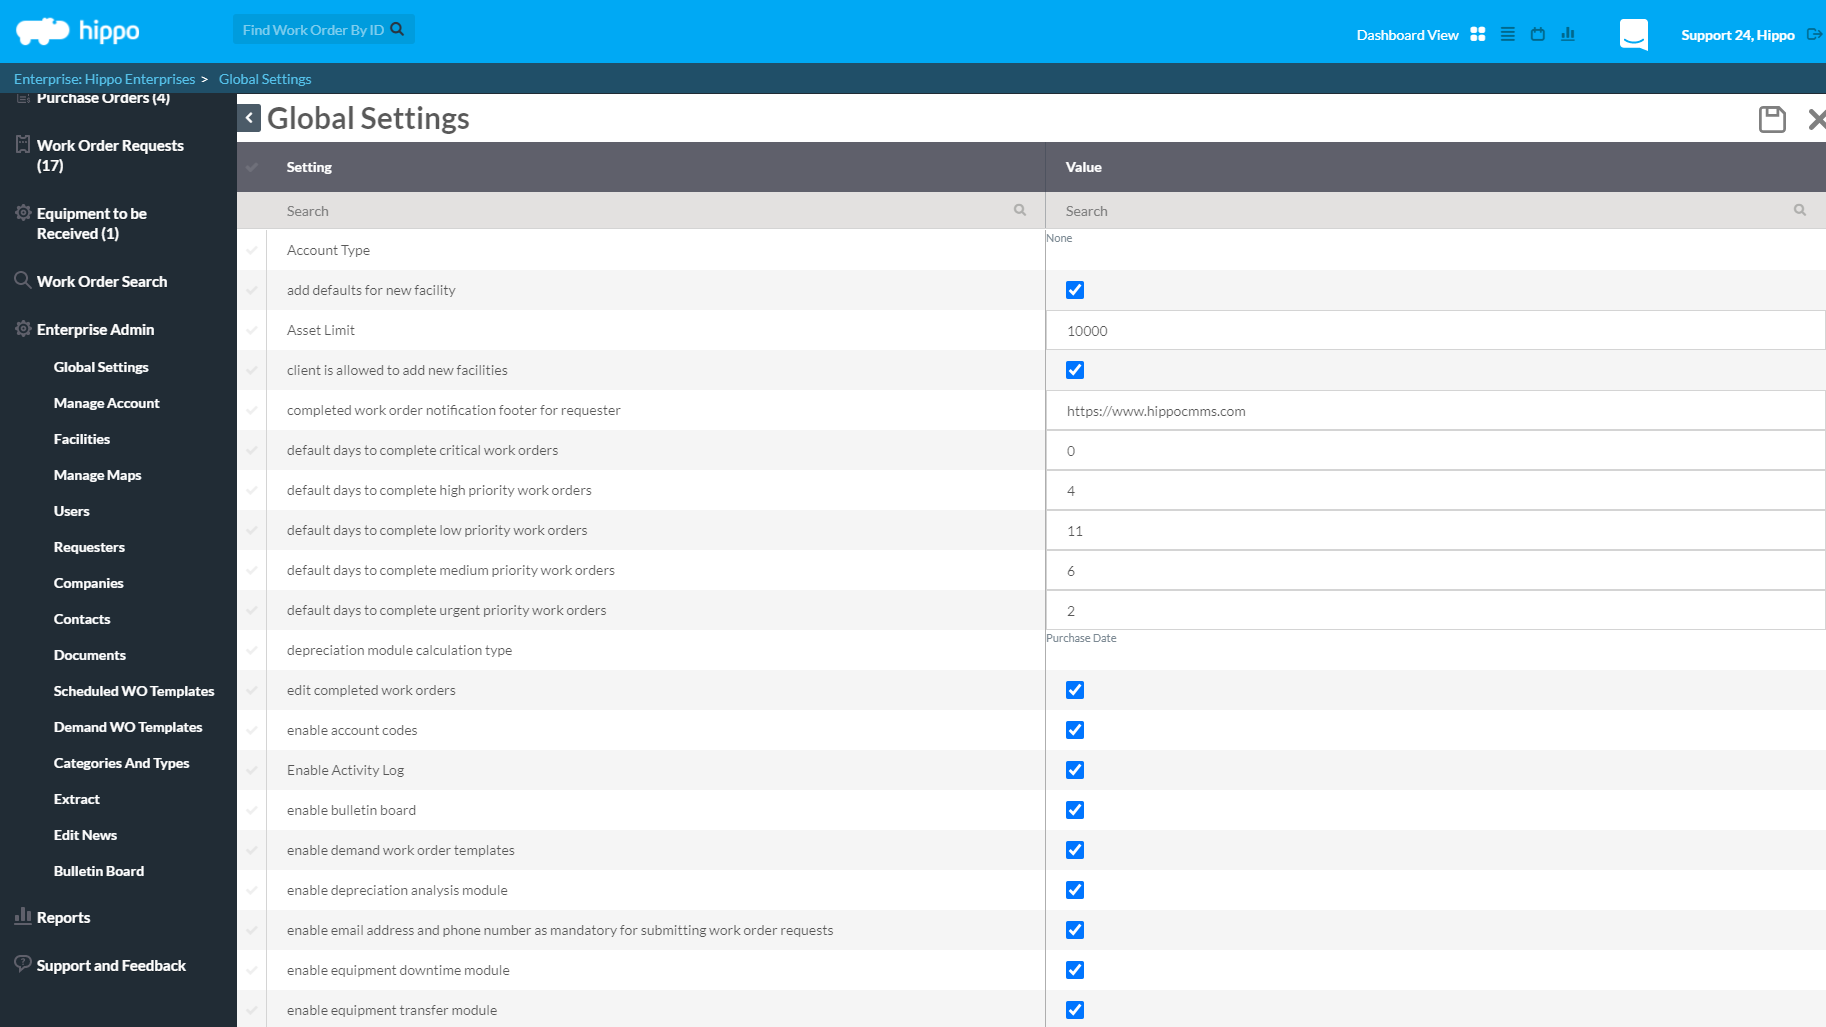
To Access the Global Settings grid, click on Enterprise Admin located on the left-hand side when first logged in. Next, click on the Global Settings panel. Any settings made on this grid will apply to all facilities and the whole Hippo program. Again, these settings can only be made by a System Admin User. In this guide, we will go over the following settings available on the Global settings grid:
- Add Defaults to New Facility
- Default Days (Priority Levels)
- Depreciation Module Calculation Type
- Equipment Deprecation Analysis Module
- Equipment Downtime Module
- Equipment Transfer Module
- Enable Work Order Request Priority
- Enforce Strict Password Standards
- Enterprise Name
- File Format
- Printing Starts Setting
- Barcode Type/QR Code Supported
1. Add Defaults for New Facility
If there is a checkmark in the box next to “add defaults for new facilities” then default information was used for the facility. This means that detailed data entry was not added and that work orders can be created for a “default location” or “default equipment”.
2. Default Days (Priority Levels)

The first few rows on the Global Settings grid allow a User to customize default days or due dates when a Priority is selected for a Demand Work Order. The Priority levels field is included on the Submit Work Order form or the Demand Work Order form. The Priority levels include Critical, High, Low, Medium, and Urgent.
- On this Global Settings grid, click in the “Value” column next to the Priority name found in the “Setting” column. For example, the first row under the Settings column is “default days to complete critical work orders”.
- Add a number in the “Value” field. This means any Demand work order set to that priority date, will automatically be given the customized amount of days to complete and will create a Due Date. If a user puts “1” in the Value column this means any Demand Work Order labeled Critical Priority, will be due tomorrow. The same rule applies to the High, Low, Medium, and Urgent Priority.
- Click on the “Save” button in the top right corner.
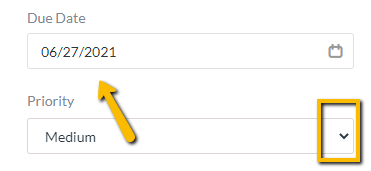
Note: the default setting on a Work Order is Medium. Using this feature, all Demand Work Orders will be given a Medium Priority, unless a User manually chooses otherwise.
3. Depreciation Module Calculation Type
This allows the System Admin User to decide if Depreciation Reports by Purchase Date or Install Date will be calculated.
Note: Depreciation Reports is an optional module that must be enabled to the Hippo program on the Global Settings grid for Depreciation Reports to work. Depreciation Reports are calculated using the Straight-Line Method.
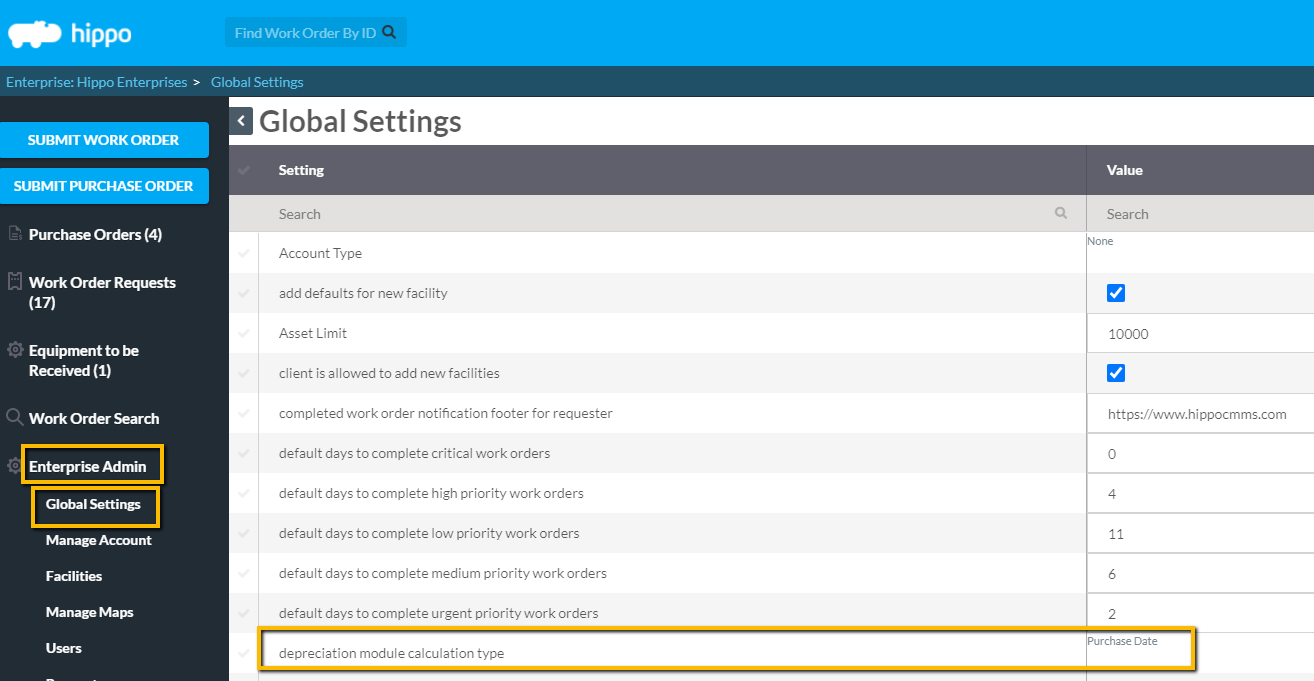
- Double click in the Value column, next to “depreciation module calculation type”.
- Then click on the dropdown menu arrow to select either “Purchase Date” or “Install Date”. This data type is for determining the content of Depreciation Reports.
- Click on the “Date Name” and it will automatically become visible in the Value column.
- Click on the “Save” button located in the top right corner of the grid screen.
This date or calculation type to be used on the Equipment grid, of any Facility Admin, has now been set.
4. Equipment Depreciation Analysis Module
By enabling the depreciation analysis module, it allows a user to create Depreciation Reports in the Hippo program. These reports calculate the current book value of assets based on the Straight-Line Method. On this grid, a user must also determine (2) the “depreciation module calculation type”.
Note: There are a few steps needed to use this feature, once it is enabled on the Global Settings grid.

- On the Global Settings grid, in the “Setting” column, look for “enable depreciation analysis module” and click on the box next to it. This box is found under the “Value” column.
- Make sure there is a checkmark in the box.
- Click on the “Save” button found in the top right corner.
- Log out of the Hippo system, then log back into it or click on the “Refresh” icon. This will add the new module.
**Now that this feature has been enabled, there are a few other steps needed to use this module. Note: Users must have permission to run Depreciation Reports. - Click on the “User” panel, under Enterprise Admin.
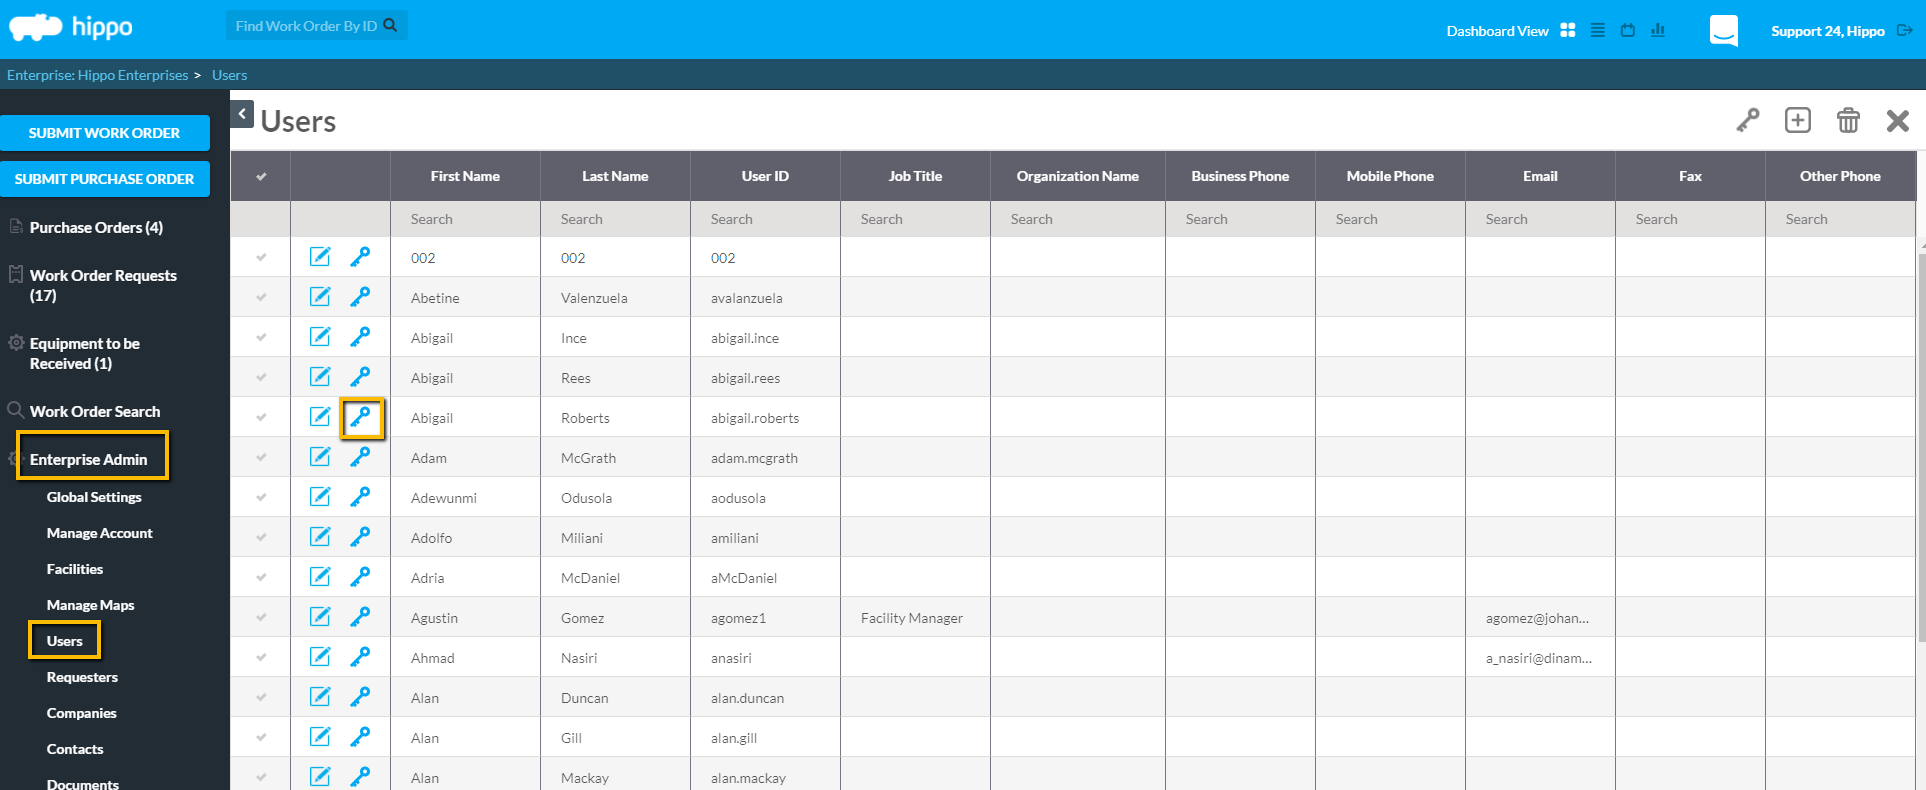
- Once on the User grid, click on the word “Edit” icon, next to the User First Name. The Edit Permissions form will open.
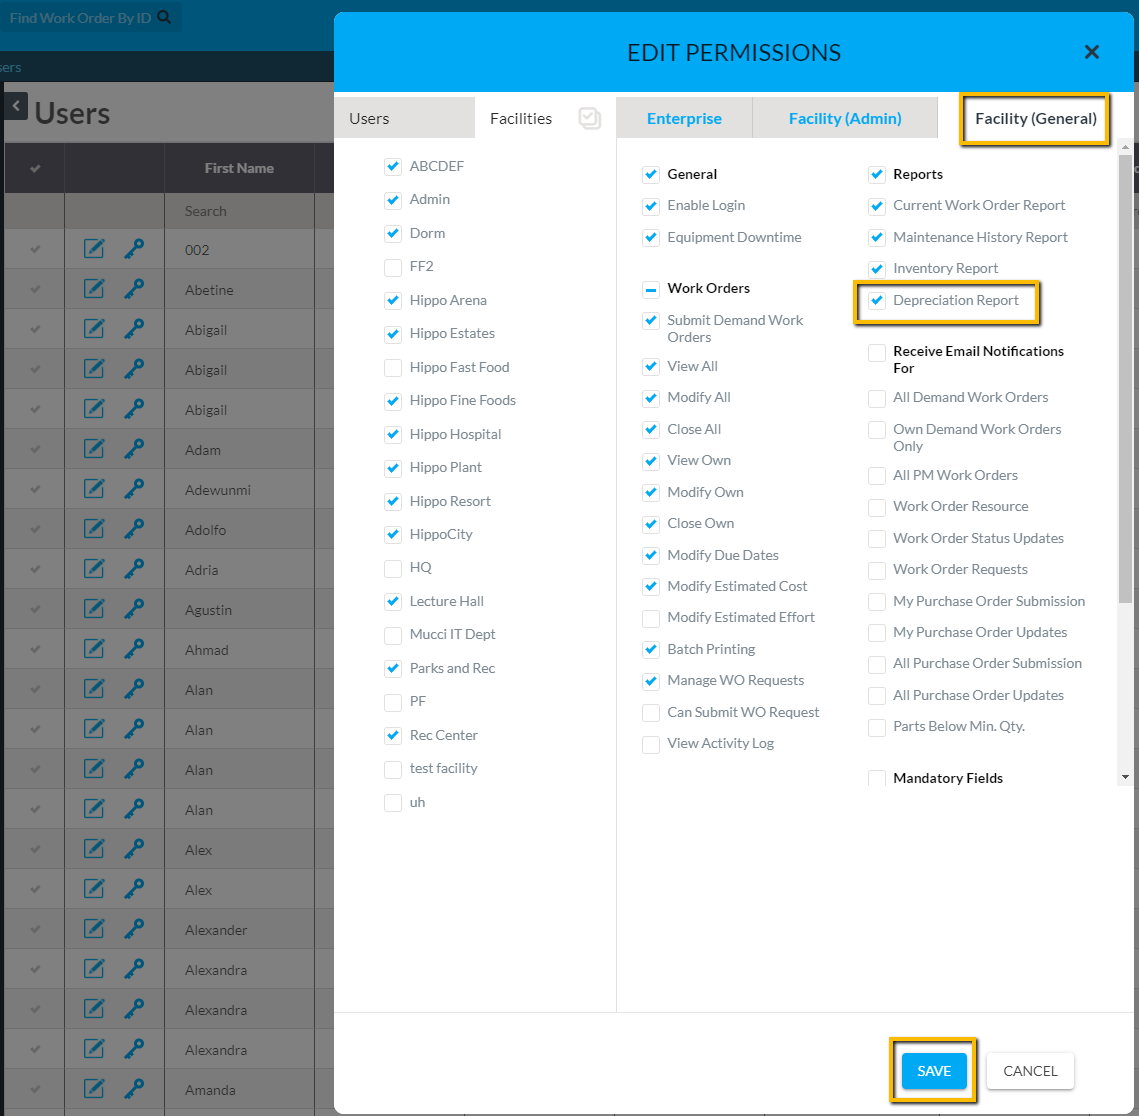
- Click on the Facility (General) page near the top of the Edit Permissions form.
- Find the “Reports” subcategory on this page and click in the box next to the “Depreciation Reports” permission. Make sure there is a checkmark in this box.
- Click “SAVE” at the very bottom of the Edit Permissions form.
**Now that the module has been enabled (Global Settings grid), and has been given Depreciation Report permissions to Users (Users grid), a user must add the asset information. Note: Asset information must be entered into the software to calculate the Depreciation Reports. - Click on the “Close” icon located at the top of the grid, to exit the User grid. The Enterprise screen will now open.
- Click on the “Facility” name to which equipment or asset information will be added to.
- Click on the “Facility Admin” panel located on the left side of the screen.
- Click on the “Equipment” panel, under Facility Admin.
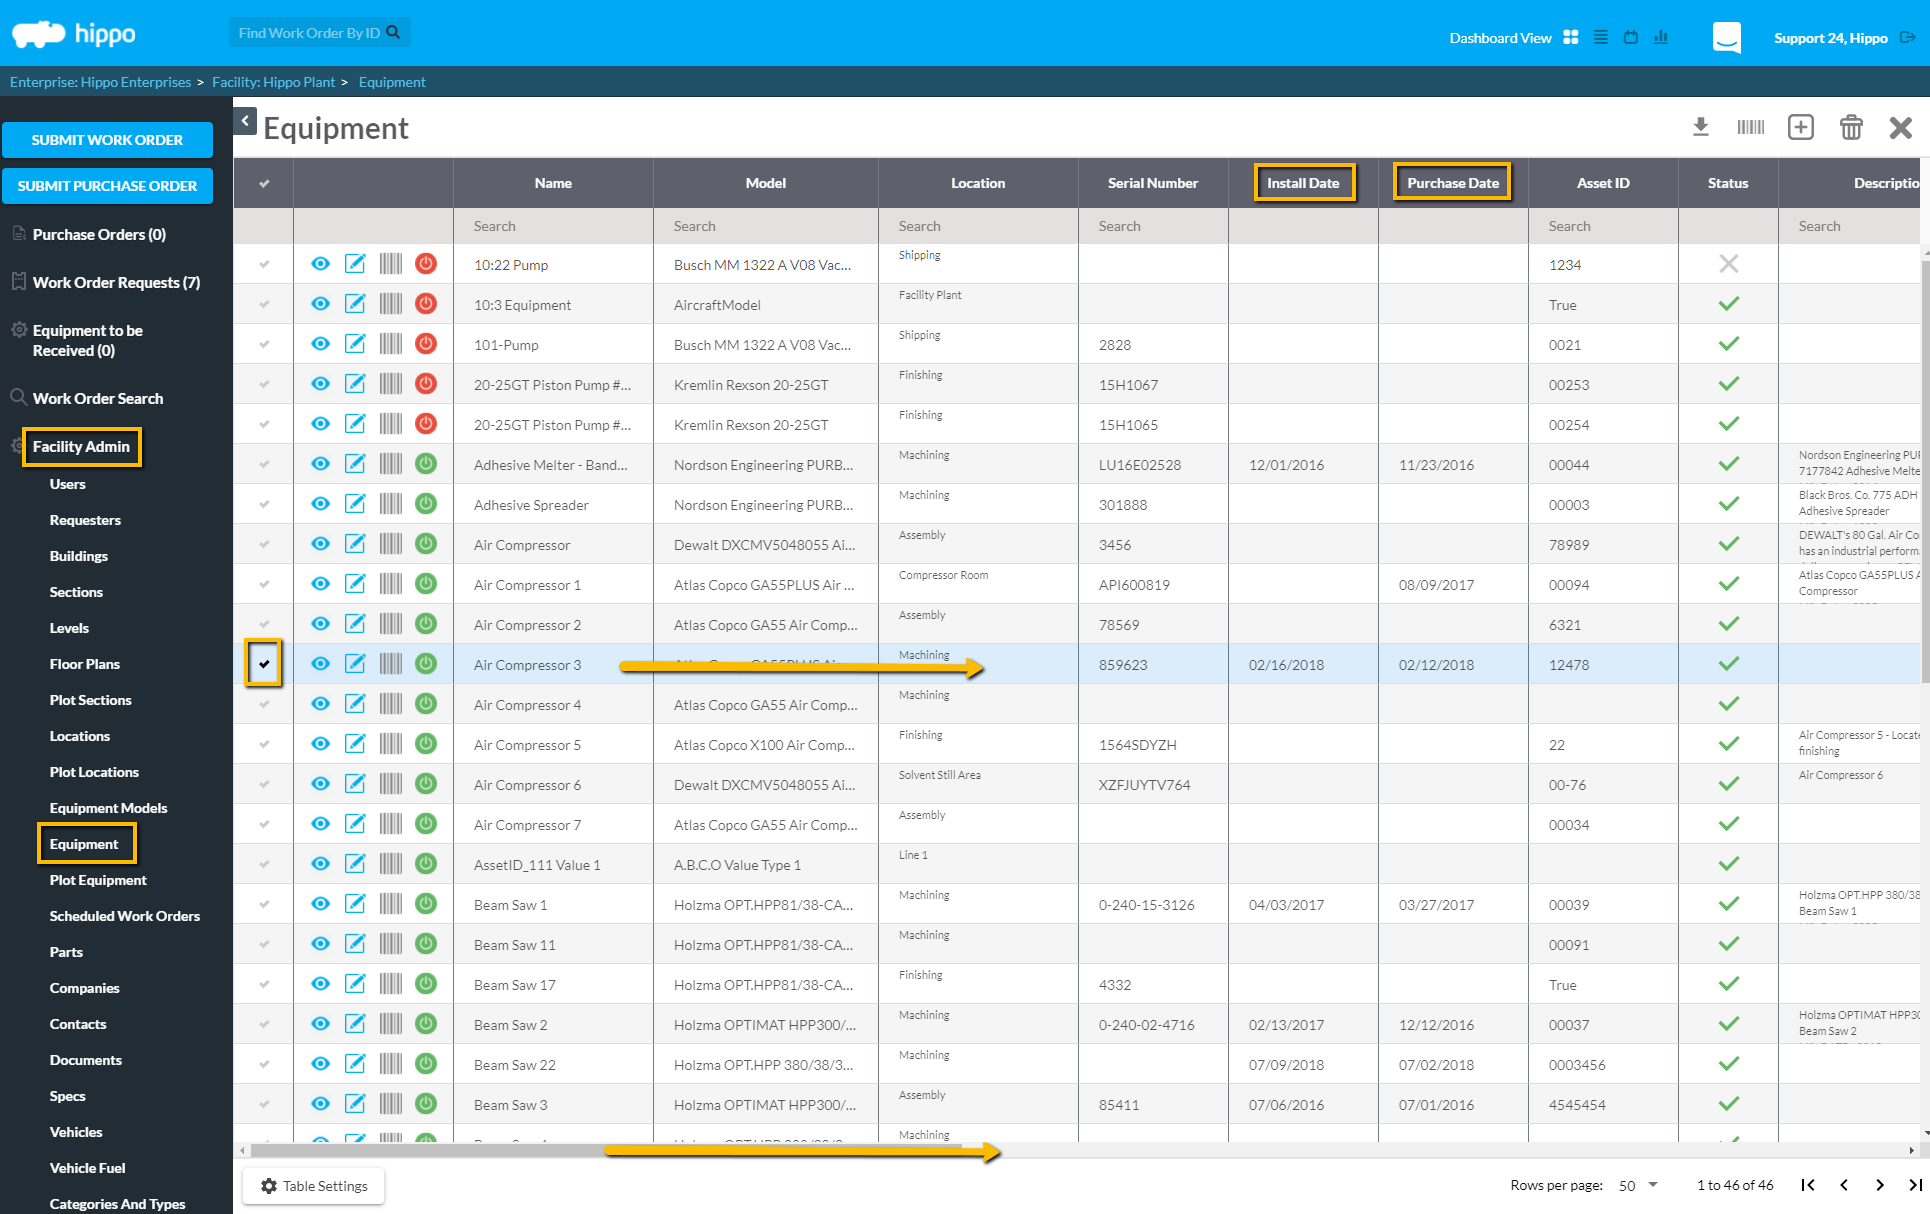
Note: On this grid, a user will have to add four columns of information per equipment name: either Purchase Date or Install Date (this was determined on the Global Setting grid the date be used), Purchase Cost, Salvage Value, and Life Expectancy.
- Click next to the Equipment name to highlight that row.
- Click and drag or scroll to the right of this grid and locate the Purchase Date or Install Date column header. Again, use the column selected as the “depreciation calculation model type” on the Global Settings grid.
- Double click in the “Purchase Date” or “Install Date” field and a calendar window will appear.
- Click on the correct date on which equipment was purchased or installed. Use the arrows at the top left or right of the calendar window to use past or future dates. Once the date is selected, it can be seen in the field.
- Click and drag or scroll to the right of the grid and look for the “Purchase Cost” field.
- Double click in the “Purchase Cost” field and type in the amount of the equipment or asset cost.
- Click in the “Salvage Value” field type in the amount the equipment or asset will be worth once it is inactive.
- Locate and click in the “Life Expectancy” field. A pop-up window will appear.
- Click in the “Years” and or “Months” field to add the expected lifespan of the equipment or asset.
- Click “OK”, and the window will disappear. The life expectancy amount in the field can now be viewed.
Note: The user can include an amount in the “Replacement Cost” field, but it plays no role in the report results. The Replacement Cost amount would indicate what it would cost to replace this equipment or asset.
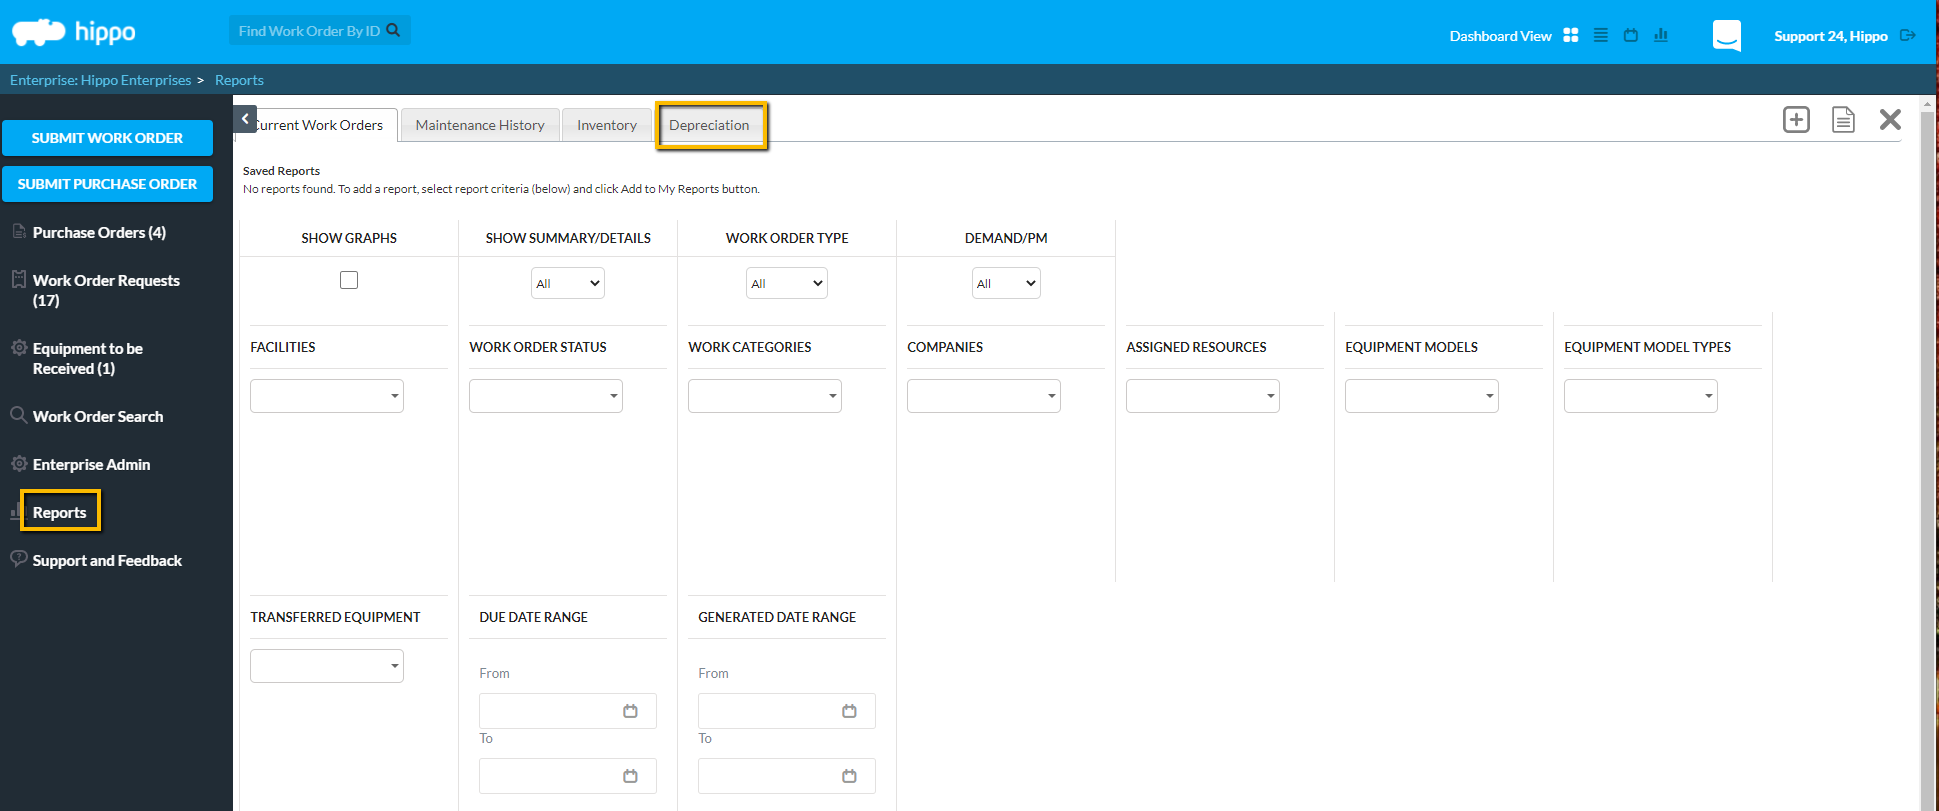
Depreciation Reports are now available. These reports are accessible from either the Enterprise Admin level or Facility Admin level.
5. Equipment Downtime Module
By enabling the Equipment Downtime module, will allow Users to report equipment down and up again. The amount of time a piece of equipment or asset has been reported down can then be calculated and viewed on Maintenance History Reports.
Note: There are a few steps needed to use this feature, once it is enabled on the Global Settings grid. This module can only be added by a System Admin User.
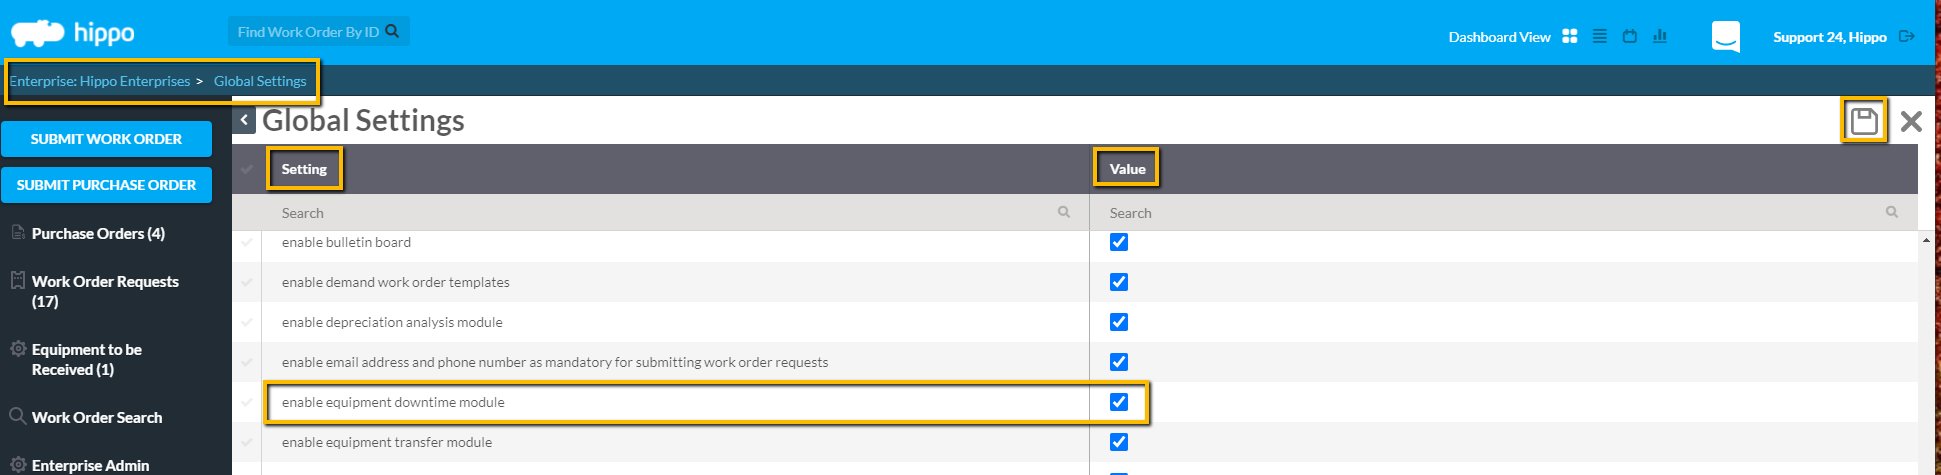
- On the Global Settings grid, in the “Setting” column, look for “enable equipment downtime module” and click on the box next to it. This box is found under the “Value” column.
- Make sure there is a checkmark in the box.
- Click on the “Save” button found in the top right corner.
- Log out of the Hippo system, then log back into it or click on the “Refresh” icon. This will add the new module.
**Now that this feature has been enabled, there are a few other steps needed to use this module. Note: Users must have permission to run equipment down and up again.
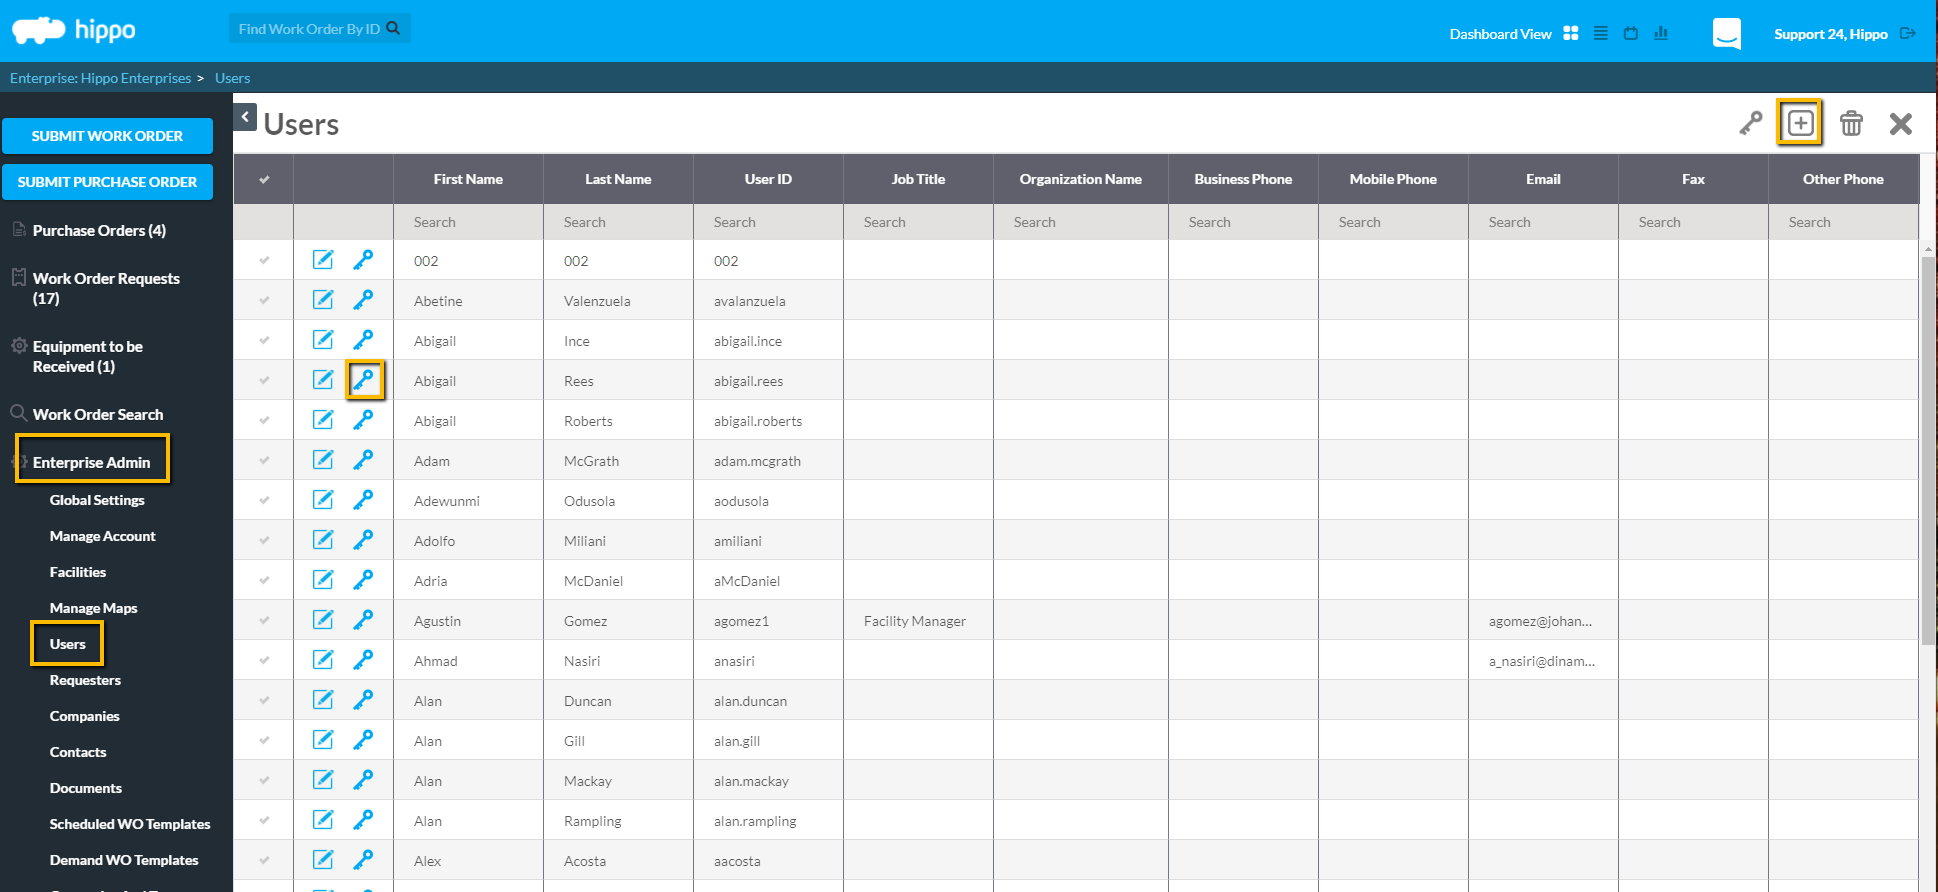
- Click on the User panel, under Enterprise Admin.
- Once on the User grid, click on the “Edit” icon, next to the User First Name. The Edit Permissions form will open.
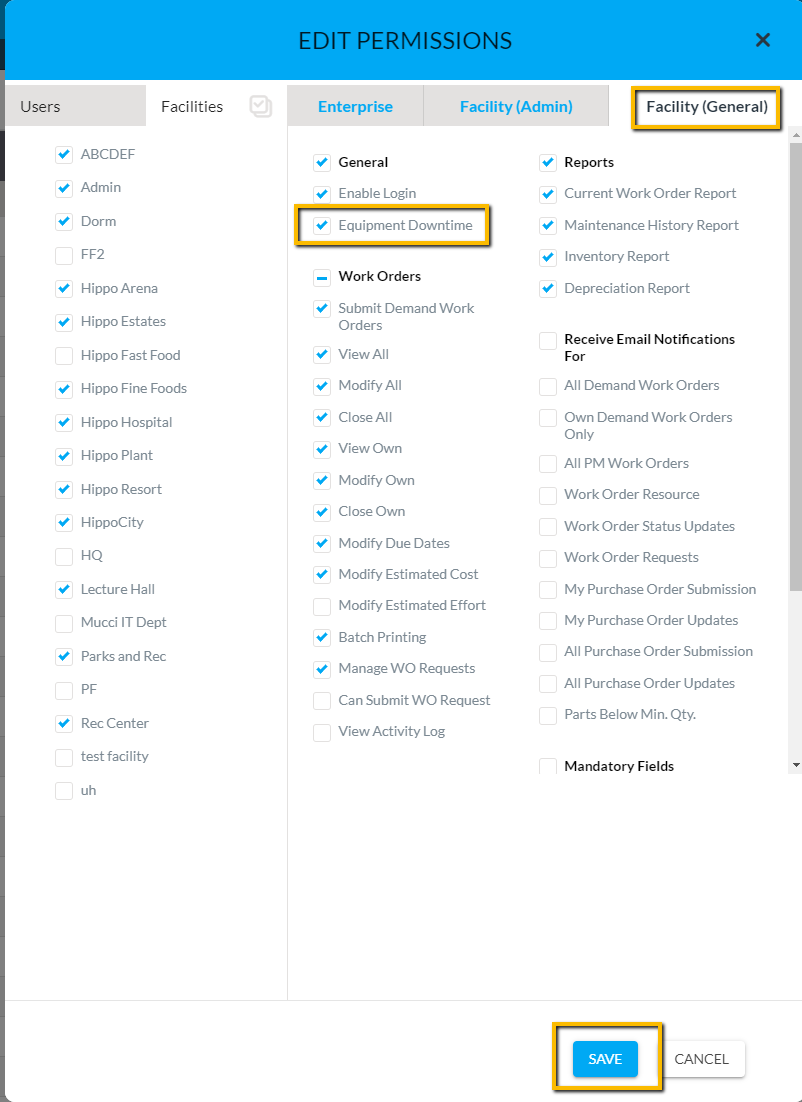
- Click on the Facility (General) page near the top of the Edit Permissions form.
- Find the “General” subcategory on this page and click in the box next to the “Equipment Downtime” permission. Make sure there is a checkmark in this box.
- Click “SAVE” at the very bottom of the Edit Permissions form.
The User now has permission to report equipment down or up again from the Equipment Detail Screen. There are two ways to open an Equipment Detail Screen. - The Equipment Detail Screen can be opened from any generated work order, by clicking on the name of the equipment.

A User may also open up an Equipment Details screen from the Equipment grid, under Facility Admin. Simply click on the “View” icon next to the “Edit” icon.
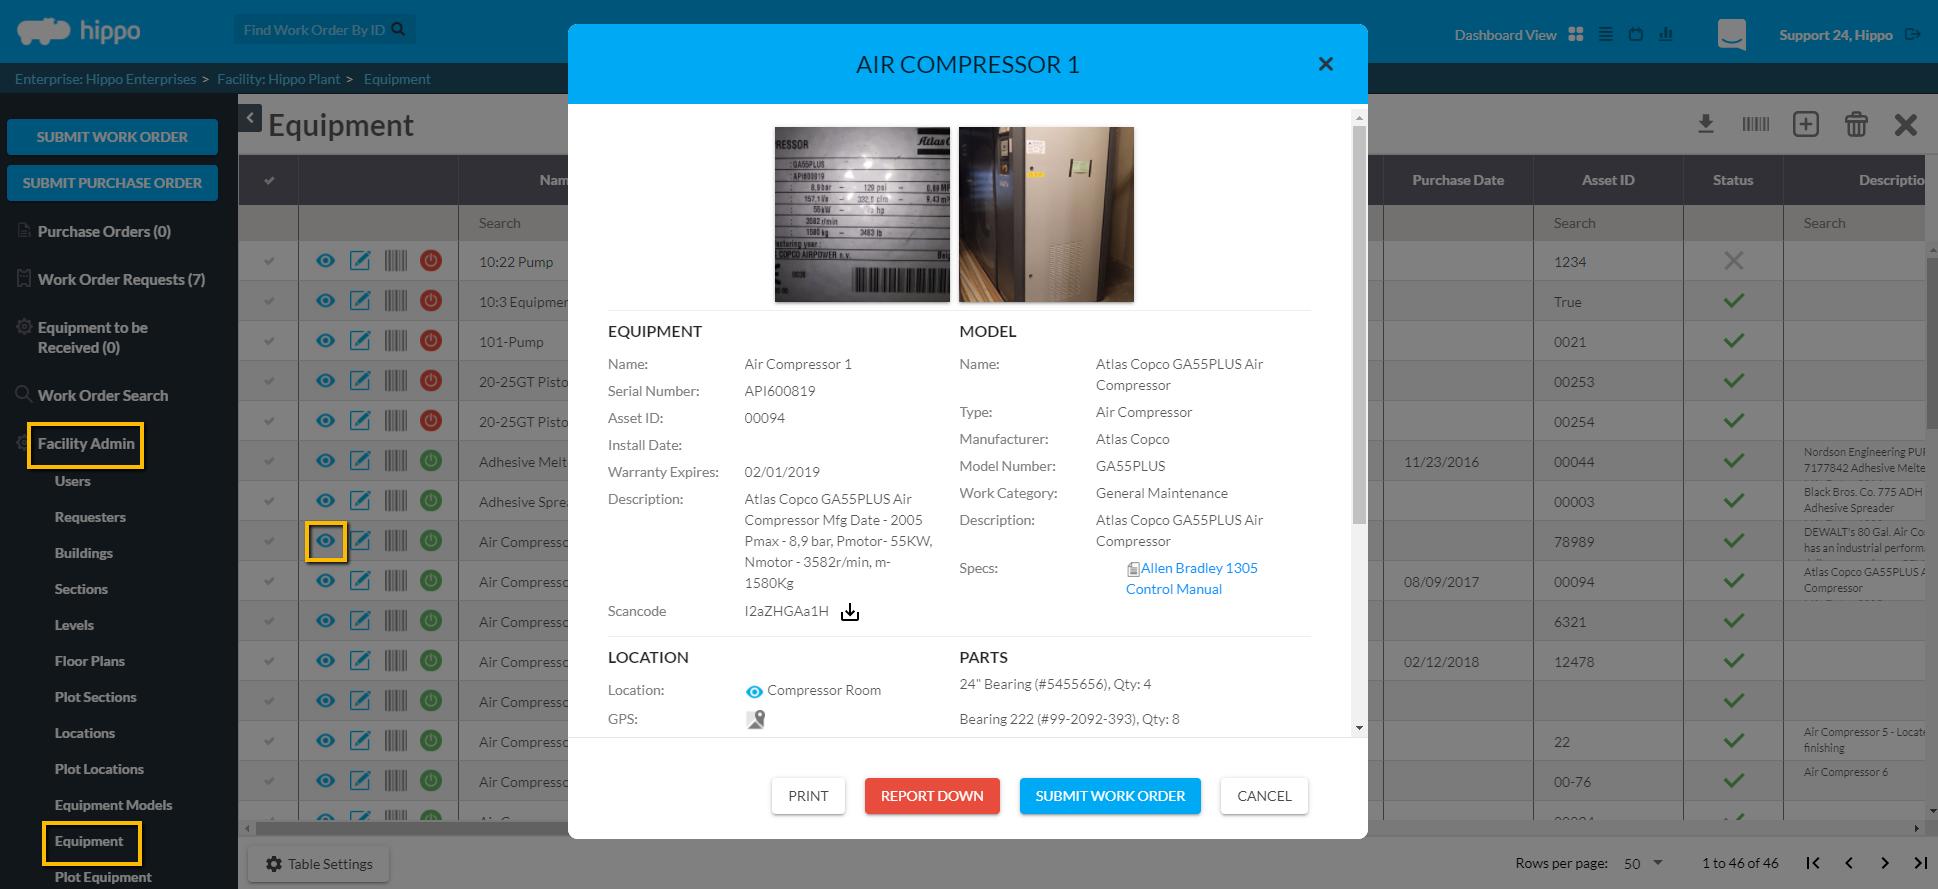
- Once the Equipment Detail Screen is open, scroll to the very bottom and click on the “Report Down” button.
- A new pop-up window will appear titled “Equipment Downtime”. From this window, a user will select the downtime date and time for this piece of equipment.
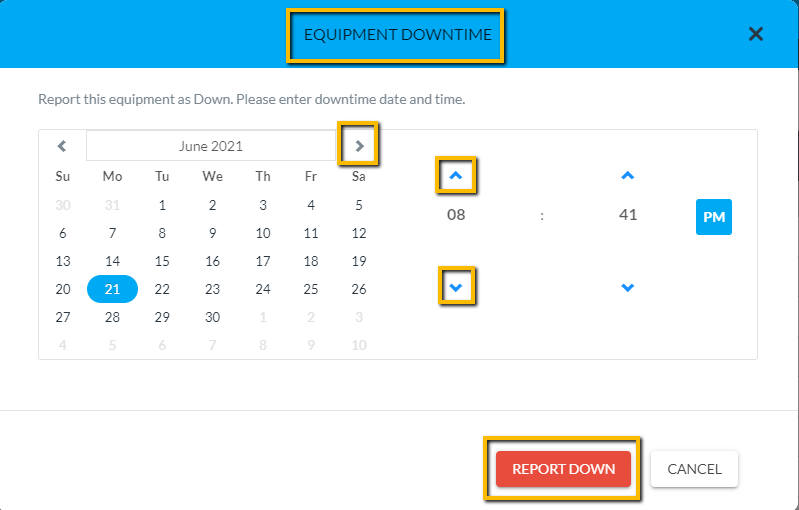
- A User can use the arrows next to the Month's name and year to move back or forward by months. Once the correct month has been selected, click on the “Calendar Date”, so that it is highlighted.
- A User may also use the arrows above and below the hours and minutes to select the exact time. Click on the AM/PM box to determine the timeframe.
- Click on the “Report Down” button at the bottom of the window. This window will disappear and a Warning label across the top of the Equipment Detail screen will be visible.

- Click on the Report Up button found at the bottom of the Equipment Detail screen, to mark equipment up again. A new pop-up window will open.
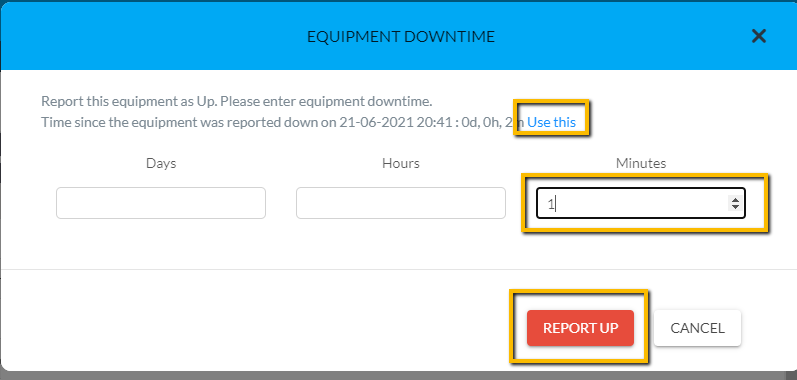
- A User can click on “Use this” to keep the calculated time from since reported down, or manually enter the time frame.
- Click in the “Days”, “hours”, or “Minutes” field to type in the numbers.
- Click on the” Report Up” button at the bottom of the window.
The Equipment Detail screen will no longer indicate that this piece of Equipment is reported down.
Note: The calculated amount of time that equipment or assets have been reported down is available in the Maintenance History Reports.
6. Equipment Transfer Module
By enabling the Equipment Transfer module, this will allow Users to transfer equipment from one facility to another.
Note: There are a few steps needed to use this feature once enabled on the Global Settings grid.
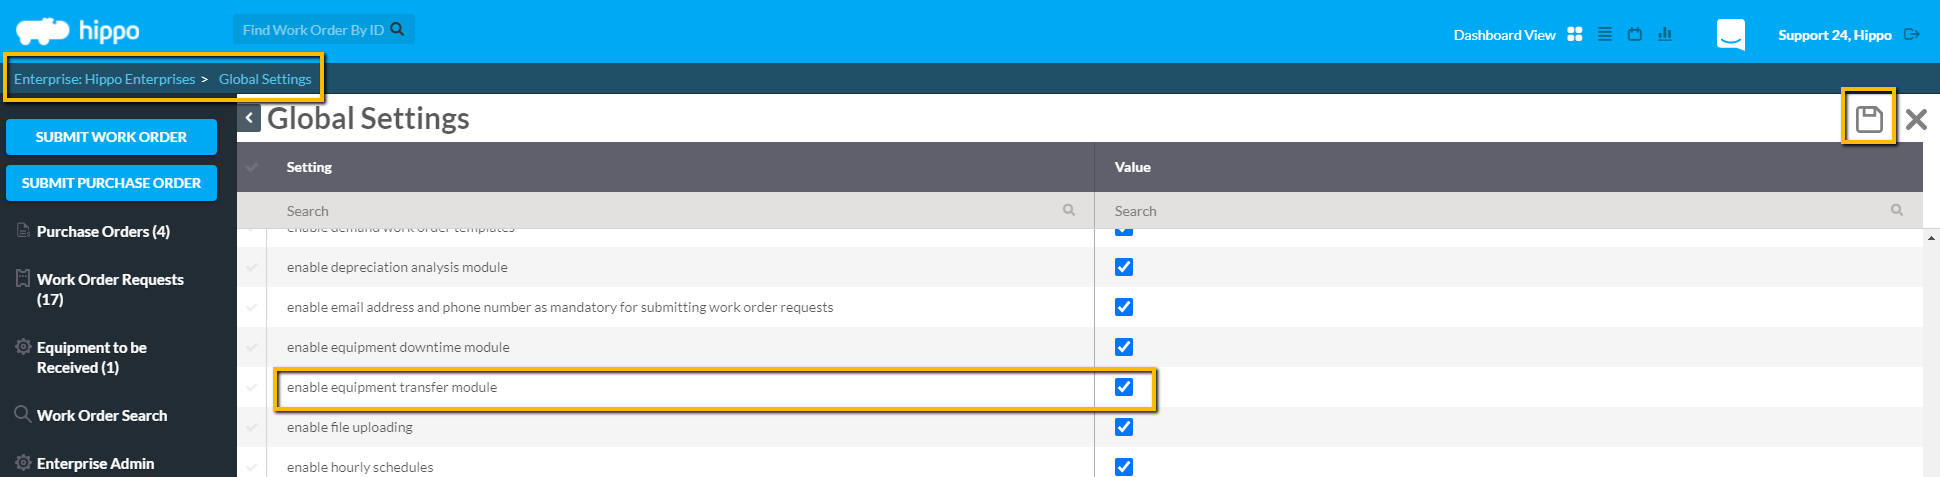
- On the Global Settings grid, in the “Setting” column, look for “enable equipment transfer module” and click in the box next to it. This box is found under the “Value” column.
- Make sure there is a checkmark in the box.
- Click on the “Save” button found in the top right corner.
- Log out of the Hippo system, then log back into it, or click on the “Refresh” icon. This will add the new module.
**Now that this feature has been enabled, there are a few other steps needed to use this module. Note: Users must have permission to transfer equipment. - Click on the “User” panel, under Enterprise Admin.
- Once on the User grid, click on the word “Edit” in the “Permissions” column, next to the User name. The Edit Permissions form will open.

- On the Enterprise page of the Edit Permission form, click in the box next to the permission “Transfer & Receive Equipment” under the “General” subcategory. A checkmark should be in this box.
- Click on “Facility Admin” located near the top of the form to open this permission page.
- Make sure that the User has permission to “View”, “Add”, and “Edit” both Equipment Models and Equipment. These permissions can be p
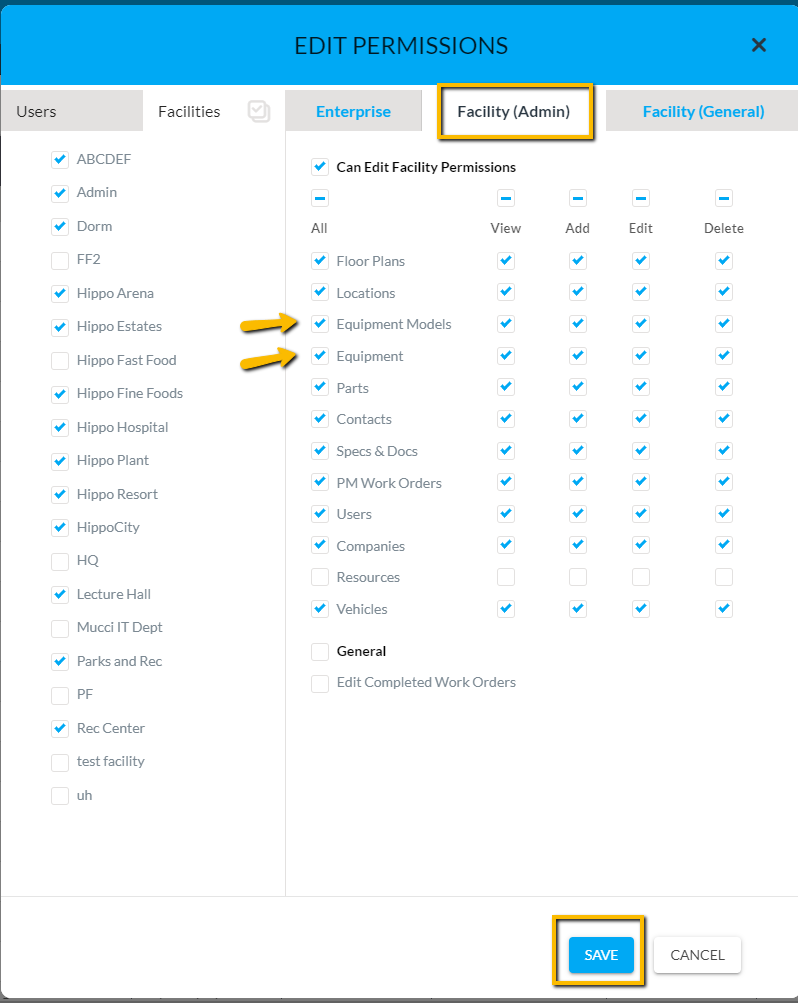 rovided to a User by clicking in the correct boxes and making sure there is a checkmark is visible.
- Click on the “Save” button located at the bottom.
Note: This User now has permission to transfer equipment from one facility to another.
- A User will need to log out and then back in again or click on “Refresh” to apply the changes.
- Now, any User with these permissions can see and click on the “Equipment To Be Received” panel on the left side of the screen. On the Transfer screen, click on “Receive” to approve the transfer of equipment from one facility to another, or click on “Cancel” to cancel the equipment transfer request.

- Click on “Receive” to transfer the equipment listed within a row. A new pop up window called “Receive Equipment” will open. Equipment info can be edited on this form.
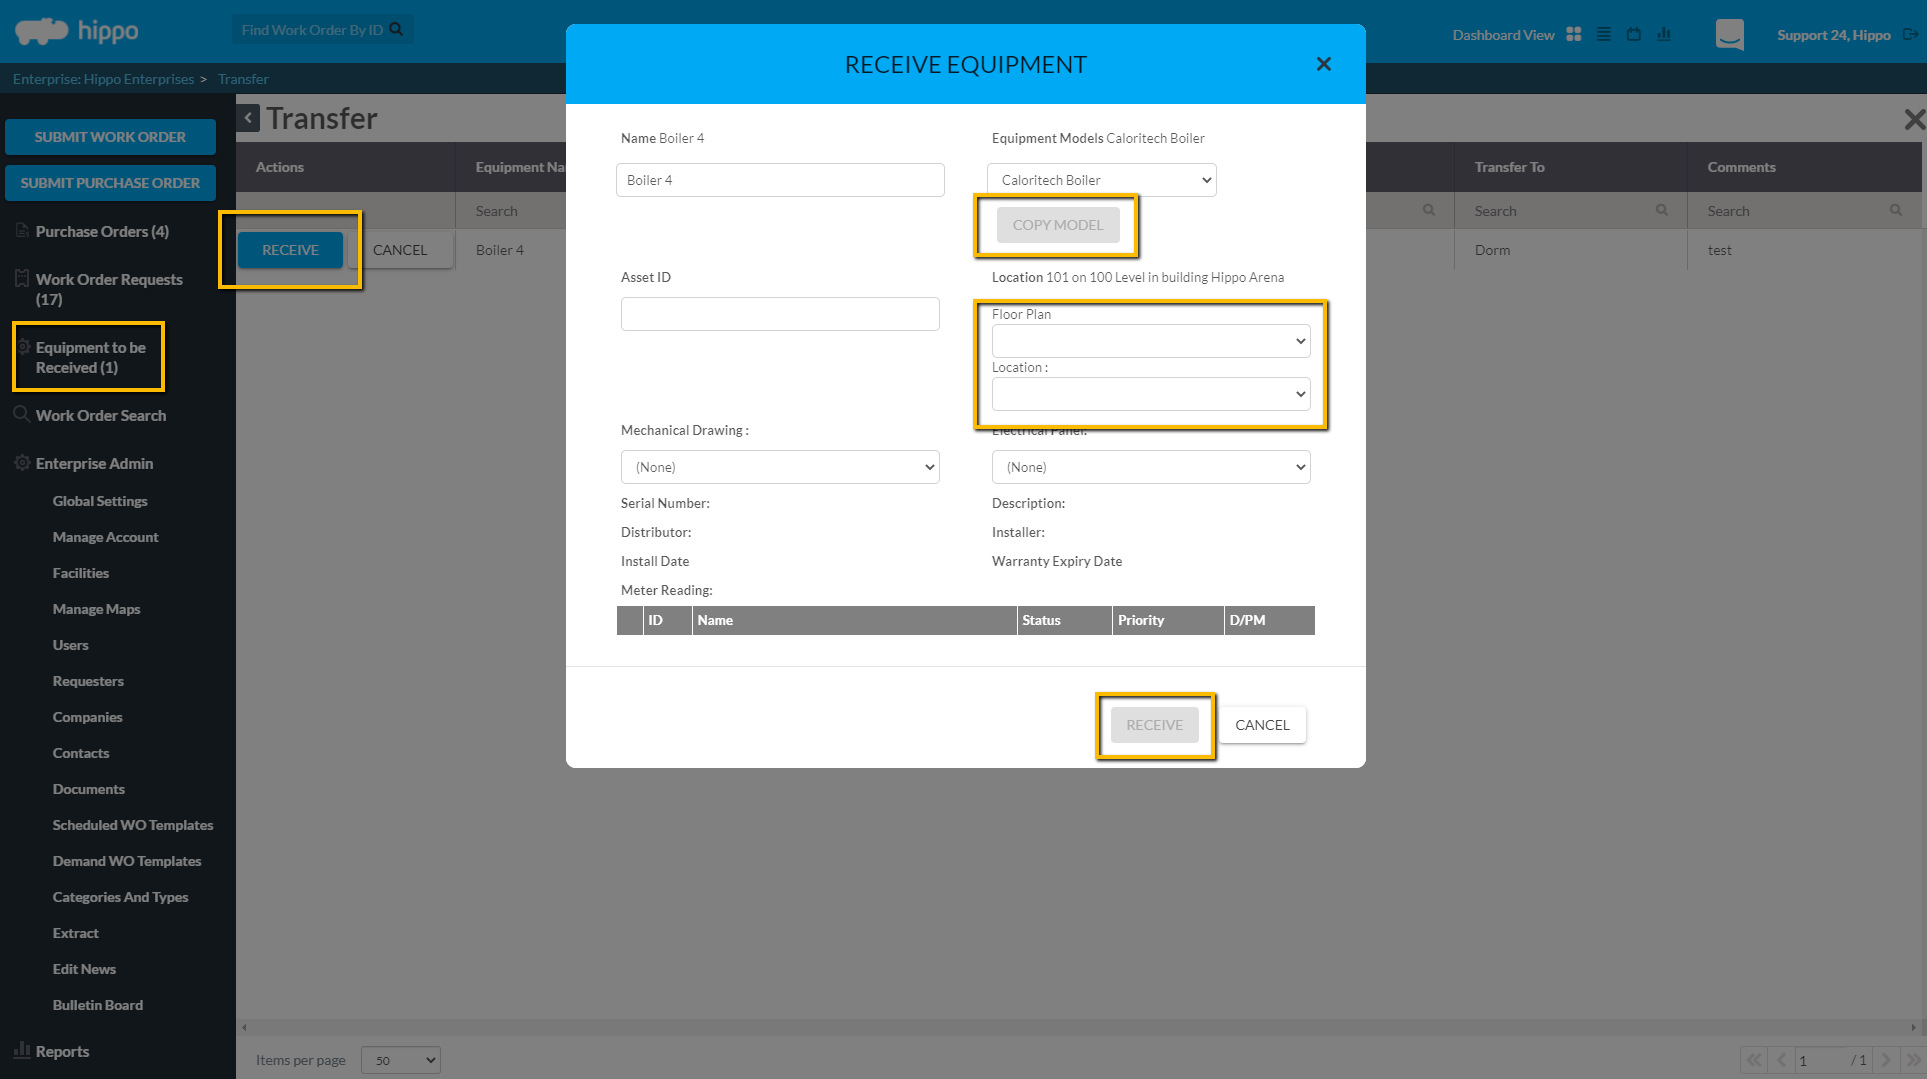
- The Equipment Models field is mandatory and is outlined in red. Click on the arrow in this field to view and select the Equipment Model info associated with this piece of equipment
- Click on the “Copy Model” button.
- Next, click on the arrow in the “Floor Plan” field, and select which Floor Plan this equipment is associated with.
- Click on the arrow in the “Locations” field to select the specific location within the Floor Plan that this equipment is found.
Note: Any other field in this form is optional to edit, but the existing information is based on the original data entry. Either these are type fields or drop down fields.
If any work orders are associated with this piece of equipment a User must “Keep” or “Reject” them.
- Click on “Keep” to transfer the existing work order to the new facility or click on “Reject” to cancel the work order.
- Once all information is reviewed, click on the “Receive” button at the very bottom of the form.
This equipment has now been transferred to the new facility, and will be visible in the new Facility Admin, Equipment grid.
7. Enable Work Order Request Priority
By enabling the Work Order Request Priority on the Global Settings grid, this adds an addition priority level field to the Work Order Request form. A Requester can select if their work order request is of Low, Medium, High, or Urgent Priority. The default priority is Medium.

- On the Global Settings grid, in the “Setting” column, look for “enable work order request priority” and click in the box next to it. This box is found under the “Value” column.
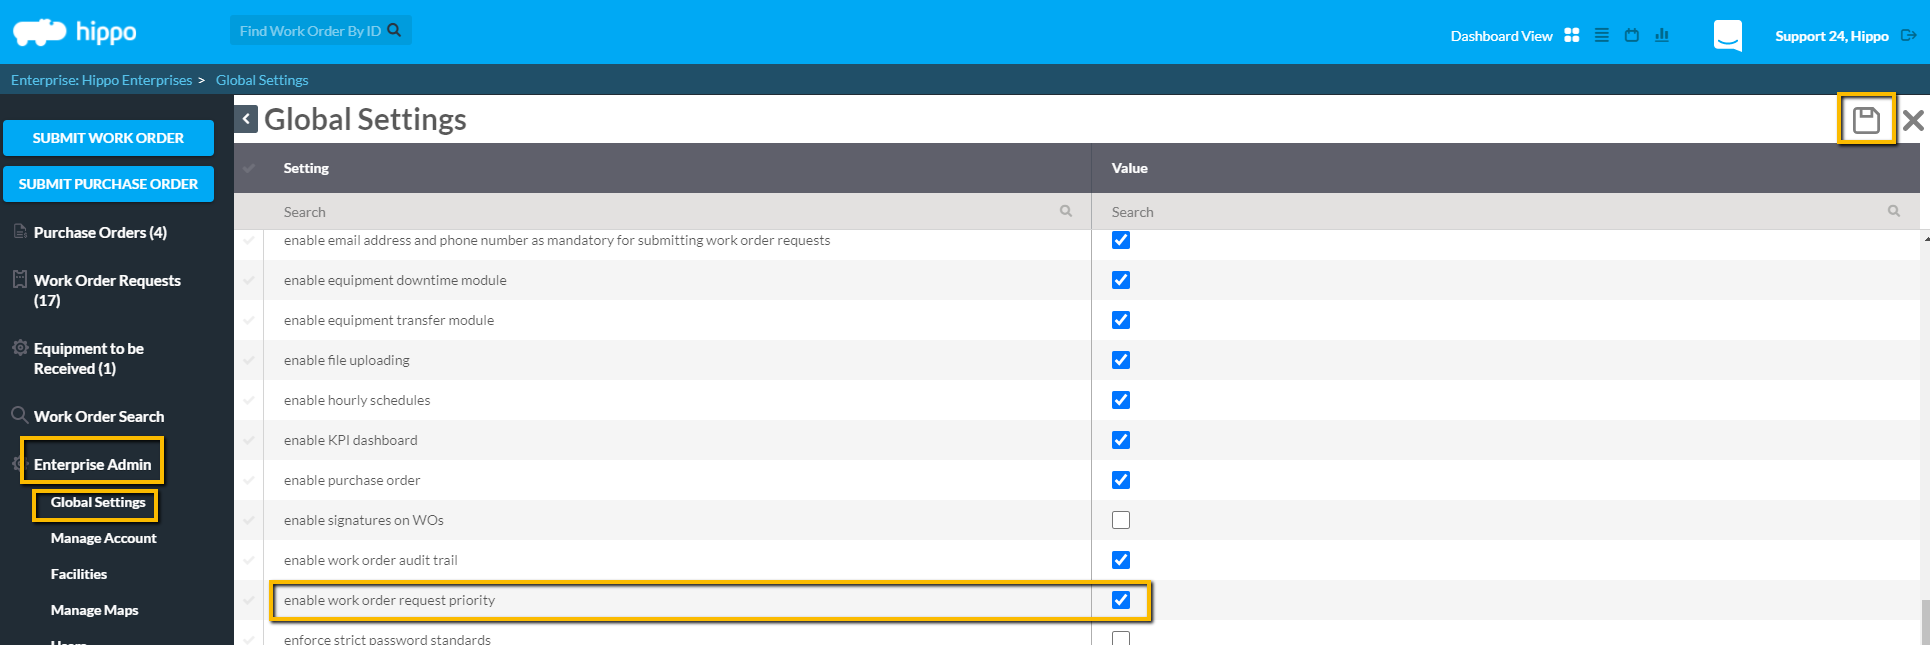
- Make sure there is a checkmark in the box.
- Click on the “Save” button found in the top right corner.
This feature or field is now available on the Work Order Request Form for any User that is a Requester.
8. Enterprise Name
On the Global Settings grid, a System Admin User can view the name of the organization or company in the Value column next to “enterprise name” in the Settings column. This is typically added by the Hippo system, once the client’s database is created and has no impact anywhere in the system.

9. File Formats
On the Global Settings grid, a System Admin User can determine what type of files Users are allowed to upload in the Hippo system. This manual will instruct a User how to add or edit files on this grid, so they apply to the whole system.
Note: The default files allowed in Hippo are the following types:
.jpeg|.jpg|.pdf|.gif|
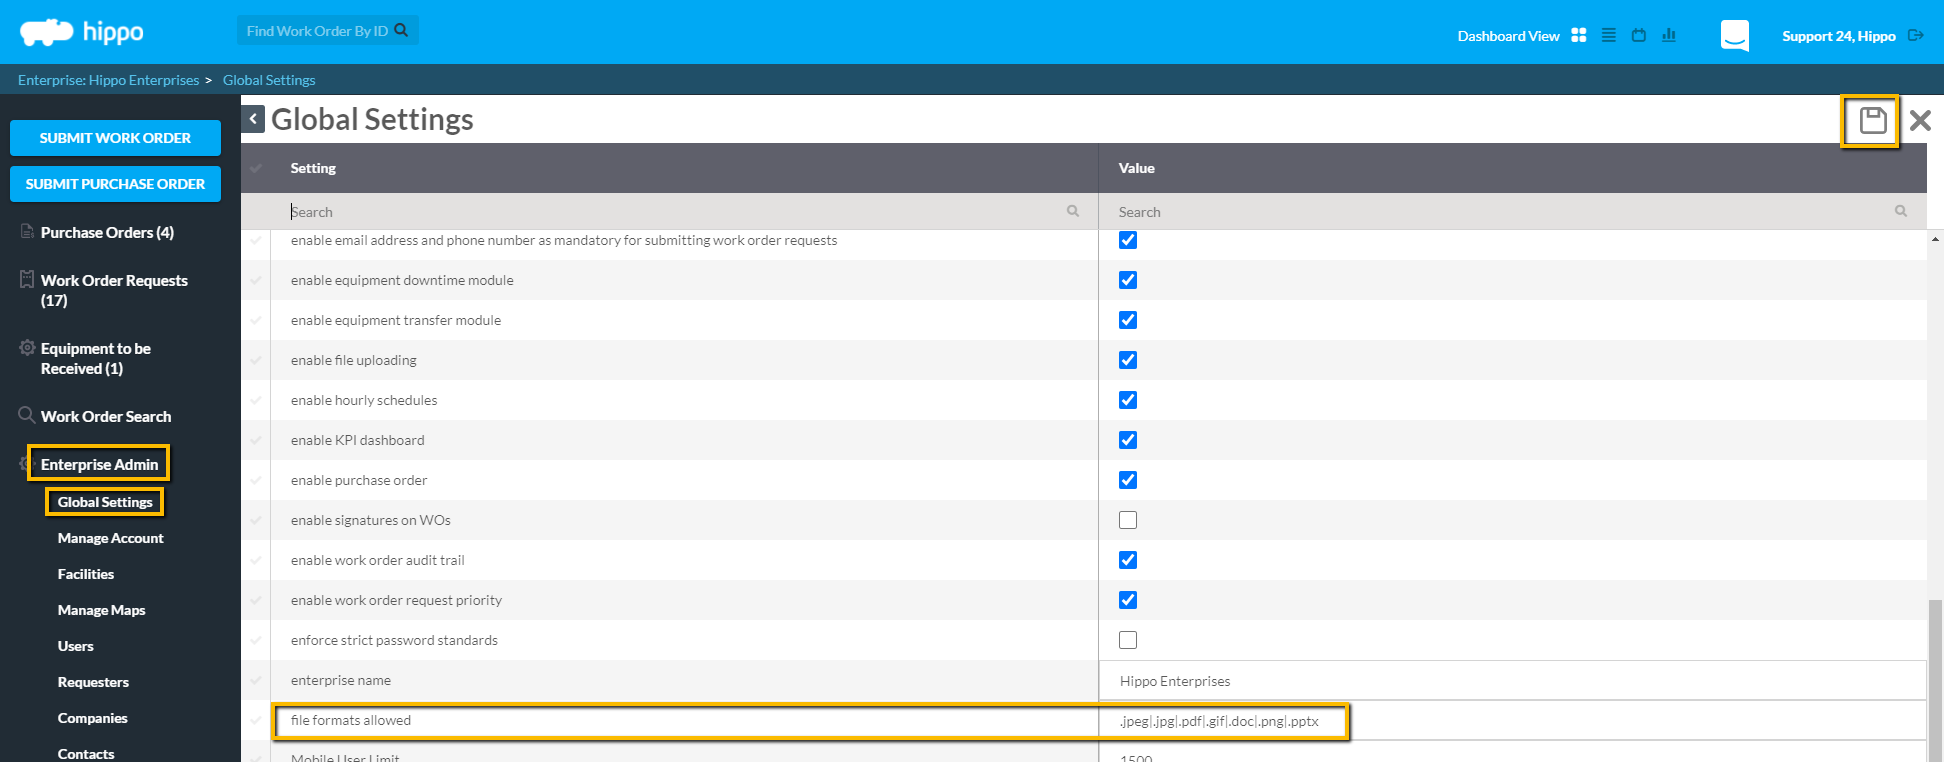
- On the Global Settings grid, in the “Setting” column, look for “file formats allowed” and click in the “Value” field next to it.
- To add a new file, type in the new file extension to allow. Note: A User must separate each file extension by using the | character.
- Hit the Save button found in the top right corner.
Note: If a User wishes to remove a file type, then click in the” Value” next to “file format allowed” and delete the file name. Make sure to click on the “Save” button in the top right corner after any changes.
10. Printing Starts Setting
A System Admin User can decide if a work order will automatically be switched to “In Progress” status if printed. This is the default setting in the Hippo system. This setting can be removed so that printing a work order will not change the status.
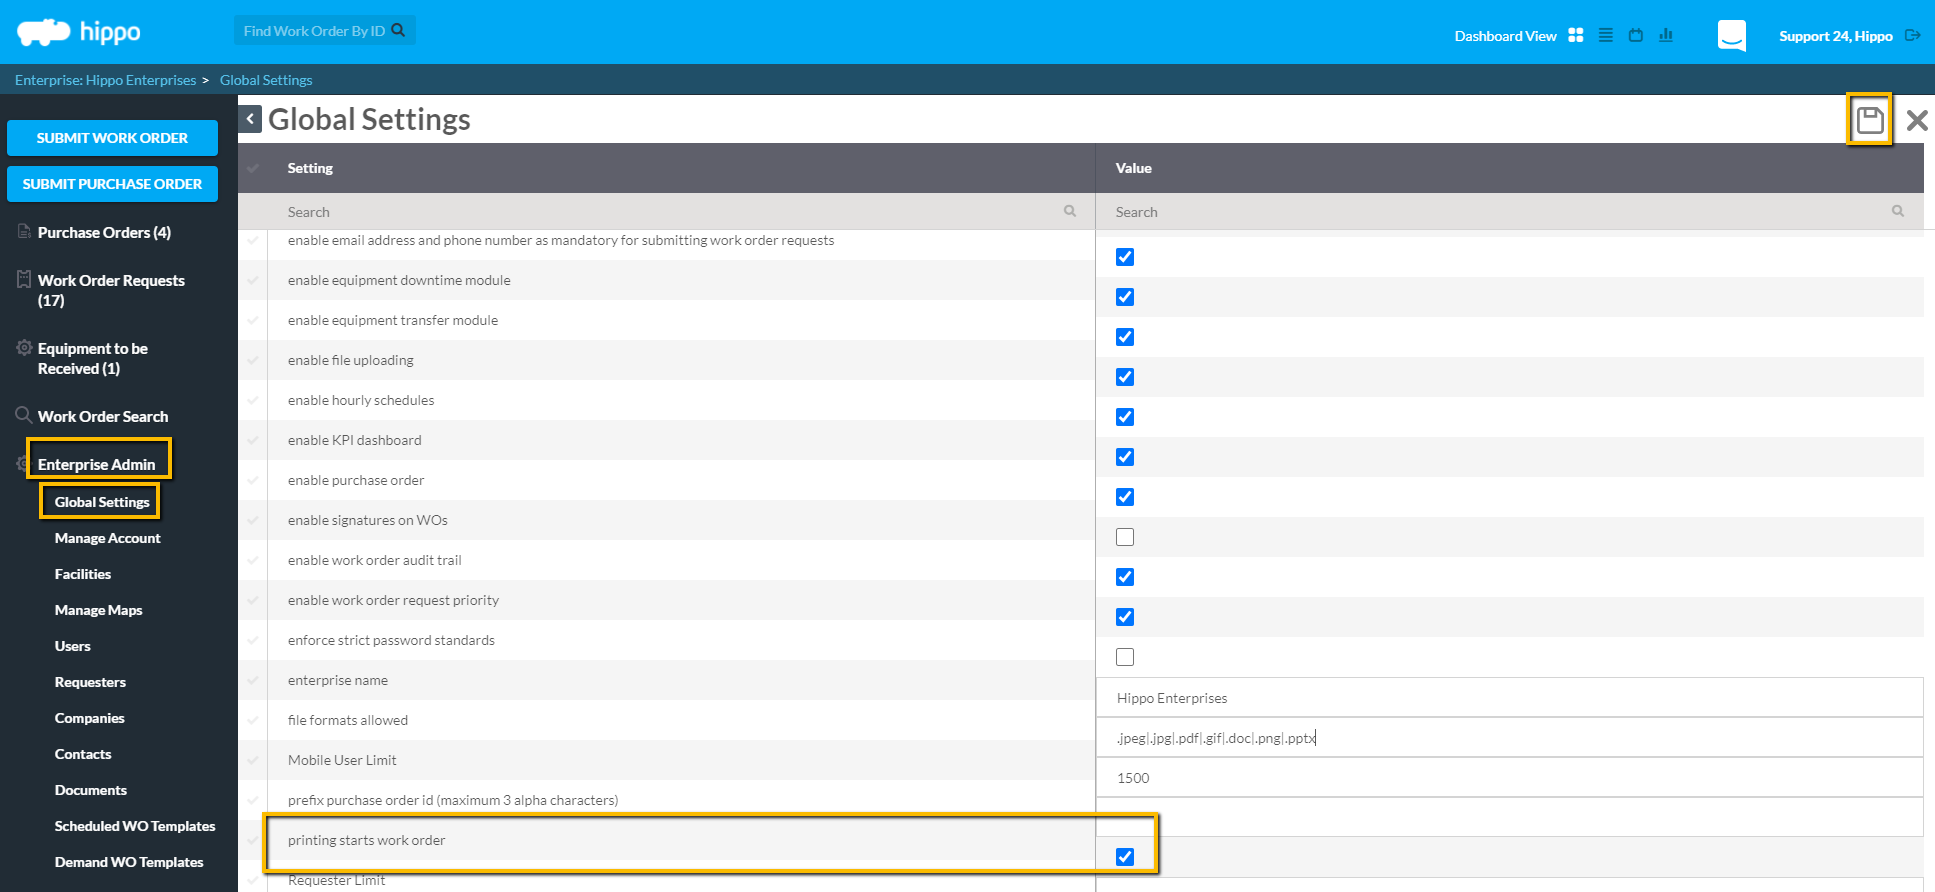
- On the Global Settings grid, in the “Setting” column, look for “printing starts work order” and notice the checkmark in the box under the “Value” column. Keep the checkmark in the box if it is preferred that the work order status be changed to “In Progress” if printed.
- To remove this setting, click on the “checkmark” in the box. Note: No checkmark means that the status of a work order will not change if the work order is printed.
- Click on the “Save” button found in the top right corner.
- Log out of the Hippo system, then log back into it, or click on the “Refresh” icon. This will adjust the system and will apply to all work orders.
11. Barcode Type/QR Code Supported
A System Admin User can view the type of Barcode/QR Code supported in Hippo. This information cannot be added to or edited.
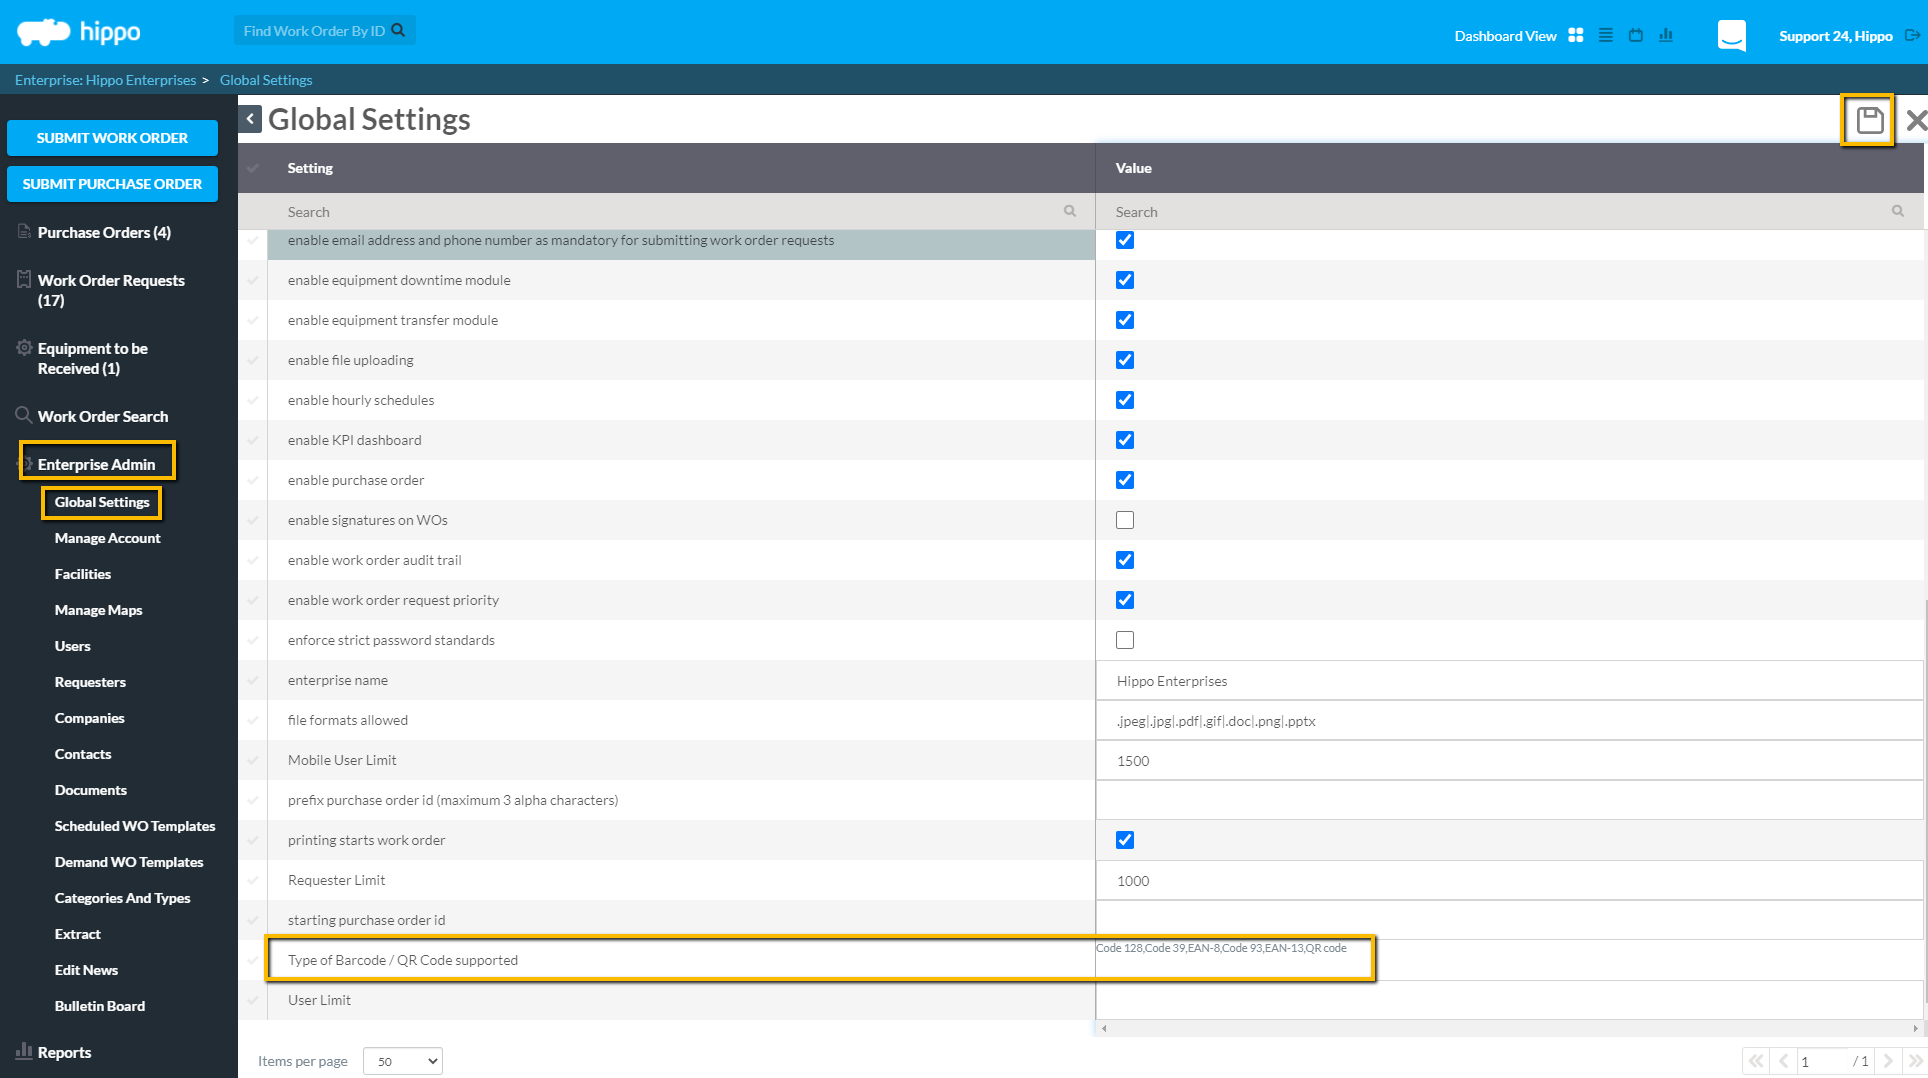
The Barcode feature is accessible from the Equipment grid, Facility level. This feature allows a User to add an existing barcode to equipment, or generate a new one.