
Logbook settings
From Logbook settings you can set the default visit duration and make email addresses mandatory, set the time before automatic check-out, and add the 'on-site' status to your visitor flow.
To edit the settings, navigate to Settings > Visitors > Logbook.

If settings are locked (grayed out) and cannot be edited
When settings have been previously saved via the Global Admin Dashboard, they might be locked at the local level.
In this case, none of the multi-location settings are configurable locally from the Settings module. The options are locked, and a message is displayed - 'Please contact a Global Admin to alter this setting'.
Learn more: Global Admin Dashboard
Contents
Visit creation settings
- Default duration of visit: Select the number of hours for the default visit duration set when creating visits. The maximum number of hours is 12.
- Make visitor email addresses mandatory when creating new visits in logbook: Enable or disable, as appropriate.
If you want to apply the settings to all the locations you are an administrator of, click Copy to all locations to the right of the 'Save changes' button.

A list of locations you administer is displayed. Click Save to apply the settings to all listed locations.
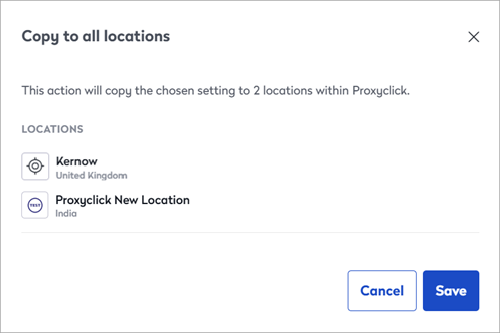
From the Global Admin Dashboard, Global administrators can manage this setting and other settings globally for multiple locations. Learn more: Global Admin Dashboard
Auto check-out
- Check out each visitor after: If selected, set the number of hours after the end time of a visit that a visitor is automatically checked out. Options range from 1 to 48 hours.
- Check out visitors every day at: If selected, set which hour of the day to automatically check out visitors with a 'checked-in' or 'on-site' status.
If you want to apply the settings to all the locations you are an administrator of, click Copy to all locations to the right of the 'Save changes' button.
A list of locations you administer is displayed. Click Save to apply the settings to all listed locations.
From the Global Admin Dashboard, Global administrators can manage this setting and other settings globally for multiple locations. Learn more: Global Admin Dashboard
On-site status
Enable the on-site status to allow an extra step in the entry process. This can be particularly useful for emergency processes that need to determine visitor status to ensure their safety.
If enabled, choose the status that is set after a visitor has registered on the kiosk:
- After registering on the iPad, the visitor is in status: Select the status to be set after the visitor registers on the kiosk, either 'Checked-in' or 'On-site'.
If you want to apply the settings to all the locations you are an administrator of, click Copy to all locations to the right of the 'Save changes' button.
A list of locations you administer is displayed. Click Save to apply the settings to all listed locations.
From the Global Admin Dashboard, Global administrators can manage this setting and other settings globally for multiple locations. Learn more: Global Admin Dashboard
Understanding 'Checked-in' and 'On-site'
On-site is an optional status that sits between the 'Expected' and 'Checked-in' statuses, and allows an extra step in the visitor's entry process to be implemented. Below shows where the on-site status fits into the visitor arrival flow:

On-site status is flexible in how it can be deployed and triggered via the dashboard, kiosk, or compatible integrations such as access control. It is important to note that only one status can be triggered from the kiosk.
Example uses
Manual security screening
- Visitors register via the kiosk, which sets their status to On-site, and they are added to the emergency list.
- After manual security screening is completed, the visitor's status is changed to Checked-in via the Visitor logbook. This sends an email notification to the host and the badge to the printer.
Distant security booth
In some cases, visitors pass through security controls when they arrive at a location - before they reach the lobby to register and check in. In this case, security can mark the visitor as on-site, which adds them to the emergency list but does not trigger the email notification to the host or the badge printing.
- After an initial security check, the guards at the distant security booth set the visitors to On-site status via the Dashboard, which adds them to the emergency list.
- The visitor makes their way to the lobby and checks in, triggering the email notifications and badge printing.
Access control integration
When Eptura Visitor is integrated with your company’s access control system:
- The visitor is sent a unique QR code in their invitation email, and their status is set to Expected.
- The visitor scans the QR code at the kiosk, which changes their status to On-site, and the visitor is then added to the emergency list.
- At this point, they can go through a check-in process to sign an NDA agreement, take photos, print a badge, etc., and enter via the access control system.
Learn more: Access control integration