Visitor Identification
About Visitor identification
Additionally, you can choose whether to allow unexpected visitors to check in on the kiosk, and if so, what information they must provide. You also have the option of storing the details of unexpected visitors who check in, so they are automatically recognized on future visits, speeding up the check-in process for visitors who have not pre-registered.
Visitor identification settings
To configure Visitor identification and set the options suitable for your organization, navigate to Settings > Visitors > Configure Kiosk > Visitor Identification. The options are explained in the tables below.

Visitor identification options
The following settings are used when a visitor checks in via the kiosk.
Visitor identification settings |
Notes |
|---|---|
|
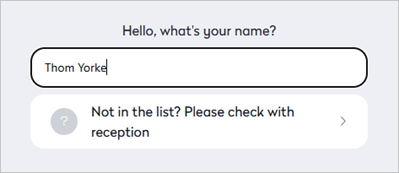
Visitors can check in by entering their name: Disable this setting if you only want visitors to check in using their invitation or pass. |
This option can only be disabled when the 'Visitors can check in with their invitation/pass (QR code)' setting is enabled. This option is shown at the bottom of the list. |
|
Recognize returning visitors: Stores information about unexpected visitors on the kiosk so it can be pre-filled on subsequent visits. |
Only visible if 'Visitors can check in by type their name' is enabled. If this option is disabled, the two sub-settings - 'Based on email' / 'Based on 3 letters' - are hidden, however, the selected options for those settings are still applied. |
|
Based on email (more confidential): When selected, only the visitor's email address is used to find their existing information. If 'Recognize returning visitors' is also enabled, the Been here before? option is added to the kiosk welcome screen. Returning visitors can tap this option and enter their email address. |
If 'Recognize returning visitors' is disabled, this option is hidden, however, the selected setting is still applied for pre-registered visitors who are checking in. You might need to temporarily enable 'Recognize returning visitors' to see the option selected here. |
|
Based on 3 letters (faster): When selected, the kiosk searches for a matching visitor when a minimum of 3 characters is entered. Choose from the following two options:
|
If 'Recognize returning visitors' is disabled, this option - and the two sub-settings - are hidden, however, the selected settings are still applied for pre-registered visitors who are checking in. You might need to temporarily enable 'Recognize returning visitors' to see the options selected here. |
|
Only allow expected visitors to check in: Enable this option to prevent visitors who are not pre-registered from checking in at the kiosk. When enabled, the visitor is shown a message inviting them to go to the reception desk. |
This option can only be enabled if the sub-setting 'Always create a new visit' is not enabled. When this option is enabled, the two sub-settings - 'Always create a new visit' and 'Prioritize the identification of visitors with an invitation over visitors without an invitation' are not applicable and are hidden. |
|
Always create a new visit: Enable this option to create a new visitor profile in the address book for every visit. Returning visitors are not recognized*. *If enabling this option when existing visitor profiles already exist on the kiosk, the previously saved visitors will still be recognized. You can clear visitor profiles from the kiosk via the Visitor Address Book. Learn more: Delete visit and visitor data |
This option is hidden if 'Only allow expected visitors to check in' is enabled. If this option is enabled, the 'Prioritize the identification of visitors with an invitation...' option is hidden. Any visitor profile that already exists on the kiosk will still be shown when this option is enabled - visitor profiles can be removed from the kiosk from the Visitor Address Book:
|
|
Prioritize the identification of visitors with an invitation over visitors without an invitation: When checking in by scanning a QR code displayed on the kiosk (or printed and displayed at your location) with a mobile device, this option prioritizes which registration screen is shown on the mobile device after tapping 'Start your check-in': When enabled, expected visitors are prioritized - the screen prompting the visitor for their email address is displayed (A). When disabled, unexpected visitors are prioritized - the screen prompting the visitor to enter their full details is displayed (B).
Registration screens shown on mobile device |
This option is hidden if 'Only allow expected visitors to check in' and/or 'Always create a new visit' are enabled. The visitor can tap 'I don't have an invite' or 'I have an invite' to switch to the other registration screen. This option applies only to the check-in process when using a mobile device. |
|
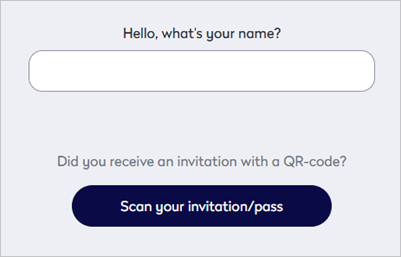
Visitors can check in with their invitation/pass (QR code): Allow visitors to check in using the QR code provided in their invitation or on their pass. When enabled, an option to 'Scan your invitation/pass' is shown on the kiosk after tapping 'Check-in' or 'Been here before?'.
|


Information to ask unexpected visitors
Choose the information required when an unexpected visitor arrives at your workplace. An unexpected visitor is a visitor without a planned visit logged in the logbook.
Information to ask unexpected visitors |
Notes |
|---|---|
| Full name: Unexpected visitors must enter their full name on the kiosk. | This option cannot be disabled. |
|
Email: Allows the visitor to enter their email address. |
Enable Required to make entering the email address mandatory. |
|
Visitor's company: Allows the visitor to enter their company name. |
Enable Required to make entering the company name mandatory. |