
Visitor Logbook Overview
The Visitor Logbook shows all upcoming visits for a particular day along with the visitor's status, whether they are expected or have checked in, for example. The logbook can show all visits for a particular location or for all locations belonging to a building. Learn more: Locations and Buildings
Contents
Open the Visitor Logbook
The Visitor Logbook is the landing page when opening Eptura Visitor, and can also be opened via the icon menu on the left.
Switch between logbooks for locations or buildings from the location drop-down at the top center of the Eptura Visitor page.

Click the Visitor Logbook menu icon to display the list of visitors for today. Navigate to a different day by clicking the left and right arrows at the top, or click Today to select a date from the calendar.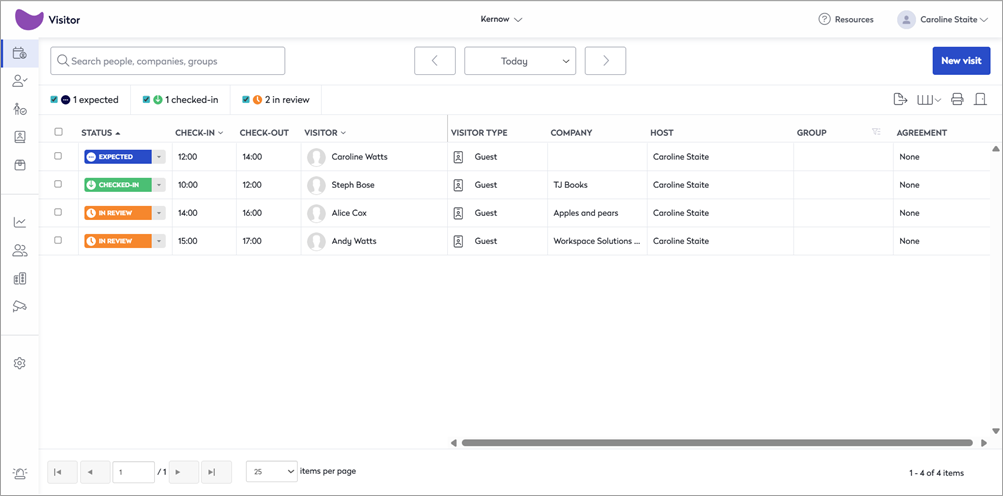
Click anywhere on a visit to view full details in the information panel that opens on the right.

Export visits
To export visits for a selected time frame and schedule reports to run automatically.
Export visits for a selected time frame
- Click the Export icon from above the list of visits to open the Export all visits dialog box.
- Select the From and To dates to export - up to 180 days of visits can be exported within any given time frame.
- Select the location or building as required - selecting a building will export all visit data for all the locations belonging to the building. Learn more: Locations and Buildings

- Click Export to start the process - you can continue working while the export is running - when the export is complete, a secure link to the data file is sent via email.
Schedule a report to run at regular intervals
- Click the Export icon from above the list of visits to open the Export all visits dialog box.
- Select the location or building as required - selecting a building will export all visit data for all the locations belonging to the building. Learn more: Locations and Buildings
- Click Schedule report to open the Scheduled automated report dialog.
- Set the report to run either Weekly or Monthly, and depending on your selection, set the Day of the week Date of the month:
- Day of week - select either Monday to Sunday from the drop-down. The data in the report will start from the same day of the previous week. Select 'Monday' to generate a Mon-Sun report for the previous week.
- Date of month - enter a date from 1 to 28. The data in the report will start from the same date from the previous month and contain between 28 and 31 days of data - depending on the length of the month. Set the date to ' 1 ' to generate a report for an entire month.

- Approximate delivery time - set the time in 24-hour format (hh:mm) in the time zone of the location. The timing of the report depends on the size of the report and the number of reports scheduled at the same time.
- Recipients - enter the recipient's email address and click Add. You can add up to 10 email addresses - each email address must match an existing Eptura Visitor user. Added email addresses are shown at the bottom.

- Click Save changes when done.
Remove a schedule
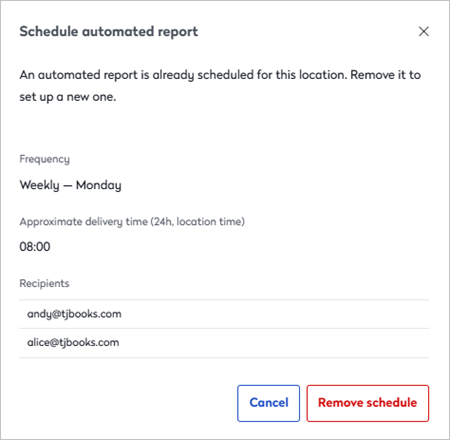
- Click the Export icon from above the list of visits to open the Export all visits dialog box, and click Schedule report.
- The existing schedule is displayed. Click Remove schedule to stop the scheduled report.
Set the columns to display in the Visitor Logbook
To change the columns and fields shown on the Visitor Logbook, select the Columns icon and tick the columns you want to display on the logbook.

Select the badge printer
To install or select the printer to print your visitor badges, select the Print icon from above the list of visits.

If the Proxyclick Print Proxy is already installed, you can select the printer to print badges to. If the Proxyclick Print Proxy is not already installed, you can follow the wizard to install the required software and activate printing from your Visitor logbook. Learn more: Print from the Visitor logbook
Print badges
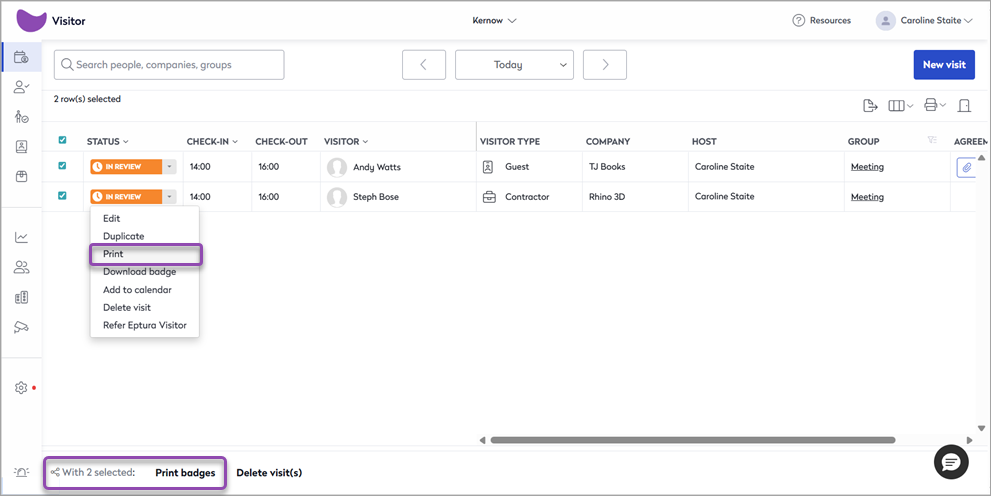
When your printer is installed and activated, the Print option is shown in the Status drop-down menu for the visitors, and at the bottom of the screen when one or more visitors are selected in the list.
Change the name of the Entrance
If you have multiple entrances to your site, it can be helpful to include the name of the entrance where your visitor checked in in the notification that is sent to the host.
Click the Entrance icon from above the list of visits to enter a name for the entrance, then click Save.

Visitor Status column
When a visitor is displayed in the logbook, the status column shows their current status - for example, whether they have arrived and are checked-in, are expected, or have checked out. Depending on the status, you can click the status to update it.
Other options are available from the Status drop-down - duplicate a visit, print a badge, download a badge for the visitor, add a visit to the calendar, delete a visit, etc. These options vary depending on the visit status and your organization's configuration.

Change the pagination
The default number of visitors listed on the Visitor Logbook is 25, and you can use the arrows to navigate through the pages. You can increase the number of visitors displayed to up to 100 per page.
