Visitor and Host Notifications
Contents
About Visitor and Host notifications
Visitor and host notifications can be customized to consider differences in process, culture, and preferences, and can be sent from a custom domain name.
The following notification emails can be sent:
Notifications for visitors
- Invitation email: Sent to the visitor when a visit is created. Useful to provide specific guidelines, an access code, or to attach a PDF, etc. The layout of this notification can be customized and the background and text colors can be set to your company branding.
- Visit reminder email: Sent to the visitor 4 hours before their visit.
- SMS reminder: An SMS text message can be sent to the visitor 2 hours before their visit.
- Welcome email: Sent to the visitor when they check in. Useful to provide WiFi details, contact details for the host, health and safety guidelines, etc. An agreement previously signed by the visitor can be attached.
- COMING SOON! Post-visit email: Sent to the visitor after their visit. Emails can be sent at either 1, 2, 3, 4, 8, and 24 hours after check-out.
- Prepare for visit: An email requesting information and agreements to be signed, can be sent to visitors ahead of a visit as part of the remote registration process. This is configured in Settings > Visitors > Remote registration. Learn more: Remote registration
Notifications for hosts
- Check-in notification: Sent to the host and/or assistant when a visitor checks in.
- Check-out notification: Sent to the host and/or assistant when a visitor has checked out.
- Check-out reminder: Sent to the host and/or assistant at a defined period after the scheduled check-out time, if the visitor has not checked out. Useful to remind the host to check the visitor out if they have left the building, so the emergency list can be kept up-to-date.
When notifications are enabled, users can further customize what they receive and how, from their user profile.
Learn more about these notifications below.
Custom domain name for email notifications
Administrators can define the domain from which visitor email notifications are sent, ensuring visitors receive emails from a recognizable and trusted domain.
The sending domain is configured from the Global Admin Dashboard. Learn more: Global Admin Dashboard
Customize default visitor and host notifications
A default customization can be saved for each notification and different settings can be configured for each visitor type. Learn more: Visitor types
- To enable/disable and customize the notifications sent to visitors and hosts, navigate to Settings > Visitors > Notifications.

- Toggle the buttons to enable or disable each email notification and/or to enable or disable an SMS reminder that is sent 2 hours before the scheduled visit.
Read on to learn more:
- Email and SMS notifications sent to visitors
- Email and SMS notifications sent to hosts and assistants
Email and SMS notifications sent to visitors
The invitation, visit reminder, welcome, and post-visit emails are customized from Notification settings as described below.
For information about the visit preparation email that can be sent to visitors before a visit, see Remote registration.
- From Settings > Visitors > Notifications, click Customize for the email notification you want to edit:
- Invitation email: Sent to the visitor when a visit is created. Useful to provide specific guidelines, an access code, or to attach a PDF, etc. The layout of this notification can be customized and the background and text colors can be set to your company branding.
- Visit reminder email: Sent to the visitor 4 hours before their visit.
- Welcome email: Sent to the visitor when they check in. Useful to provide WiFi details, contact details for the host, health and safety guidelines, etc. An agreement previously signed by the visitor can be attached.
- COMING SOON! Post-visit email: Sent to the visitor after their visit. Emails can be sent at either 1, 2, 3, 4, 8, and 24 hours after check-out.
- Visitor types - If you have created different visitor types, you can customize the email notification for each visitor type, and the invitation email can be completely disabled for a particular visitor type if required. Learn more: Visitor types
- COMING SOON! Enable/disable the invitation email per visitor type - toggle the buttons to the left to disable or to the right (blue) to enable. Only the invitation email can be toggled off/on.
- Customize - Click the arrow next to the visitor type to expand the options and customize the settings.

Available visitor types depend on your organization's configuration.
- Choose the settings for the selected notification type as described below.
 Default settings for the invitation email sent to visitors
Default settings for the visit reminder email sent to visitors
Default settings for the welcome email sent to visitors Default settings for the post-visit email
Settings for visitor email notifications
Custom text
All email notifications can include custom text in the body of the email. Basic formatting tools are provided.
Good to know when editing the custom text:
- Copy and paste plain text only. Copying and pasting rich text format from applications such as Microsoft Word, is not recommended, as invisible formatting might also be copied. Always copy text from a plain text editor before adding it to the editor.
- You can add custom fields and visit data to the messages. Click the 'Variables' drop-down, and select the field to add to the message.
- Always save changes before navigating away from the settings. The editor does not automatically save changes; exiting without saving will lose any updates you have made.
Invitation email
View image

Invitation emails are automatically sent to visitors when a visit is created. These emails can include helpful details such as guidelines, access codes, and optional PDF attachments. The layout and styling can be customized to match your company's branding.
The following options - configured from Settings > Visitors > Notifications > Invitation email > Customize - can be included in invitation emails sent to visitors:
- Host details: Include or exclude any or all of the following:
- Email address
- Direct phone number
- Mobile phone number
- Personal Assistant direct phone number
- Company's main phone number
- QR code: Attach a unique QR code to the email. The code can be used to check-in/out at the kiosk or in combination with an Access Control System (ACS).
- Privacy: Choose whether to show or hide the 'Add to Calendar' option in the invitation email.
- Attach PDF: Upload a PDF attachment to send with the email. This is useful to send a floor plan, or directions, etc.
- Custom text: Enter the text to be included in the body of the email. See above: Custom text
The layout of the Invitation email can be customized by showing or hiding sections, and adjusting their order. Fonts and colors can be tailored to match your branding, and an image can be added with a clickable link to a website.
To change the layout and style, click the Preview / Customize button at the bottom of the Invitation notification settings screen to get started.

Change the colors and font
Select a font and set the background and text colors to suit your company's branding. The color of URLs and other links are not affected.
- Click Customize Layout at the top of the 'Preview / Customize' screen.

- Set your colors and preferred font:
- Enter the hex code values for the background color and text color - make sure to precede the values with ' # '.
- Click the Font drop-down to select a font.

- Click Save Layout when done or follow the steps below to continue customizing the email.
Add a clickable image
- Scroll to the bottom of the 'Preview / Customize' screen and click Upload Image.

- Select the image from your drive to upload - images must be JPG or PNG format, 1MB or under, with a maximum resolution of 570 x 570PX
- To add a clickable link to open a website, enter the website URL in the box.
Change the layout
|
 Drag sections to reorder the layout Drag sections to reorder the layout |


- When you have finished customizing the email, click Save Layout.
- To preview the layout, click Send a test copy at the bottom of the 'Preview / Customize' screen, to send an email to your email address.
You can revert to the default layout at any time by clicking Reset Layout at the top.
Visit reminder email
View image
A reminder about a visit can be sent to the visitor 4 hours before their visit. A reminder email is not sent if a visit is canceled.
The following options can be set:
- Choose the host's contact details to show or hide in the email:
- Direct phone
- Mobile phone
- Personal Assistant direct phone
- Company main phone number
- QR code: Attach a unique QR code to the email. The code can be used to check-in/out at the kiosk or in combination with an Access Control System (ACS).
- Custom text: Enter the text to be included in the body of the email. See above: Custom text
Welcome email
View image
A welcome email can be sent to visitors when they check in. This can be useful to provide WiFi details, contact details for the host, health and safety guidelines, etc. An agreement previously signed by the visitor can also be attached.
The following options can be set:
- Choose the host's contact details to show or hide in the email:
- Direct phone
- Mobile phone
- Personal Assistant direct phone
- Company main phone number
- QR code: Attach a unique QR code to the email. The code can be used to check-in/out at the kiosk or in combination with an Access Control System (ACS).
- Signed agreement/NDA: Attach an agreement or NDA (non-disclosure agreement) previously signed by the the visitor.
- Custom text: Enter the text to be included in the body of the email. See above: Custom text
Coming soon!The post-visit email is expected in June 2026 Post-visit emailView image
A post-visit email can be sent to a visitor after they have checked out. From Settings > Visitors > Notifications, scroll down to Post-visit email and select either 1, 2, 3, 4, 8, or 24 hours after check-out from the Timing drop-down list.
Click Customize to edit the custom text to include in the body of the email. See above: Custom text |

SMS reminder
A reminder can be sent to the visitor via Short Message Service (SMS) 2 hours before the visit's start time.
Email and SMS notifications sent to hosts and assistants
- Check-in notification: An email and/or SMS is sent to the host and/or assistant when a visitor checks in.
- Check-out notification: An email sent to the host and/or assistant when a visitor has checked out.
- Check-out reminder: An email sent to the host and/or assistant at a defined period after the scheduled check-out time, if the visitor has not checked out. Useful to remind the host to check the visitor out if they have left the building, so the emergency list can be kept up-to-date.
Check-in notification via email and SMS
Informs hosts and/or assistants when a visitor has checked in that allows them to send a message back to reception to acknowledge their arrival or provide further instructions.
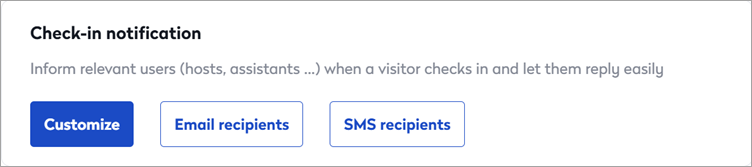
- Click Customize to set the default options for the check-in notification sent to hosts and click Save when done.

Default options for the check-in notification sent to hosts
You can set the following defaults for the check-in notification sent to hosts:
- Select the Reply buttons to display in the notification email. The reply is sent to Reception:
- I'll be there in 5 minutes
- I'll be there in 15 minutes
- Let the visitor in
- I'm not available
- Deny visitor access
- Send a message
- Custom text: Enter the text to be included in the body of the email.
- Click Email recipients to choose who to send the email notification to by default. (The default settings can be over-overridden by the user in their user profile). Options are Host and Assistant.
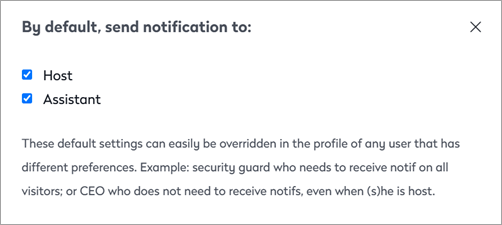
- Click SMS recipients to choose who to send the SMS/text notifications to by default. Options are Host, Assistant, and Additional Recipients. Selecting Additional Recipients enables by default, the 'Notify me by SMS if I have been added to the recipients' option in the user's profile.

The defaults set here can be overridden by the user from their user profile.
Check-out notification
Informs hosts when their visitors have left the building.
- Click Email recipients to choose who to send the email notification to by default. (The default settings can be over-overridden by the user in their user profile). Options are Host and/or Assistant.
Check-out reminder
Sent to the host and/or assistant at a defined period after the scheduled check-out time, if the visitor has not checked out. Useful to remind the host to check the visitor out if they have left the building, so the emergency list can be kept up-to-date.

- Toggle the button to enable or disable the check-out reminder.
- From the Timing drop-down, select the number of hours after the planned check-out to send the reminder. Options are 1, 2, 3, 4, or 8 hours after the planned check-out time.
- Click Email recipients to choose who to send the email notification to by default. (The default settings can be over-overridden by the user in their user profile). Options are Host and/or Assistant.
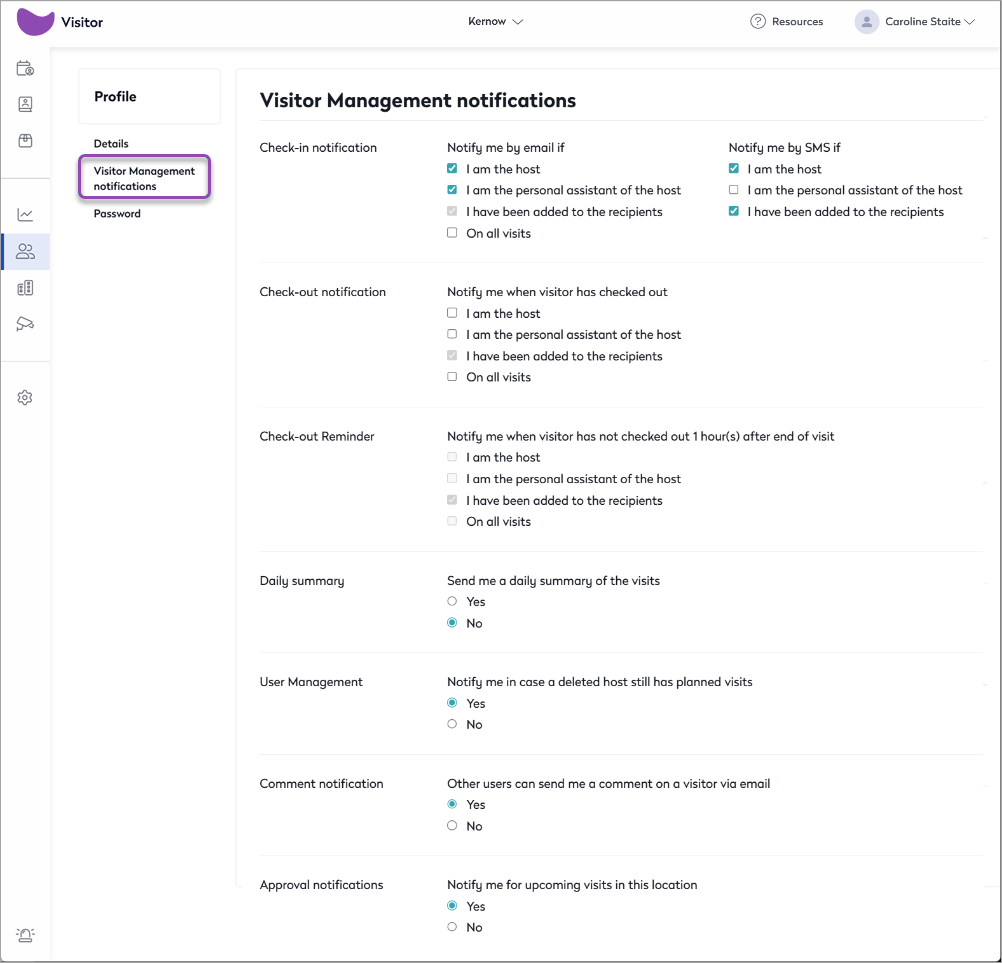
Override default options for specific users
Users can override the defaults set above from their user profile, or admins can override them for users from the Employees module.
To modify the default notification options:
- Users: Click your profile at the top-right of Eptura Visitor and click Manage profile. Select Visitor Management notifications from the menu on the left.
- Admins: Open the Employees module and click the user's name to open their profile. Click Edit then select Visitor Management notifications from the menu on the left.
Learn more
- Set defaults for the check-in and check-out notifications for individual users from User Management. Learn more: Visitor Management notifications
- Users can assign a personal assistant to receive check-in and check-out notifications for visitors. Learn more: Assign a Personal Assistant
- An email requesting information and agreements to be signed, can be sent to visitors ahead of a visit as part of the remote registration process. Learn more: Remote registration