Remote registration
Create a remote registration flow to allow visitors to provide required information prior to their visit and to send agreements that might need signing in advance.
Your remote registration journeys can be centrally managed from the Global Admin Dashboard. When a check-in and/or remote registration template has been saved to a location from the Global Admin Dashboard, those journeys can no longer be edited locally. Learn more: Global Admin Dashboard ↗️`
Contents
Enable remote registration
- Sign in to Eptura Visitor and navigate to Settings > Visitors > Remote Registration.
- Enable Remote registration with the toggle at the top of the page.

Build your registration flow
The remote registration flow described below is created in the same way as custom screens are created for the check-in journey on the kiosk. Learn more: Custom screens for checking in on the kiosk ↗️
Add custom screens (steps/flow) to the remote registration journey to gather additional details about your visitor and provide information in advance of a visit. Rules can control the next step in the process, as determined by the visitor's responses. These additional screens are displayed during the remote registration journey and can include questions, messages, images, and videos.
Responses already provided via the remote registration process or by a previous visit, are prefilled on the screens.
Your check-in and remote registration journeys might be centrally managed from the Global Admin Dashboard. When a check-in and/or remote registration template has been saved to a location from the Global Admin Dashboard, those journeys can no longer be edited locally. Learn more: Global Admin Dashboard ↗️
There are four ways to present the question or information to the visitor:
- Questions: Ask a question and choose how responses are given (entering text or tapping an option from a list).
- Messages: Provide information that does not require a response.
- Images: Upload an image to display on the screen.
- Videos: Play a video on the screen.
As you create your custom screens and add them to the remote registration journey, they are added to the flow diagram on the right, helping you to visualize the visitor's experience.

From Settings > Visitors > Remote Registration, click Configure registration flow to start creating or selecting custom screens for the remote registration journey.
- Select the type of screen to add to the flow:

- Questions: Ask a question and choose how responses are given: Allow the visitor to enter text; present a list of options for the visitor to select from; require a simple 'yes' or 'no' response; or request a date. Learn more: Questions
- Messages: Provide information that does not require a response. Learn more: Messages
- Images: Upload an image to display on the screen. Learn more: Images
- Videos: Play a video on the screen. Learn more: Videos
- When you've selected and configured the custom screen type, click the Next step is drop-down and select the next screen to display in the journey. The options include all the screens already added to the process, and an option to proceed to the next step.
- Click Save to add the screen to the flow.
Continue to add custom screens to complete the visitor's registration journey.
Screens not flowing as expected? Don't worry! If you've added screens in such a way that the arrows on the diagram are not pointing to the intended step or the screens are not flowing as expected, it's easy to reorder the screens. Learn more: Reordering screens ↗️`
New screen does not appear in the diagram? Sometimes a new screen is positioned on the diagram under an existing screen. Drag the existing screen to reveal the new screen underneath.
Screen types
Custom screens can be presented to the visitor during remote registration in four different ways:
Questions and Smart rules
Ask a question and choose how responses are given: Allow the visitor to enter text; present a list of options for the visitor to select from; require a simple 'yes' or 'no' response; or request a date. You can also request a file is uploaded, such as proof of ID.
Coming soon!The Visitor Type option is expected in June 2026 The built-in Visitor Type option allows you to quickly build a check-in journey based on the type of visitor - guest, contractor, employee, or customer (the listed visitor types depend on your organization's configuration).
|
Create a new question or pick an existing question from the list. Existing questions are saved and managed in Settings > Custom fields. Learn more: Custom fields ↗️`
While it is possible to create questions when setting up the remote registration journey, we recommend creating them first in 'Custom fields'. Existing questions are more easily added to the flow. Learn more: Custom fields↗️`
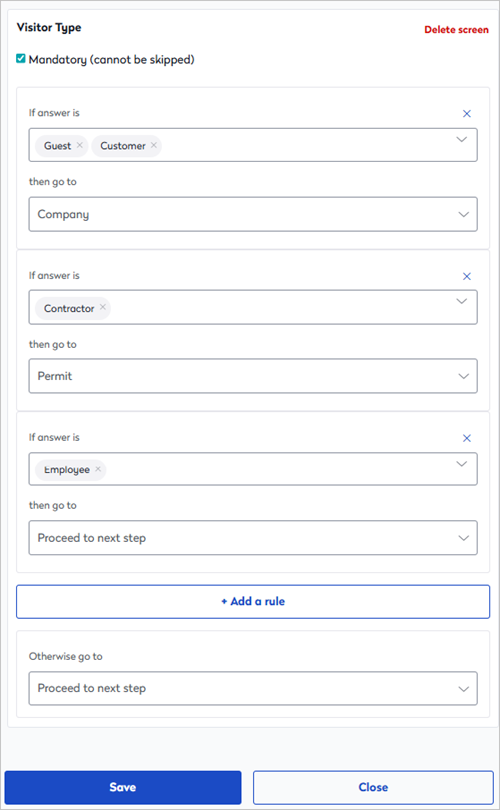
Questions can incorporate rules that decide the next step. For example, you can ask a visitor if they are a guest, a contractor, or an employee. If they respond 'guest' you can tell them that their host will collect them shortly; or if they respond 'contractor', you might want to check if they have a valid pass before allowing them to continue.
Other questions simply require a response entered before continuing, such as a Company name or email address.
If you are requesting a file upload, the file type must be either PNG, JPG, GIF, or PDF, and the file must not exceed 5MB.
Smart rules
When adding a multiple-choice or yes/no question to your check-in process, you can add a rule to allow the answer to determine the next step in the process.
To add a rule for the question, click Add a rule to show the options:
- If answer is: Select the answer from the list that the rule applies to.
- Then go to: Select the next question or step displayed if the visitor selects the answer above.
To add another rule for a different answer, click Add a rule and select another answer and action from the list. You can continue to add rules for all possible answers, or if all the remaining answers should simply move the visitor to the next step:
- Otherwise, go to: Select the next question or step to display if the visitor chose an option without a specific rule set.

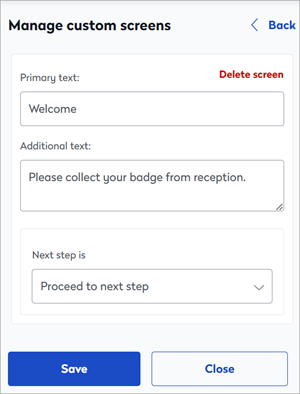
Messages
When you want to provide specific instructions or information for your visitor, add a message to the journey. The message can be presented at any point during the check-in process, and be followed by the step of your choice.
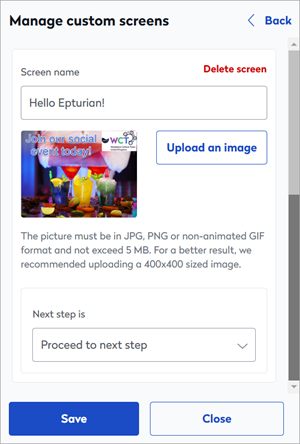
Images
Sometimes pictures speak louder than words. Upload an image to be displayed at a given point during the check-in journey. Image files must be in JPG, PNG, or non-animated GIF format, and must not exceed 5MB. For best results, we recommend a resolution of 400 x 400px
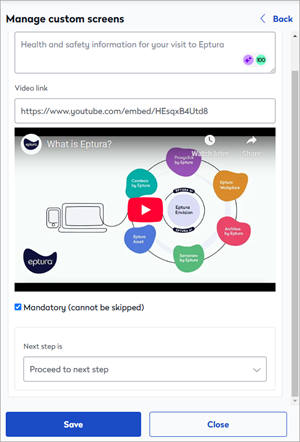
Videos
Videos can be useful to provide welcome information, a walk-through tour, or health and safety information, etc. Videos must be hosted on YouTube - just add the YouTube URL to the custom screen and enter text to be shown along with the video as it plays.
Visitor's picture in advance
When enabled, this option requests that a picture of the visitor is uploaded before they arrive.
Navigate to Settings > Visitors > Remote Registration and enable Visitor picture in advance to collect the visitor's photo during remote registration.

Sign agreements in advance
Request that an agreement is signed in advance of the visit.
Navigate to Settings > Visitors > Remote Registration and enable Sign agreements in advance.

When enabled, a Please prepare for your visit email notification is sent to the visitor. This email is sent separately from the visit invitation and contains a Prepare visit link that directs them to the remote registration web page, where they can sign the agreement (and complete any other required actions configured for remote registration).
The agreement is configured in Settings > Visitors > Configure kiosk > Agreement (NDA)
Learn more: Visitor agreements ↗️
Notifications sent to visitors and hosts
Good to know when editing email notifications
- Copy and paste plain text only. Copying and pasting rich text format from applications such as Microsoft Word, is not recommended, as invisible formatting might also be copied. Always copy text from a plain text editor before adding it to the editor. Copying text from one Visitor email to another is fine.
- You can add custom fields and visit data to the messages. Click the 'Variables' drop-down, and select the field to add to the message.
- Always save changes before exiting; the editor does not automatically save changes and exiting without saving will lose any updates you have made.
Notifications sent to visitors
Registration request and reminder notifications
Registration request and registration request reminder emails are sent to visitors in advance of a visit, and request that the remote registration process be completed prior to arriving on-site. The emails can be edited to suit your requirements.
- Registration request: You can set the number of hours in advance of a visit the registration request is sent, and if the visit occurs within the defined timeframe, the email is sent immediately.
- Registration request reminder: You can set the number of hours in advance of a visit that a reminder email is sent if the remote registration process has not been completed.
Both emails can be customized for the type of visitor. Available visitor types depend on your organization's configuration. Learn more: Visitor types ↗️
From Settings > Visitors > Remote Registration, scroll down to Notifications sent to visitors.
- Click Customize to edit the registration request or registration reminder emails.

- If you have visitor types configured, select the type of visitor to expand the section and reveal the email editor.

- Edit the email as required and click Save when done.

- Timing of registration request: Enter the number of hours before the visit the Registration request email is sent. If this overlaps the check-in time, the email is sent immediately after the visit is created. Click Save.
- Timing of registration reminder: Enter the number of hours before the visit the Registration reminder email is sent to visitors who have not yet completed the remote registration. Click Save.
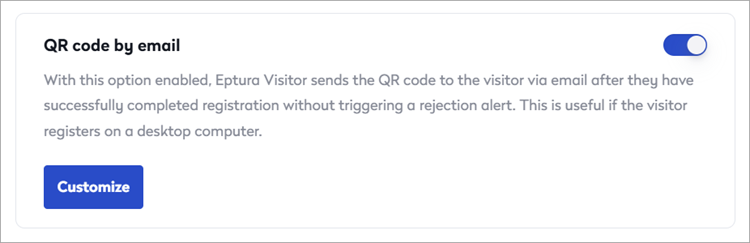
QR code by email
Enable QR code by email to configure a check-in QR code to be sent to the visitor when the remote registration process has been completed. iOS users can download the pass to their Apple wallet. The QR code is used to check in on arrival.
- From Settings > Visitors > Remote Registration, enable QR code by email, and click Customize to edit the email.
- If you have visitor types configured, select the type of visitor to expand the section and reveal the email editor.

- Edit the email as required and click Save when done.
Notification sent to hosts
Visit refusal alert
If a visitor's response to a registration question was flagged as unacceptable, a visit refusal alert notification is sent to the host allowing them to contact the visitor and rearrange the visit as appropriate. If you have visitor types configured, you can customize the message sent to the host for each visitor type.
From Settings > Visitors > Remote Registration, scroll down to Notifications sent to hosts.
- Click Customize to edit the visit refusal alert.

- If you have visitor types configured, select the type of visitor to expand the section and reveal the email editor.

- Edit the email as required and click Save when done.
Completing the remote registration
When remote registration is enabled and a registration flow is created, the visitor is sent the registration request via email at the defined number of hours defined before the planned check-in, with a link to start the registration process. (The number of hours is set in Settings > Visitors > Remote Registration > Notifications sent to visitors).
On receipt of the email, the visitor clicks the Prepare visit button in the email to start the registration.

The link opens in the default browser and the remote registration flow is started.
Good to know
- No additional apps or add-ins are required to complete the registration process or to upload files.
- Document uploads must be either PNG, JPG, GIF, or PDF file type, and the file size must not exceed 5MB.
- Documents uploaded by visitors are available from the Visitor Logbook.