Global Admin Dashboard
About the Global Admin Dashboard
The Global Admin Dashboard provides Global administrators a centralized interface to manage settings across multiple locations, with granular control over different regions or territories.
This dashboard offers the following benefits:
- Centralized management: Global administrators can manage settings from a single, unified dashboard, providing detailed control over various regions.
- Efficiency: Settings can be able to be applied to all locations simultaneously, streamlining the update process and saving time.
- Customization: Supports the configuration of settings specific to different regions.
- Security: Settings are locked at local level when applied via the Global Admin Dashboard, to ensure global settings remain consistent and secure.
- Custom domain for visitor notifications: Administrators can define the domain from which visitor email notifications are sent, ensuring visitors receive emails from a recognizable and trusted domain.
- Audit log: The audit log currently stores basic information about changes made via Global Admin Dashboard. More auditing information is planned for a future release.
The Global Admin Dashboard is available for certain Eptura Visitor plans. Contact Eptura to find out more.
Required: Organization view
The Global Admin Dashboard requires Eptura Visitor locations and buildings to be managed under an Organization view. Existing customers can contact Eptura to configure the Organization view. From June 2025 release, an Organization view is configured by default for new Eptura Visitor customers.
When the view is configured, an 'Organizations' section is displayed at the top of the Locations list.
Contents
Launching the Global Admin Dashboard
The Global Admin Dashboard is launched from the location drop-down at the top of Eptura Visitor on the web. Click the location drop-down and select your Organization from the top of the list to open the Global Admin Dashboard.

Multi-site settings
Certain settings can be applied to multiple locations at the same time from the Global Admin Dashboard. The settings that show the 'Copy to all locations' button in the Settings module, can be selected in bulk from the Global Admin Dashboard and applied to the specific locations you select.
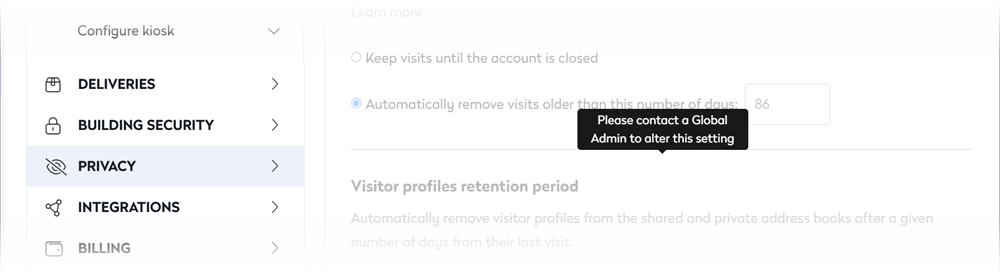
When settings have been saved to a location via the Global Admin Dashboard, none of the settings listed on the Global Admin Dashboard Settings are then configurable locally for the location from the Settings module. This includes settings that were not changed. The options are grayed out on the Settings module and a message is displayed, 'Please contact a Global Admin to alter this setting'.
Settings that are not listed on the Global Admin Dashboard are still managed locally from the Settings module.
To get started, select your Organization from the top of the location drop-down list to open the Global Admin Dashboard.
The Global Admin Dashboard is launched and displays your managed locations. (To return to the local dashboard for a location, click View local dashboard).
No menu options displayed on the left? The Global Admin Dashboard is only available for certain Eptura Visitor plans. Contact Eptura to find out how to enable it for your organization.
- Select the locations to apply the settings to. You can click the check box at the top of list to select all locations or select individual locations.

- Select Settings from the menu on the left of the Global Admin Dashboard to show the settings that can be applied to multiple locations

- Change the required settings and click the toggle 'on' for each setting that you want to apply to the locations selected in the previous step. The toggle is blue when enabled. Learn more about these settings in the Modules section of this guide.
- When you've made your changes and toggled the settings on that you want to apply to the selected locations, click the Save changes button at the top.
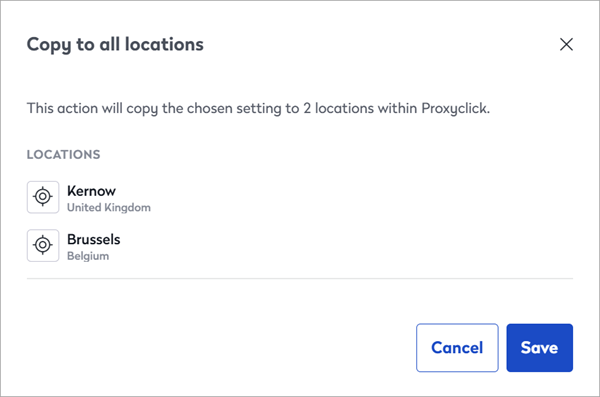
- A confirmation message is displayed listing the locations the settings will be applied to. Check the locations and click Save to confirm the changes.
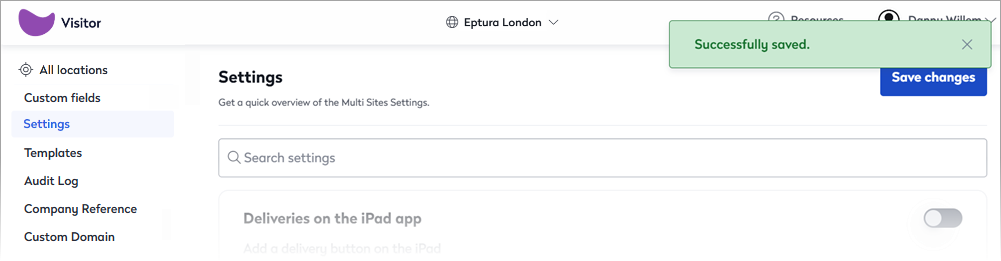
- A message confirming the changes have been successfully applied is displayed at the top right of the screen.
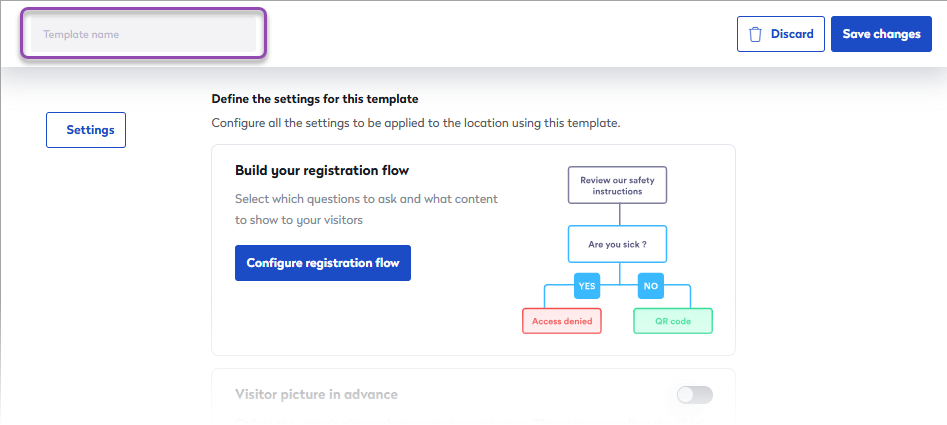
Templates and Custom fields
Check-in and Remote registration journeys can be centrally managed from the Global Admin Dashboard. Create templates for the journeys and save them to your selected locations. When the check-in and/or remote registration templates have been saved to a location from the Global Admin Dashboard, those journeys can no longer be edited locally.
The check-in and remote registration templates use custom fields that are created directly from the Global Admin Dashboard. These custom fields are viewable from your locations but cannot be edited locally.
Create custom fields
Create the custom fields to use for your centrally managed check-in and remote registration templates.
Custom fields created from the Global Admin Dashboard can be viewed from your locations but cannot be edited locally.
- Select your Organization from the top of the location drop-down to open the Global Admin Dashboard.
- Select Custom fields from the menu.
- Click the New custom field on the right.

- Now create the custom fields to use in your centrally managed check-in and remote registration templates. Learn more: Create Custom Fields, Custom Screens and Smart Rules
Create templates
Create the centrally managed templates for your check-in and remote registration journeys.
When the check-in and remote registration templates are saved to your locations from the Global Admin Dashboard, those journeys cannot be edited locally.
- Select your Organization from the top of the location drop-down to open the Global Admin Dashboard.
- Select the locations you want to save the template(s) to.
- Select Templates from the menu and choose the type of template to create settings for; either for the Check-in or Remote registration journey.

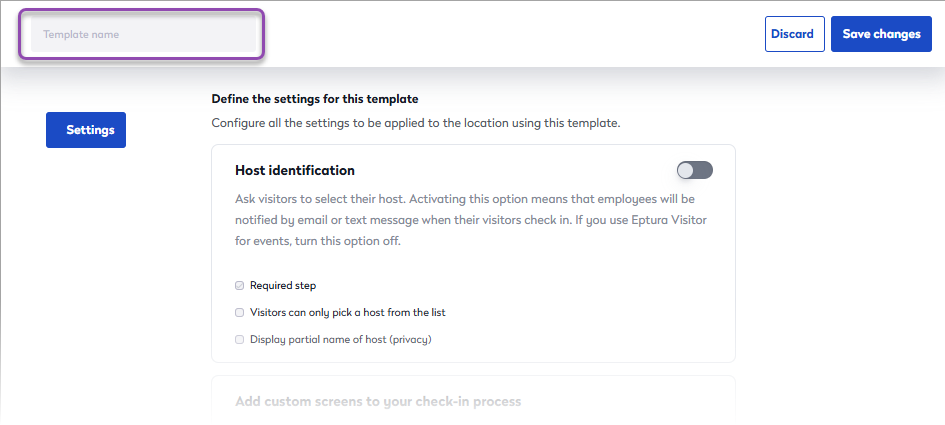
- Configure the settings for the template type:
|
Check-in settings
|
Remote registration settings
|
- Select the templates to save to the locations selected earlier; you can only select one template of each type (1 check-in and 1 remote registration template), and click Save changes.
- A confirmation message is displayed listing the locations the settings will be applied to. Review the locations the template(s) will be saved to and click Save to confirm.
Audit Log
The Audit Log shows when and where multi-site settings were applied using the Global Admin Dashboard, and who performed the change.
Currently, the Audit Log only stores the date, time, the name of the admin who performed the change, and the locations the change was applied to. More information is planned for a later release.
To view the Audit Log, select your Organization from the top of the location drop-down list to open the Global Admin Dashboard.
No Organization displayed? Contact Eptura to configure an Organization for your Eptura Visitor implementation.
- Select Audit log from the menu to view the log. You can enter a value in the search box to filter the results by date, time, or administrator.
- To view which locations the settings were applied to, click View More.

Company Reference
This Company Reference value is for your own purposes and can be useful for reporting or integrations with third-party applications. It is not visible to users. Learn more: Company settings
You can quickly view or edit Company Reference values for each of your locations from the Global Admin Dashboard.
To view the Company Reference values, select your Organization from the top of the location drop-down list to open the Global Admin Dashboard.
No Organization displayed? Contact Eptura to configure an Organization for your Eptura Visitor implementation.
- Select Company Reference from the menu to view and edit the values.

- Edit the values as required and click Save to apply the Company Reference to the location.
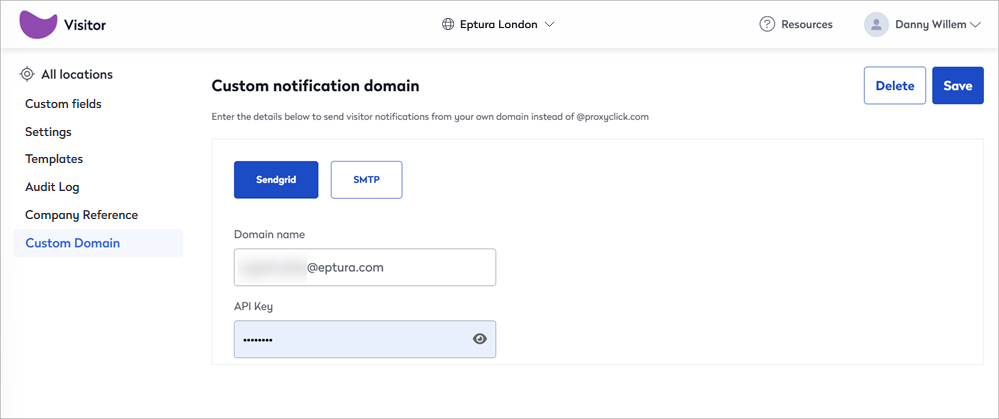
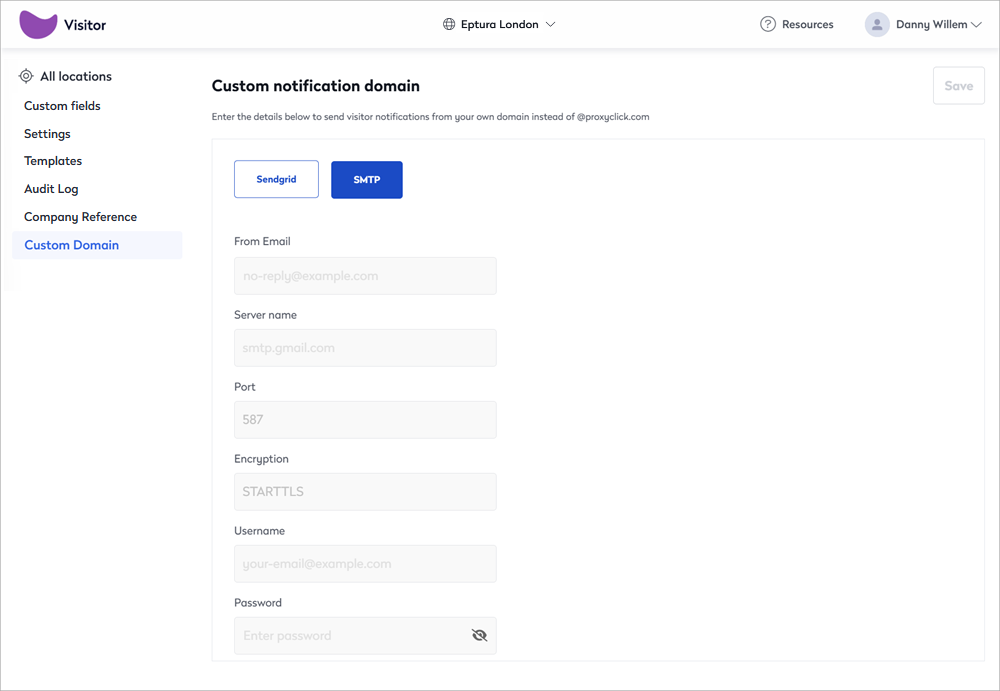
Custom domain for visitor notifications
Administrators can define the domain from which visitor email notifications are sent, ensuring visitors receive emails from a recognizable and trusted domain. The domain can be set by entering either your SendGrid account credentials or SMTP details.
To set the sending domain, select your Organization from the top of the location drop-down list to open the Global Admin Dashboard.
No Organization displayed? Contact Eptura to configure an Organization for your Eptura Visitor implementation.
- Select Custom Domain from the menu on the left and enter your SendGrid or SMTP details where indicated.
- SendGrid: Enter your SendGrid email address and API key, and click Save. This is the email address that notifications will be sent from. Learn more: SendGrid domain authentication
- SMTP: Enter your SMTP details, and click Save. See also: SMTP configuration notes
- SendGrid: Enter your SendGrid email address and API key, and click Save. This is the email address that notifications will be sent from. Learn more: SendGrid domain authentication
If nothing is entered for SendGrid or SMTP, or the connection fails, emails are sent from '@proxyclick.com'.
SendGrid domain authentication
The following steps presume an understanding of SendGrid and DNS, and might differ depending on your environment.
- Sign in to your SendGrid account.
- From the left menu, navigate to Settings > Sender Authentication.
- Under 'Domain Authentication', click Get Started.
- Enter your custom sub-domain (e.g. mail.example.com) and choose your DNS host.
- Enable Automated Security to generate DKIM and SPF records.
- Click Next to view the CNAME records and the SPF TXT entry.
- Copy each record exactly as shown in SendGrid.
- Sign in to your DNS provider and create the CNAME and TXT records.
- Wait 5–30 minutes for DNS changes to propagate.
- Return to SendGrid and click Verify. Status will change to Verified.
SMTP configuration notes
- No additional DKIM setup is required by Eptura Visitor when using your SMTP server.
- Ensure your SMTP server is configured to sign outgoing emails as needed.
- Verify that your SMTP host IP addresses are authorized in your SPF policy.