Custom Screens
Contents
About Custom screens
Add custom screens (steps/flow) to the check-in process and the remote registration flow to gather additional details about your visitor and provide information. Rules can control the next step in the process, as determined by the visitor's responses. These additional screens are displayed on the kiosk or in the remote registration process, and can include questions, messages, images, and videos.
Responses already provided via the remote registration process or by a previous visit, are prefilled on the screens.
Your check-in and remote registration journeys can be centrally managed from the Global Admin Dashboard. When a check-in and/or remote registration template has been saved to a location from the Global Admin Dashboard, those journeys can no longer be edited locally. Learn more: Global Admin Dashboard
There are four ways to present the question or information to the visitor:
- Questions: Ask a question and choose how responses are given (entering text or tapping an option from a list).
- Messages: Provide information that does not require a response.
- Images: Upload an image to display on the screen.
- Videos: Play a video on the screen.
As you create your custom screens and add them to the check-in or remote registration journey, they are added to the flow chart on the right, helping you to visualize the visitor's experience. The check-in process always starts with the default host information screen.

Example of a check-in flow at the kiosk
Screens can easily be reordered, inserted, and removed from the flow.
Set up custom screens for the check-in process
- Sign in to Eptura Visitor and navigate to Settings > Visitors > Configure kiosk > Custom screens.

- Skip if prefilled: Enable this option to bypass screens containing questions if all questions (on all screens) are prefilled via remote check-in or from a returning visitor's previously saved details.
Custom screens are only skipped if all questions on all screens are prefilled. If one or more custom screens are not prefilled, then all the screens are displayed regardless.
- Click Manage custom screens to start creating a new screen or edit existing screens.
Build your check-in journey
- Select the type of screen to add to the flow:

- Questions: Ask a question and choose how responses are given: Allow the visitor to enter text; present a list of options for the visitor to select from; require a simple 'yes' or 'no' response; or request a date. Learn more: Questions
- Messages: Provide information that does not require a response. Learn more: Messages
- Images: Upload an image to display on the screen. Learn more: Images
- Videos: Play a video on the screen. Learn more: Videos
- When you've selected and configured the custom screen type, click the Next step is drop-down and select the next screen to display in the journey. The options include all the screens already added to the process, and an option to proceed to the next step.
- Click Save to add the screen to the flow.
Continue to add custom screens to complete the visitor's registration journey.
Screens not flowing as expected? Don't worry! If you've added screens in such a way that the arrows on the diagram are not pointing to the intended step or the screens are not flowing as expected, it's easy to reorder the screens. Learn more: Reordering screens
New screen does not appear in the diagram? Sometimes a new screen is positioned on the diagram under an existing screen. Drag the existing screen to reveal the new screen underneath.
Screen types
Custom screens can be presented to the visitor in four different ways:
Questions and rules
Create a new question or pick an existing question from the list. Existing questions are saved and managed in Settings > Custom fields. Learn more: Custom fields
While it is possible to create questions when setting up the check-in journey, we recommend creating them first in 'Custom fields'. Existing questions are more easily added to the check-in flow. Learn more: Custom fields
Questions can incorporate rules that decide the next step. For example, you can ask a visitor if they are a guest, a contractor, or an employee. If they respond 'guest' you can tell them that their host will collect them shortly; or if they respond 'contractor', you might want to check if they have a valid pass before allowing them to continue.
Other questions simply require a response entered before continuing, such as a Company name or email address.
Here's an example of a basic question not requiring a response and a more complex question incorporating rules that determine the next step in the check-in journey:
|
Example of a basic question not requiring a response. Regardless of the response, the visitor is taken to the next step in the check-in process.
|
|
Example of a question requiring the response to be selected from a list. The next step depends on the response selected. A response is mandatory, so the visitor cannot continue the check-in journey until they have made a selection. The selection is saved to their visitor profile and can be prefilled on subsequent visits.
|
|


Rules
When adding a multiple-choice or yes/no question to your check-in process, you can add a rule to allow the answer to determine the next step in the process.
To add a rule for the question, click Add a rule to show the options:
- If answer is: Select the answer from the list that the rule applies to.
- Then go to: Select the next question or step displayed if the visitor selects the answer above.
To add another rule for a different answer, click Add a rule and select another answer and action from the list. You can continue to add rules for all possible answers, or if all the remaining answers should simply move the visitor to the next step:
- Otherwise go to: Select the next question or step to display if the visitor chose an option without a specific rule set.

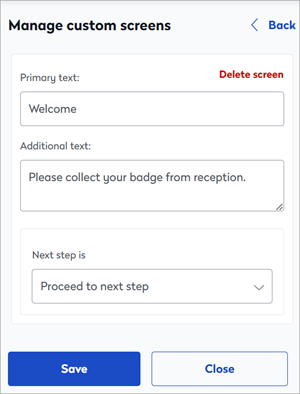
Messages
When you want to provide specific instructions or information for your visitor, add a message to the journey. The message can be presented at any point during the check-in process, and be followed by the step of your choice.
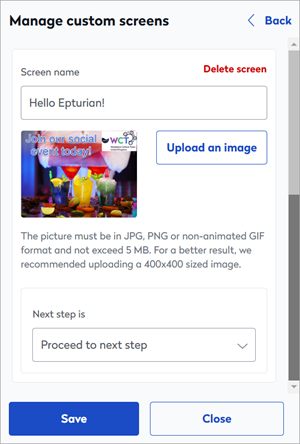
Images
Sometimes pictures speak louder than words. Upload an image to be displayed at a given point during the check-in journey. Image files must be in JPG, PNG, or non-animated GIF format, and must not exceed 5MB. For best results, we recommend a resolution of 400 x 400px
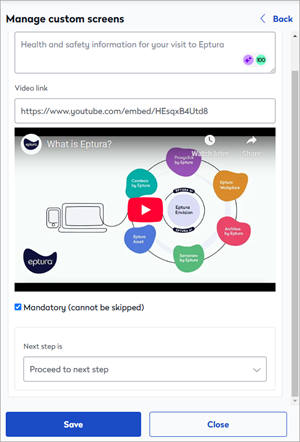
Videos
Videos can be useful to provide welcome information, a walk-through tour, or health and safety information, etc. Videos must be hosted on YouTube - just add the YouTube URL to the custom screen and enter text to be shown along with the video as it plays.
Reordering screens
It's easy to adjust the check-in flow to change the order that screens are displayed. As a general rule, click the step that you want to precede the screen in its new position, and set the screen you want to follow it as the next step, and continue until the screens are in the desired order.
Only the arrows on the flow diagram are automatically updated when you reorder the screens. The steps can be manually dragged and dropped so they are visually in the right place.
In the example below, only 'guests' are asked to enter their vehicle's license plate details, but we want to change this so every visitor is asked to enter these details. The GIF below shows us moving the License Plate screen above the Visitor Type screen by following this process:
- Select the Host / Picture screen (this is the screen we want to be displayed before the License Plate screen) and then set Next step is to 'License Plate'.
- Select the Email screen and set Next step is to 'Welcome'.
- Drag the License Plate screen to its new position under Host / Picture and set Next step is to 'Visitor Type'.
