
Import Person Assignment
Eptura - Portfolio Manager
After you have your organization's locations imported in, then you can associate people to those locations using a spreadsheet format. After the import, you will receive clear statuses and error reports for any records that weren’t successfully imported, so any issues can be corrected.
Contents
- Step 1. Download the template file
- Step 2. Complete your data
- Step 3. Upload the import file
- Step 4. Verify the person assignment
Person Assignments Template File - this includes the template instructions and more details about the tabs and columns found in the spreadsheet.
Step 1. Download the template file
- From the Home screen, click Portfolio Manager and the Portfolio Manager screen displays.
- Click the Tools menu and then select Import person assignments.

The Person assignments screen displays.

- Click the Import button and Import person assignments form displays.

- Click the template to download it.
Step 2. Complete your data
We recommend you review the Person Assignments Template File (section below) as this includes the template instructions and more details about the tabs and columns found in the spreadsheet. This will help you to reduce any inaccurate or inconsistent data that can cause import errors.
People - It is important to remember that your people must be in the system before you can use this import.
- Fill in your data and review carefully.
- Save the file as .CSV with a max file size of 500KB.
Remember the downloaded template is an .XLSX file, so you will need to save this as a .CSV file and then you can upload the file.
Step 3. Upload the import file
- Drag and drop the file on the form or click the browse files and select the file to upload it.

- Click the Done button and the file is uploaded.

Action Required
If the import has an error, then you can download the report called {file_name}_results.csv and it will display the error message and from this you can correct the import file.
Make sure you correct your import file and not the report file.
- After the import was run, you will see the status changes to Success.

Step 4. Verify the person assignment
- Navigate to the Space Floor Plan Viewer to see the person assignment.

Person Assignments Template File
The templates_import-assignments-template.xlsx contains the following tabs:
- Information tab
- AssignmentImport tab
- AssignmentImportCSVExport tab
- Lists tab
Information tab
The Information tab contains the instructions for the import file.
Space Imports
The Excel file contains templates to import a variety of space information, including:
- Assignments
Each Import has a specific Sheet for you to fill in, named {Entity}Import, for example, AssignmentImport. You can use this tab to fill in the information you want to import.
There is a corresponding sheet for the CSV export, named {Entity}ImportCSVExport, for example, AssignmentImportCSVExport
Do not modify the CSV Export tabs as they will be used to generate the Import CSV.
Each Import Sheet has the following configuration:
- Column Requirement
- Column Inclusions Row
- Cell Color
Column Requirement
- Mandatory - must always be present as this is how we uniquely identify your row.
- Required -If included, the value cannot be blank.
- Required* - This column must be included to create.
Column Inclusions Row
The imports allow you to do partial updates, letting you select which columns to include in your import.
By default, the columns are set to Include for each import and these are the columns required to create. If you are running an update, then you can change the columns to Exclude columns that you don't need to update.
From the drop-down, select Include to update the column OR select Exclude when you want to leave the column as is.
For example:
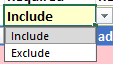
Any columns with Exclude is selected, it will use the 'default on creation if excluded' row value when the imported row is being created and note this is not configurable.
Cell Color
The cell color gives you information about what is required.
|
Red - A value in this cell is required and running the import without this value will cause this row to error. |
| Yellow - A value in this cell is missing, but not required. This is valid, but a warning that the value will be removed if you are updating the row and there was a value for this Entity before. |
|
Gray - This value will be ignored. This will show for any of the following:
|
AssignmentImport tab

- This template can be used to create, update, and delete Assignments
- Do not change the column headers in Row 7, these will be required for the import
- When finished updating entries, switch to the AssignmentImportCSVExport tab and export to CSV.
| Column Requirement | Table Header | Description |
|---|---|---|
| Mandatory | personEmail | |
|
siteName |
An assignment can be assigned to:
|
|
| Mandatory | buildingName | |
| Mandatory | floorName | |
| Mandatory | spaceName | |
| delete |
AssignmentImportCSVExport tab

This tab will populate from the data you entered in AssignmentImport tab.
Lists tab
This tab contains the look-up data that populates the values.
