Enable Support Access
Eptura - Platform Settings
Level: Administrator
Support Access allows your Administrators to authorize an Eptura Support Team user's access for a limited time and if needed, the time can be extended or you can revoke access to all Support users.
Remember that Support users created in the customer’s environment is based on consent provided by the customer; these users can access the customer's environment using SSO/forms.
Access Directory Settings
- From the Home screen, select your profile icon.
- Click the Platform settings.
- From the menu, click Support access.

Enable Support Access
- Toggle the Enable support access to ON.
- From the Select duration drop-down, select the time. The minimum time is 30 minutes and the maximum time is 72 hours.
- Click the Start access button and the Confirm access dialog displays the message, "By enabling this you allow Eptura support to access your system for troubleshooting. Do you want to proceed?"
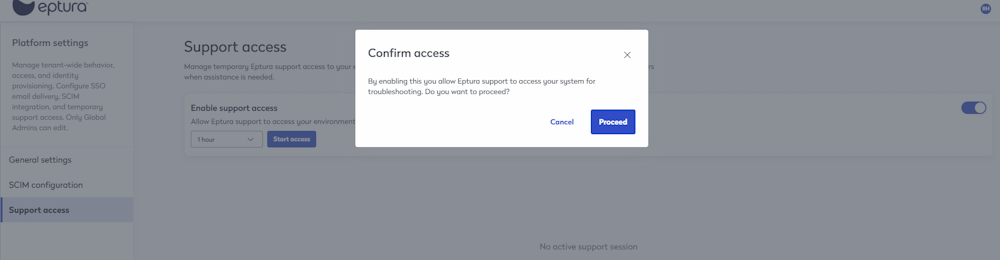
- Click the Proceed button and the access is granted.
When the Support user connects, you will see their name in the Active Support Accounts list.

Additionally, when the Support User has logged in, you will see the user's account in the Directory's People tab and their type will be Support. Then later when the Support User's access has been revoked, this user account will be removed.

Extend Support Access
If you need to extend access, this can be easily done. For example, if the Support team has been working on an issue for 2 hours and they need an extra hour.
- From the duration drop-down, select the time.
- Click the Update access button and the Confirm duration update displays, with the message "Ongoing access was provided until time date. Do you want to update the access duration.

- Click the I agree button and the time is extended.
Revoke an individual Support User's Access
If you want to revoke access for particular Support Users, this can be done by.
- From the Active Support Accounts list, check the Support User Name check box, note you can select multiple Support Users.
- Click the Delete icon and the message displays "Confirm deletion. Selected support user will be deleted from the directory and their access (if any) would be revoked."
- Click the Yes, delete button and the support user(s) access is revoked.
Disable and Revoke all Support Access
If you need to disable and revoke all Support user access.
- Uncheck the Allow Eptura support to access your environment check box and the Revoke access dialog displays the message "Are you sure you want to revoke access for Eptura support for the ongoing investigation?"

- Click the Revoke access button and all Support Users' access is revoked.