Import Group Member Data
Eptura - Directory
Level: Administrator
Your Administrator can upload the group member data into the directory.
Step 1. Open the Group member import form
- From the Home screen, click the Directory tool and the Directory screen displays.
- Click the Groups tab.
- Click the New groups drown-down.

- Select the Import group member data and the Group member data import panel displays.

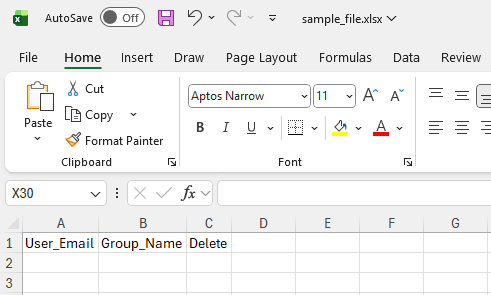
Step 2. Download and prepare the file
- Click the sample_file.xlsx button and the file is downloaded.
- Navigate to the downloads folder and open the file.
- Complete the data in the spreadsheet and the Group Data Requirements and Business Rules for the Standard Fields are listed below.
Step 3. Upload your file
- In the Upload your file area, either: drag and drop the file onto the area OR click the Browse file link to browse to the file and select it. Then the file uploads.
- Click the Review your data button.

- Click the Complete import button. The file import starts and you will see a notification with the message "Upload Completed and group memberships updated successfully.
Group Member Data Requirements and Business Rules
Standard Fields
| Field Name | Required Field | Business Rules |
|---|---|---|
|
User_Email |
Yes |
Valid email address of the user (must exist in the system) |
|
Group_Name |
Yes |
Valid group name that exist in system |
|
Delete |
No |
Expected value Default = No Accepted value: Yes/No (Case insensitive) |