Screen Settings
Eptura - Device Hub
Overview
Screen settings are used to create a profile to manage the behavior of your desk screens and room screens. There is no limit to the number of profiles you can create. We recommend that you have a maximum of 1,000 room screens be added to each profile to maintain efficient loading times when editing a profile.
When you create Setting Profiles, these can be created to the Global level. After you have created the Setting Profile, this can be applied to the screen. Learn how to do this in Rooms & Screens and Desks & Screens.
Access Settings
From the menu, select Device Management > Settings and the Manage Settings displays the list of profiles.

The Manage Settings lets you:
- (A) Search - In the Search field enter in the profile name and this will search through both the Rooms Screens and Desk Screen list.
- (B) Add - Either a Room Settings or Desk Settings.
- (C) Status - Change the default; click the Set As Default button and the profile is changed.
- (D) Edit - Click a setting's profile name and this lets you rename or edit the settings.
- (E) Actions - Click the Delete icon to remove a profile you no longer want.
Add a new Setting Profile
The steps to add a new Settings Profile are the same for a desk or room, however there are a few differences in the settings.
- Either click the Add Desk settings button or the the Add Room settings button and the Add Screen Settings Profile.
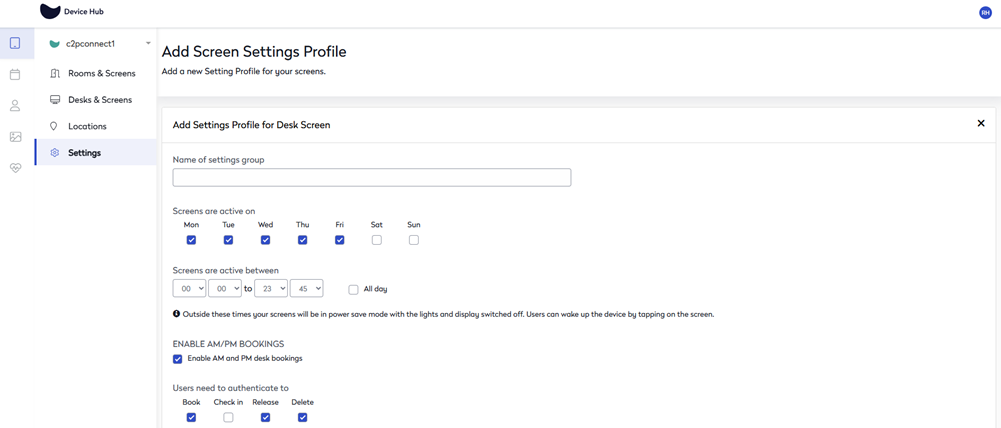
- In the Settings group name, enter the name and we recommend you use a meaningful name.
- See the Settings Overview below for how to complete the settings.
Edit an existing Setting Profile
- Click a setting's profile name and the "Add Screen Setting Profile" screen displays.
- Country or location - If you edit the default profile, then you won't be able to edit the country or location. You will need to edit a different profile's country or location and then set this profile as the default.
- If needed, in the Settings name, edit the name.
- Click the Next button and the settings display, see the Settings Overview below for how to complete the settings.
- When you have finished, scroll to the end of the page and click the Save button.
Settings Overview
Below are the settings for desk screens and room screens.
| Setting | Desk Setting Description | Room Setting Description |
|---|---|---|
|
Name of settings group |
Displays the name. |
Same as the desk setting. |
|
Select the UI version |
N/A |
Choose which UI version either:
|
|
Screens are active on |
You can set the active days and times for your business hours. Outside of these hours, the screens will be in power-save mode with the lights and display switched off. Check the days of the week that the screens are active. |
Same as the desk setting. |
|
Screens are active between |
Set the start time and end time that the screen is active. Outside of these times, the screens will be in power-save mode with the lights and display switched off. Users can wake up the screen by tapping on the screen. Or, if you check the All day check box, then the screens will be active all day. When the All day is checked, then the screens will not check for software updates. |
Same as the desk setting. |
|
Enable AM/PM Bookings |
By default, the AM and PM desk bookings is checked. |
- |
|
Booking Hours |
When the AM/PM desk booking is checked, then you can set the start times. AM
PM
|
-
|
|
User need to authenticate to |
Choose which authentication you require the user to:
If an option is enabled, users will have to enter their Pin or present their swipe card to complete this action. If it is disabled, anyone can complete the action on the screen. |
Check which authentication you require the user to:
If an option is enabled, users will have to enter their Pin or present their swipe card to complete this action. If it is disabled, anyone can complete the action on the screen. |
|
Time format |
By default, the 24-hour time format is set. Uncheck the Use 24 hour format check box to display the AM/PM time format.
|
Same as desk setting.
|
|
Screen security PIN |
By default, the Screen security PIN is checked. In the PIN field, enter a custom number for the on-screen setup. We recommend you change this from the standard factory default to avoid unwanted tampering with settings. |
Same as desk setting. |
|
RFID card types |
Choose which RFID card types can be registered to use the screen:
If an option is enabled, users can register an RFID card of this type against their account. |
Same as desk setting. |
|
Start meeting on-screen |
By default, the "Ask users to check in on-screen" is checked. Enter the number of minutes users can check in before the meeting. |
Same as desk setting. |
| Booking policy | N/A |
Choose when users can make bookings for the current day and book ahead. From the Booking policy, drop-down select:
|
|
Default booking tile |
N/A |
Enter the booking title to display on the screen when making a booking. The default booking title is “Instant Meeting”. |
|
Default Organizer name |
N/A |
Enter the name for the organizer when bookings are made without any authentication. The default organizer name is “Screen Booking”. |
|
Privacy
|
N/A |
Choose the privacy settings, if you want to:
|
|
Set this as default |
If you want these desk settings to be the default settings, then check this. |
Same as desk setting. |