Add or Edit a Person
Level: Administrator
Your users can be managed using SCIM and the groups can also be managed in SCIM and this will help you control who has access to the apps.
When you need to create a manual person, with a Person Type, such as a Contractor, Customer, Vendor, or Visitor, then your Administrator can quickly complete this. After the person is created, then their App Access can be granted at the individual level or the group level.
- Add a Person
- Edit a Person
- Person Fields
- Overview tab
- Job tab
- More tab
- App access tab - This tab displays after you have added a person and when you configure the app access, this will make the person a user in your application.
Add a Person
- From the Home screen, click the Directory tool and the Directory screen displays.
- From the People tab, click the Add Person button and the New person form displays.
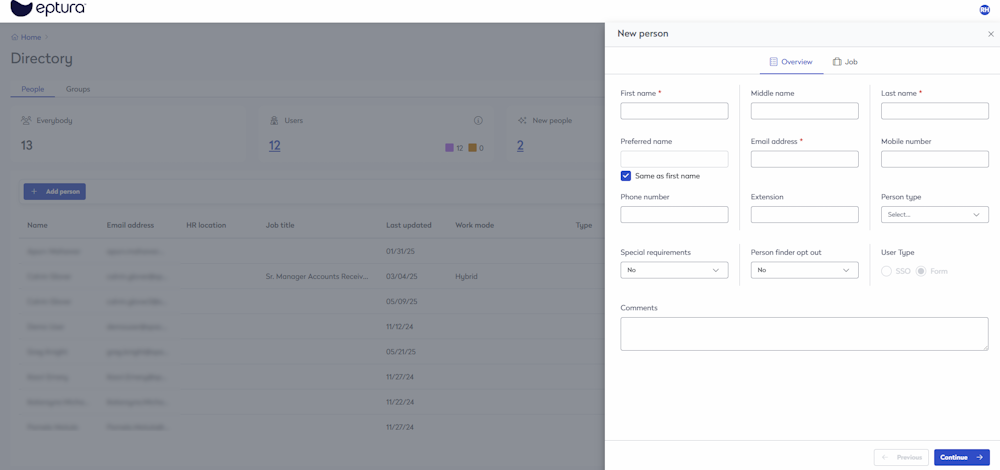
- In the First Name field, enter the person's first name.
- In the Last Name field, enter the person's last name.
- In the Email Address field, enter the person's email address.
- Click the Continue button and the Job tab displays.
- Complete the Job fields; see below for a description of each field.
- Click the Continue button and the More tab displays.
- Complete any Custom fields.
- Click the Create Person button. The person is successfully created.
Edit a Person
- From the Home screen, click the Directory tool and the Directory screen displays.
- From the People tab, either browse the list or search for the person.
- Click the person's name and the Profile details display.
- Update the person's profile fields and see the Person Fields table below to learn about what person fields can be edited.
- Click the Update profile. The person's profile is saved.
Person Fields
Remember, if the person is brought into Eptura using SCIM then some fields will not let you edit, as they will be updated using the SCIM.
This describes the fields in the Overview tab, Job tab, and More tab.
Overview tab
| Field | Description |
|---|---|
|
First name |
Enter the first name of the person. |
|
Middle name |
Enter the middle name of the person. |
|
Last name |
Enter the last name of the person. |
|
Preferred name |
If the person has a preferred name, then uncheck the Same as first name check box and then enter in their preferred name. |
|
Email address |
Enter the person's email address. |
|
Mobile number |
Enter the person's mobile number. |
|
Phone number |
Enter the person's phone number. |
|
Extension |
Enter the person's extension number. |
|
Person type |
From the Person type drop-down, select the type. For example Contractor, Customer, Vendor, or Visitor. The person type is set up by your Administrator; learn more in Add, Edit, or Delete a Person Type. |
|
Special requirements |
The special requirements indicate the person has a requirement such as OHS Requirement, needs a sit-to-stand desk, needs dual monitors, etc.
|
|
Preferred language |
From the Preferred language drop-down, select the person's preferred language. |
|
Person finder opt out |
If you have an employee who requires not to be found in the Person Finder, then they can be opt-out of the search. Check the Person finder opt out check box. |
| User Type | This displays if the user was created from SSO or the Form. |
|
Comments |
Enter any comments. |
Job Tab
| Field | Description |
|---|---|
|
Employee ID |
Enter the person's employee ID. |
|
Job title |
In the Job title field, enter the person's job title. |
|
Department |
From the Department drop-down, select the person's department. Departments are set up by your Administrator; learn more in Add, Edit, or Delete Departments. |
|
Work mode |
From the Work mode drop-down, select either: In-office, Hybrid, or Full-time remote. |
|
Manager |
From the Manager drop-down, select the person's manager. |
|
HR location |
This is from the SCIM and this is a HR information field. |
|
HR county |
This is from the SCIM and this is a HR information field. |
|
HR floor |
This is from the SCIM and this is a HR information field. |
| Device login name | Enter the device login name. |
|
Life safety role |
From the Life safety role drop-down, select the first responders, such as fire warden or first aid officer. |
|
Preferred work schedule |
|
More Tab
This tab contains custom fields that you can complete, if needed.
Custom fields are set up by your Administrator; learn more in Add, Edit, or Delete Custom Fields.
App Access Tab
This tab display after you have added a person and when you configure the app access, this will make the person a user in your application.

Update a person to be an Administrator
- If the person is an administrator, then check the Is admin check box.
Revoke or Allow Access to an App
In the Individual App Access section, complete the following:
- If you need to revoke access to an app, then click the Revoke access button.
- If you need to grant access to an app, then click the Allow access button.

When access is granted, then the activation email is sent out to the user.

Group Level Access
- If you need group level access, then add this person as a member to a group, see Add, Edit, or Delete a Group.