Import People Data
Level: Administrator
Your Administrator can upload your people data into the directory.
Contents
Step 1. Open the Import People Data form
- From the Home screen, click the Directory tool and the Directory screen displays.
- From the People tab, click the Add person drop-down.
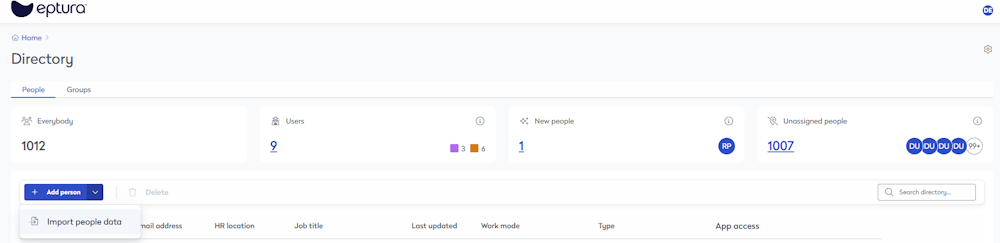
- Select the Import people data and the People data import panel displays.

Step 2. Download and prepare the file
- Click the sample_file.xlsx button and the file is downloaded.
- Navigate to the downloads folder and open the file.
- Complete the data in the spreadsheet and the People Data Requirements and Business Rules for the Standard Fields, Custom Fields, and App Access are listed below.

Note there is a panel that contains the fields and the descriptions; click the View formatting requirements and business rules link.

Step 3. Upload your file
- In the Upload your file area, either: drag and drop the file onto the area OR click the Browse file link to browse to the file and select it. Then the file uploads.
- Click the Review your data button.

If your data has errors, then click the Download error list button and the .XLSX file will download. When you open the file, it will contain an error description. You can correct the error(s) and then re-upload the file.
People Data Requirements and Business Rules
Standard Fields
| Field Name | Required Field | Business Rules |
|---|---|---|
| First Name | Yes | Accepts any value Max 40 char |
| Middle Name | No | Accepts any value Max 40 char |
| Last Name | Yes | Accepts any value Max 40 char |
| Preferred Name | No | By default, Preferred name = First Name Accepts any value Max 40 char |
| Yes | Format: xxx@yyy.zzz Must be unique |
|
| Mobile Number | No | Numeric values Min 4 digits Max 17 digits Space not allowed |
| Phone Number | No | Numeric values Min 4 digits Max 17 digits Space not allowed |
| Extension | No | Numeric values Min 1 digit Max 4 digits Space not allowed |
| Person Type | No | Values provided must exactly match Person type configured (Case insensitive) |
| Special requirements | No | Default = No Accepted value: Yes/No (Case insensitive) |
| Person finder opt out | No | Default = No Accepted value: Yes/No (Case insensitive) |
| Comments | No | Accepts any value |
| Employee ID | No | Accepts any value Special characters not allowed |
| Job title | No | Accepts any value Special characters allowed |
| Department | No | Values provided must exactly match Department preconfigured in the system (Case insensitive) |
| Work Mode | No | Default = None Accepted value: In-office, Hybrid or Full-time Remote (Case insensitive) |
| Manager | No | Format: xxx@yyy.zzz Email provided must exactly match in the person records created in the system |
| HR Location | No | Accepts any value |
| Device login name | No | Accepts any value |
| Life Safety Role | No | Default = None Accepted values: Fire Warden, First Aid Officer and/or CPR Certified (Case insensitive) Sample data: *First Aid Officer*fire warden* |
| Preferred work schedule | No | Default = None Data format: *{Day of the week (Case insensitive)}~{Start hour in HH:00 format}~{End hour in HH:00 format}* Sample data: *Saturday~15:00~19:00*sunday~15:00~19:00*Monday~09:00~05:00*TUESDAY~09:00~05:00* |
| Is Form User | Yes | Accepted value: Yes/No (Case insensitive) Changing the user's authentication method SSO/Form, will impact their login experience. |
| Delete | No | Default = No Accepted value: Yes/No (Case insensitive) Note: If the value is set to "Yes", the existing person records will be deleted from the system. |
Custom Fields
Inputs for the custom fields are optional.
Your Administrator will need to create the Custom Fields, before the data can be imported in.
App Access
Inputs for the app access fields are optional.
| Field Name | Required Field | Business Rules |
|---|---|---|
| Eptura Workplace | No | Default = No Accepted value: Yes/No (Case insensitive) |
| Eptura Asset | No | Default = No Accepted value: Yes/No (Case insensitive) |
| Eptura Engage | No | Default = No Accepted value: Yes/No (Case insensitive) |
| Eptura Visitor | No | Default = No Accepted value: Yes/No (Case insensitive) |
| Envision | No | Default = No Accepted value: Yes/No (Case insensitive) |
| Devicehub | No | Default = No Accepted value: Yes/No (Case insensitive) |