Set up and pair sensors
When spaces are not pre-booked and presence is detected by a sensor, Condeco creates anonymous bookings that are not associated with an actual user. This enables Condeco to show and record the space as in use and allows administrators to accurately monitor how and when resources are being used.
PIN/RFID authentication must be disabled for Condeco screens installed at spaces monitored by sensors: When authentication settings are enabled, the user must either enter a PIN or swipe their RFID card to complete actions such as creating, starting, or ending a booking. These authentication settings must be disabled to allow anonymous bookings to be made (or ended) when the sensor detects changes to the presence in an unbooked space.
Authentication options are set in the desk booking screen and meeting room screen settings groups in the Device Hub.
Contents
Sensors home page on the Device Hub
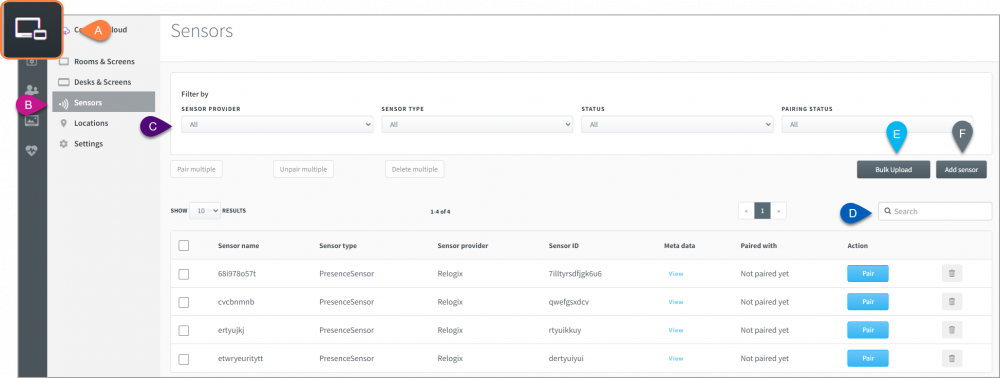
Open the Device Hub Sensors page from Device Management (A) and Sensors (B). From here you can add and manage sensors, and pair them with Condeco resources such as rooms and desks. Use the drop-down lists (C) to filter the list by Sensor provider, sensor type, latest sensor activity, and paired or unpaired sensors. To find a specific sensor, enter the sensor name in the search box (D).
The list of sensors shows the name of the sensor, the sensor type, the sensor provider, the sensor ID, the Condeco resource the sensor is paired with, and the time of the sensor’s last activity.
When adding sensors to the Device Hub you have the option to store additional information of your choice. This can be accessed from the Metadata column.
How to add sensors to the Device Hub
Sensors can be added directly to the Device Hub individually and manually paired with the workspace, or uploaded and paired in bulk via a CSV file.
Add sensors manually to the Device Hub
Sensors can be added directly to the Device Hub individually and paired with the workspace.
Add the sensor
- Sign in to the Condeco Device Hub
- Select Device Management from the left icon bar (A) and select Sensors (B).
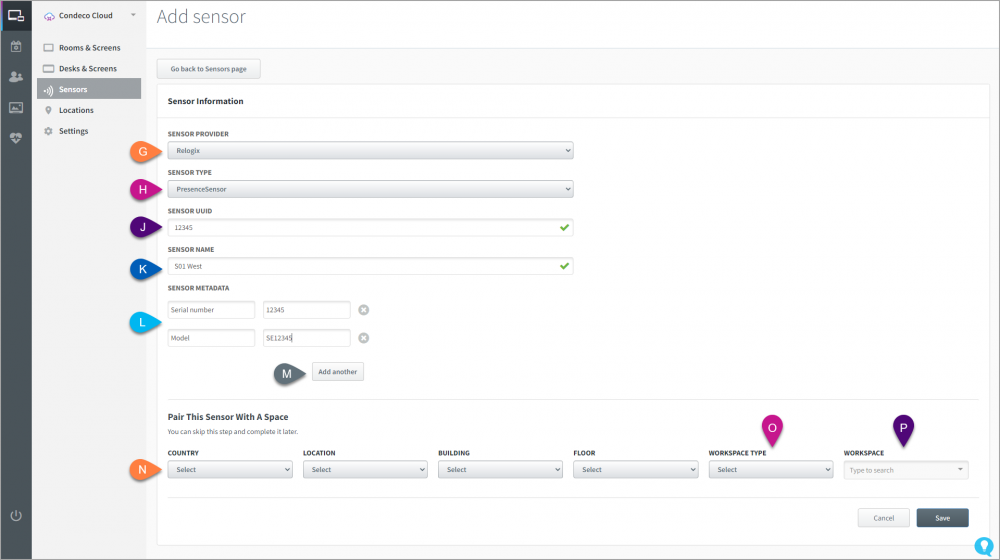
- Click Add sensor (F) to open the Add sensor page.
- Select your sensor provider from the list (G).
- Select the sensor type you are adding from the list (H).
- Enter the sensor’s UUID (J).
- Enter a name for the sensor (K).
- Optional To save more information about the sensor (serial number, etc.), create appropriate labels and enter relevant details (L). Click Add another (M) to add more labels if required. A maximum of 10 additional labels can be added.
- Click Save to save the sensor and pair it with a workspace later or pair it now.
Pair the sensor with a space
- From the drop-down lists (N) select the Country, Location, Building, and Floor for the workspace that the sensor will manage.
- Select the Workspace type (O), either a personal space or meeting space.
- In the Workspace field (P) enter the name of the workspace to pair with the sensor.
- Click Save.
The sensor is now listed on the Sensors page.
Add sensors in bulk to the Device Hub using a CSV file
Sensors can be added to the Device Hub in bulk via a CSV file. The process creates the sensor resources in the Device Hub and pairs each one with the workspace name specified in the CSV. The sensor resources are added to the default sensor settings profile.
The process involves downloading a template CSV from the Device Hub containing all workspace names for the selected location, adding your sensor information to the relevant workspace entries, and finally, uploading the CSV to the Device Hub.
The CSV template includes the following fields:
| Field label | Description |
|---|---|
| WorkspaceId | Id of workspace (prefilled). |
| WorkspaceName | Optional Name of the workspace (prefilled). |
| WorkspaceType | Optional Type of workspace (prefilled). |
| SensorId | Id of Sensor (provider ID). |
| SensorProvider | Enum 0=Reogix |
| SensorType | Enum 0=Presence |
| SensorName | Optional Name of the Sensor. |
Requirements and considerations when uploading sensor data via a CSV file
- The maximum size of the CSV upload file is 10 MB.
- Up to 25,000 sensor mappings can be processed via a single CSV file.
- The SensorID values must contain a minimum of 8 characters. Prefix shorter SensorID values with leading zeros to ensure a minimum of 8 characters before uploading.
- NOTE: If any SensorID values have a prefix of ‘0’ (zero), care should be taken if the CSV file is opened/edited in Microsoft Excel, or any other application that automatically removes a preceding zero. We recommend using a simple text editor such as Notepad++ to edit the CSV file.
- After the file is uploaded, the records are processed in batches of 5,000 (max) in the background, with an interval of 30 minutes between batches.
- Only one CSV file can be uploaded per API request.
How to download and complete the CSV, and upload the sensor data
Create a default sensor settings profile before uploading the sensor data to the Device Hub. Learn more about settings and rules for sensors
- Sign in to the Condeco Device Hub
- Select Device Management from the left icon bar (A) and select Sensors (B). View related screenshot: Tags A-F
- Click Bulk upload (E) to open the Bulk Add Sensors page. View related screenshot: Tags A-F
- Select location for sensors (Q): From the drop-down lists, select the Country, Location, Building, and Floor to apply to the sensor devices.
- Click Download .csv file (R) to create a CSV file containing the details of all workspaces at the selected location. Do not change the name of the downloaded CSV file!
- Add your sensor devices to the CSV alongside the workspaces they should be paired with.
- Upload CSV file: Click Browse (S) to find and select the CSV file containing the workspace and sensor information. The name of the file must be identical to the name of the file downloaded in the previous step.
- Click Upload (T).
Do not exceed the maximum person capacity of a space when pairing multiple sensors to the same Condeco resource: The number of sensors paired with a Condeco resource should not exceed the maximum capacity (occupancy) configured for the resource in the Condeco room settings, and when pairing sensors manually you are prevented from pairing more than this number. However, when pairing sensors via the bulk upload function, the number of paired sensors is not validated against the resource capacity setting, so it is possible to pair more than is necessary.
The time to upload depends on the number of sensors being added. You can navigate away from this page whilst your file is processing.
For a successful upload the CSV file must be in UTF-8 format, include a maximum of 1,000 rows, and the name of the file must be identical to the name of the downloaded file.
Pair sensors with workspaces
A sensor resource must be paired with a Condeco workspace resource to communicate with Condeco and initiate actions when activity is detected in a workspace. Multiple sensors can be paired with the same Condeco workspace to monitor larger spaces and initiate actions in Condeco for the same resource.
The number of sensors paired to a Condeco resource must not exceed the maximum capacity set in the room settings.
Pair sensors with the space they will monitor. You can apply the pairing when the sensors are added to the Device Hub, either individually Learn how or in bulk using the CSV file Learn how.
You can also apply a pairing (or unpair) after adding sensors to the Device Hub:
- Sign in to the Condeco Device Hub
- Select Device Management from the left icon bar (A) and select Sensors (B). View related screenshot: Tags A-F
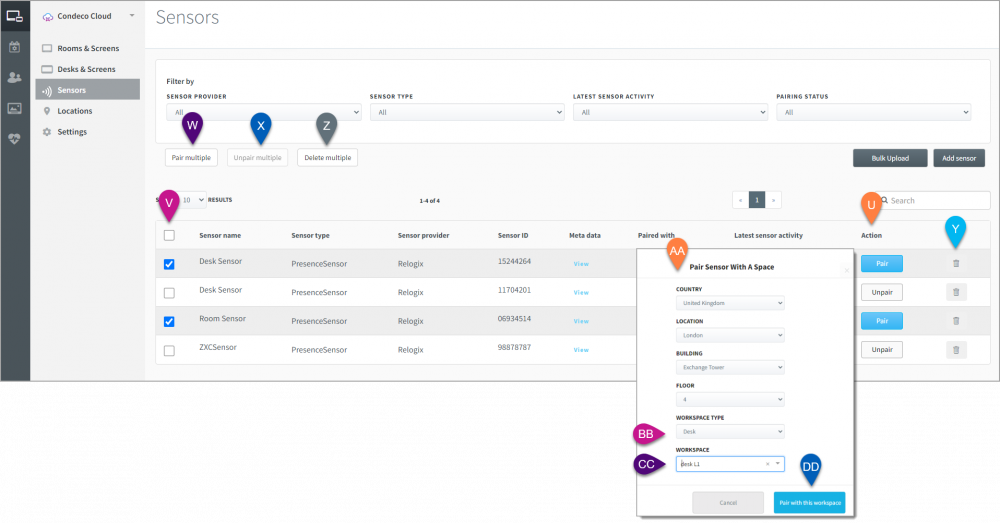
- Use the Filter (C) to find all paired or unpaired sensors or use the Search box (D) to find a particular sensor. View related screenshot: Tags A-F
- Click Pair (or Unpair) from the Action column (U). If you want to pair or unpair multiple sensors with a workspace, select the sensors from the list and click the Pair multiple (W) or Unpair multiple (X) button above the list.
- If pairing, select the Location (AA) details from the drop-down lists in the popup window.
- Select the Workspace type (BB) and enter the name of the workspace (CC) to pair the sensor with.
- Click Pair with this workspace (DD) when done.
Edit a sensor resource
Edit a sensor to change the workspace pairing or unpair it from a workspace. You can also change the sensor name and add/amend additional information about the sensor (metadata).
The sensor provider, UUID, and sensor type cannot be edited once created.
- Sign in to the Condeco Device Hub
- Select Device Management from the left icon bar (A) and select Sensors (B). View related screenshot: Tags A-F
- Use the Filter (C) and/or Search box (D) to find the sensor you wish to edit. View related screenshot: Tags A-F
- Click the sensor to open the Edit sensor page and make your changes. (The Edit sensor page is similar to the Add sensor page).
- Click Save when done.
Deleting a sensor resource
Sensors are automatically unpaired from any Condeco resource when deleted.
- Sign in to the Condeco Device Hub
- Select Device Management from the left icon bar (A) and select Sensors (B). View related screenshot: Tags A-F
- Use the Filter (C) and/or Search box (D) to find the sensor you wish to delete. View related screenshot: Tags A-F
- Click the bin icon (Y) to the right of the sensor to delete it, or if you want to delete multiple sensors, select the sensors from the list (V) and click the Delete multiple button (Z) above the list. View related screenshot: Tags U-DD
- Click Delete to confirm.